Overview
Platforms Available
- Mobile app - Install on Google Play
- Cross platform website - Access here
- Surveys website - Access here (Survey-related modules only)
- HRMS website - Access here
Permissions Required
- Notification - To receive important updates and alerts.
- Storage - To save and access files or data.
- Location - To enable location-based features.
- Camera - To capture and upload images.
Do not deny any permissions, as this may cause the software to malfunction.
Login
Mobile
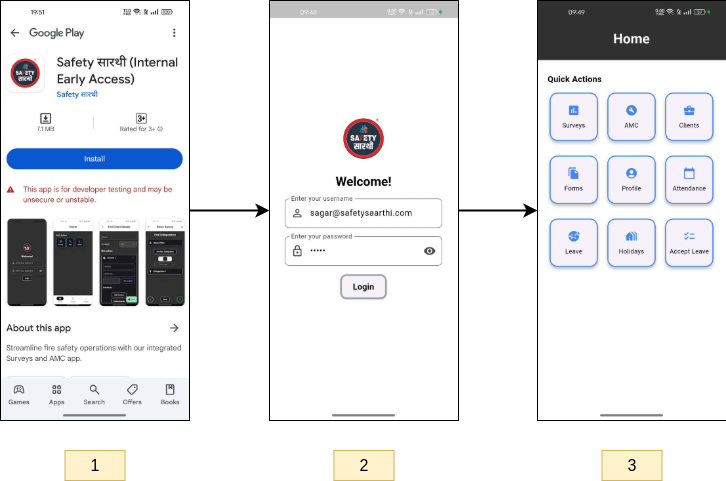
- Visit Google Play and press install.
- Open the app and enter the username and password provided to you.
- You will be directed to the home page.
Cross Platform Website
- Visit Cross platform website and enter your username and password.
- You will be directed to the home page.
Surveys Website
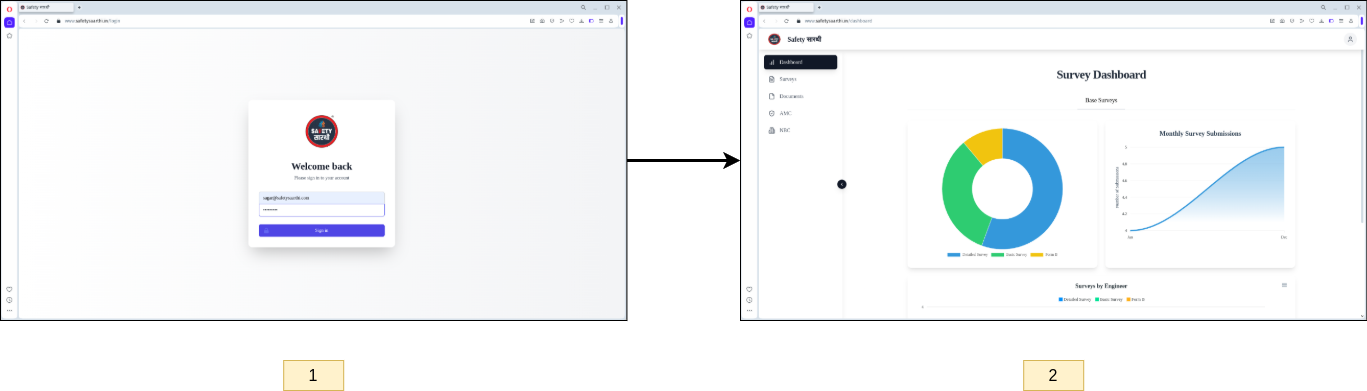
- Visit Surveys website and enter your username and password.
- You will be directed to the home page.
HRMS Website
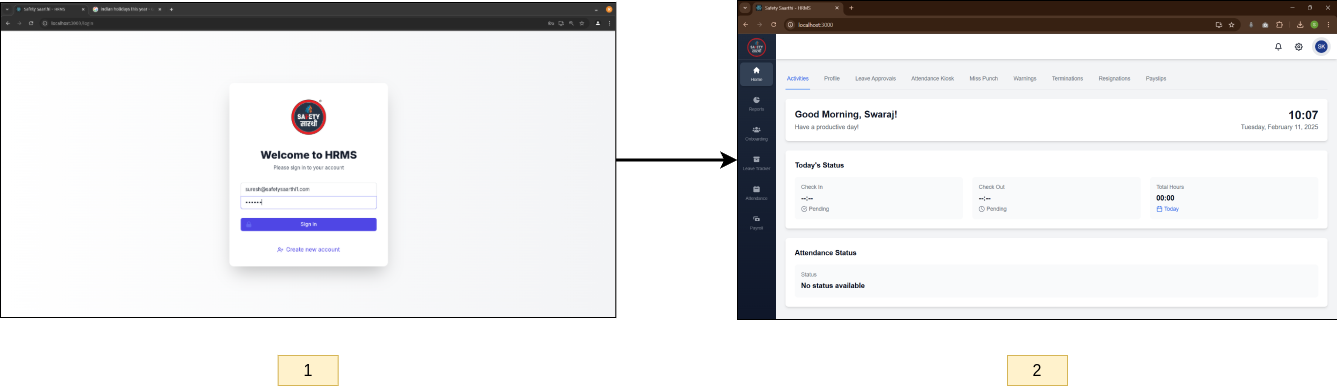
- Visit HRMS website and enter your username and password.
- You will be directed to the home page.
- If you do not know your password, contact your HR representative. They will provide you with the necessary credentials.
- Currently, the "Forgot Password" feature is not available. If you need to change your password, please contact the software developer.
Clients
Add New Client
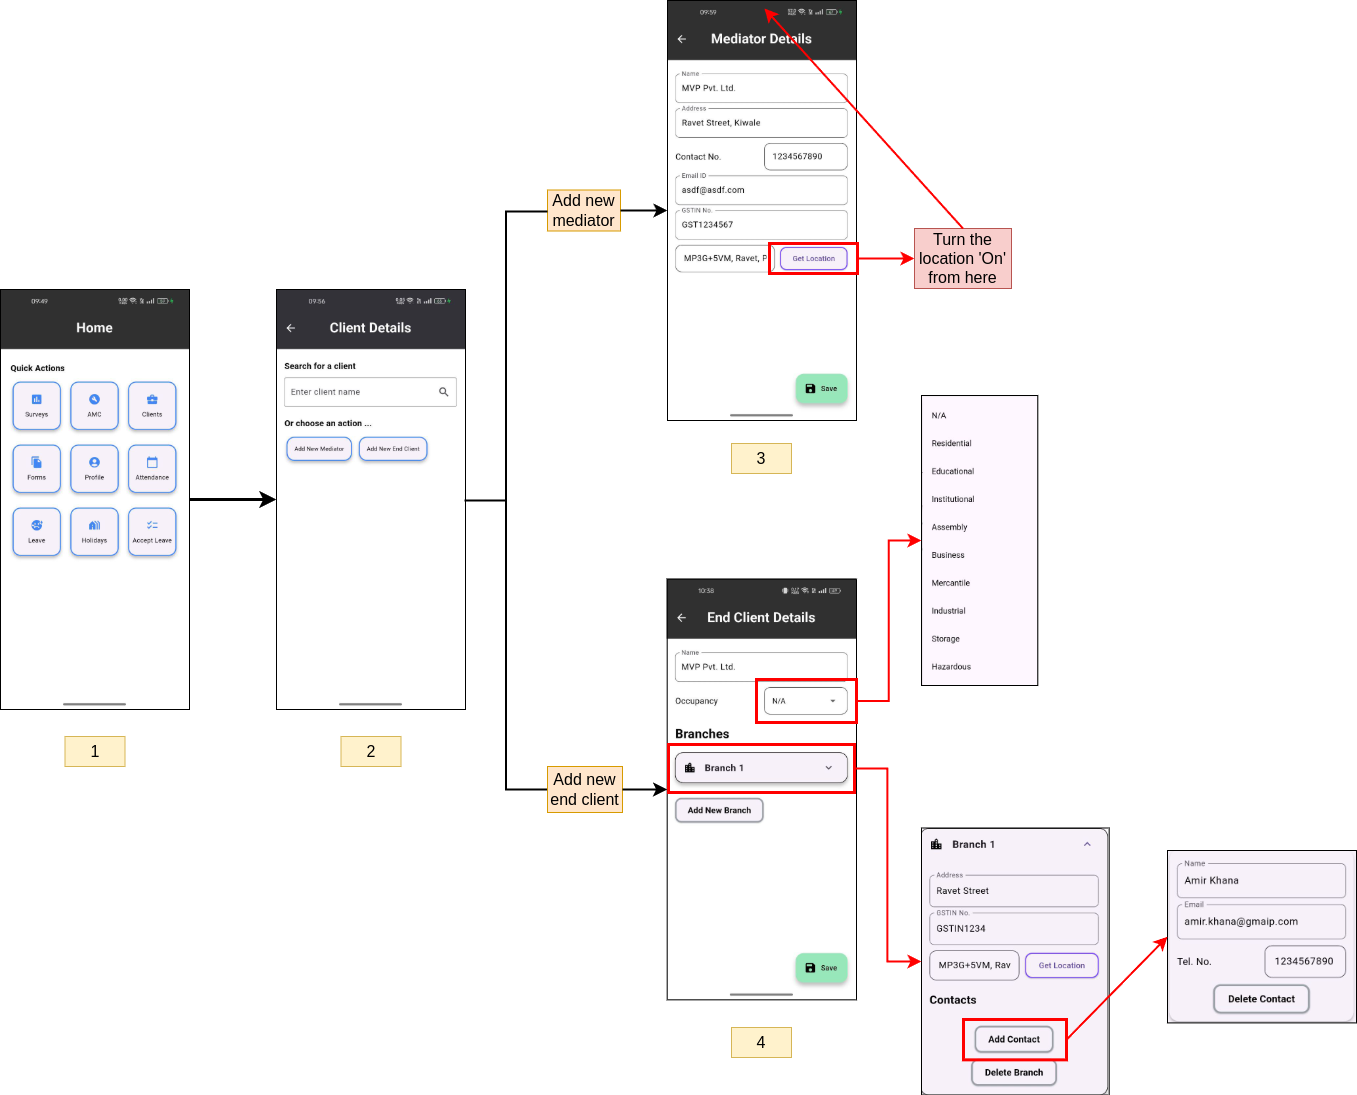
- From the home page, click on the 'Clients' button.
- You will see two options:
- 'Add New Mediator' - For adding mediator details.
- 'Add New End Client' - For adding end client details.
- Fill out the form with the required details.
- For End Clients, ensure you specify the occupancy and add multiple branches if needed. Each branch can include contact information for multiple people.
The address entered for a branch will be used in surveys, so ensure it is accurate.
These steps are applicable for both the mobile app and the Cross platform website.
Edit Client
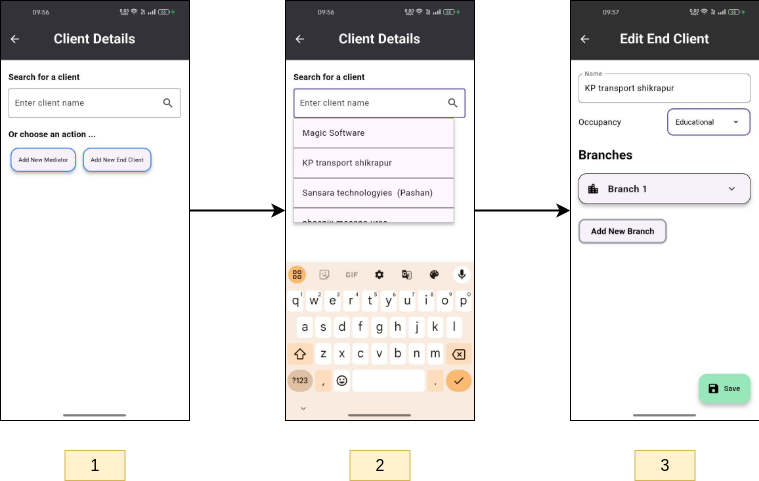
- From the home page, click on the 'Clients' button.
- Use the search bar to find the client (mediator or end client) you want to edit.
- Select the client, and you will be directed to the edit page. Make the necessary changes and save.
This step is applicable for both the mobile app and the Cross platform website.
Surveys
Select Survey
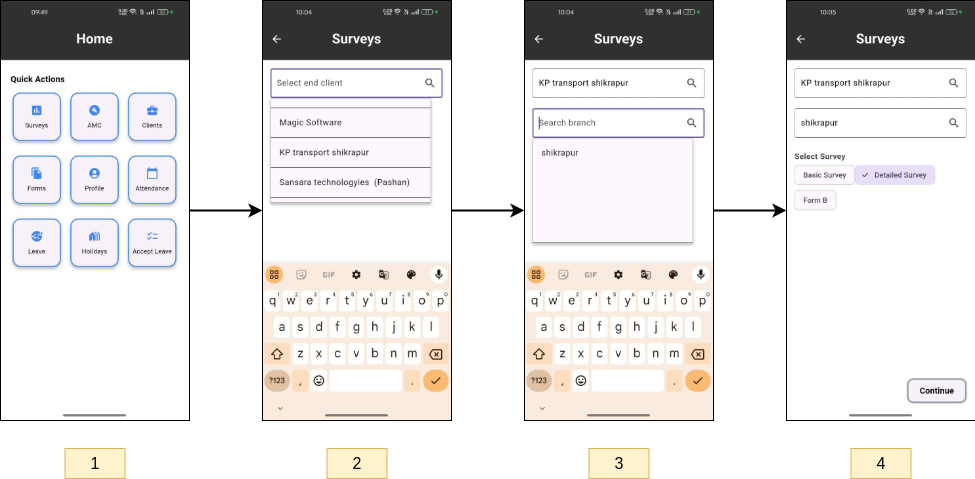
- From the home page, click on the 'Surveys' button.
- Use the search bar to select an end client. The search bar will display the names of all end clients.
- Once an end client is selected, another search bar will appear. This search bar contains the branch names (addresses) for the selected end client. Select the desired branch.
- After selecting a branch, you will see three buttons:
- Basic Survey
- Detailed Survey
- Form B (Note: This is a survey form, not an audit form.)
This step is applicable for both the mobile app and the Cross platform website.
Fill Survey
-
Basic Survey
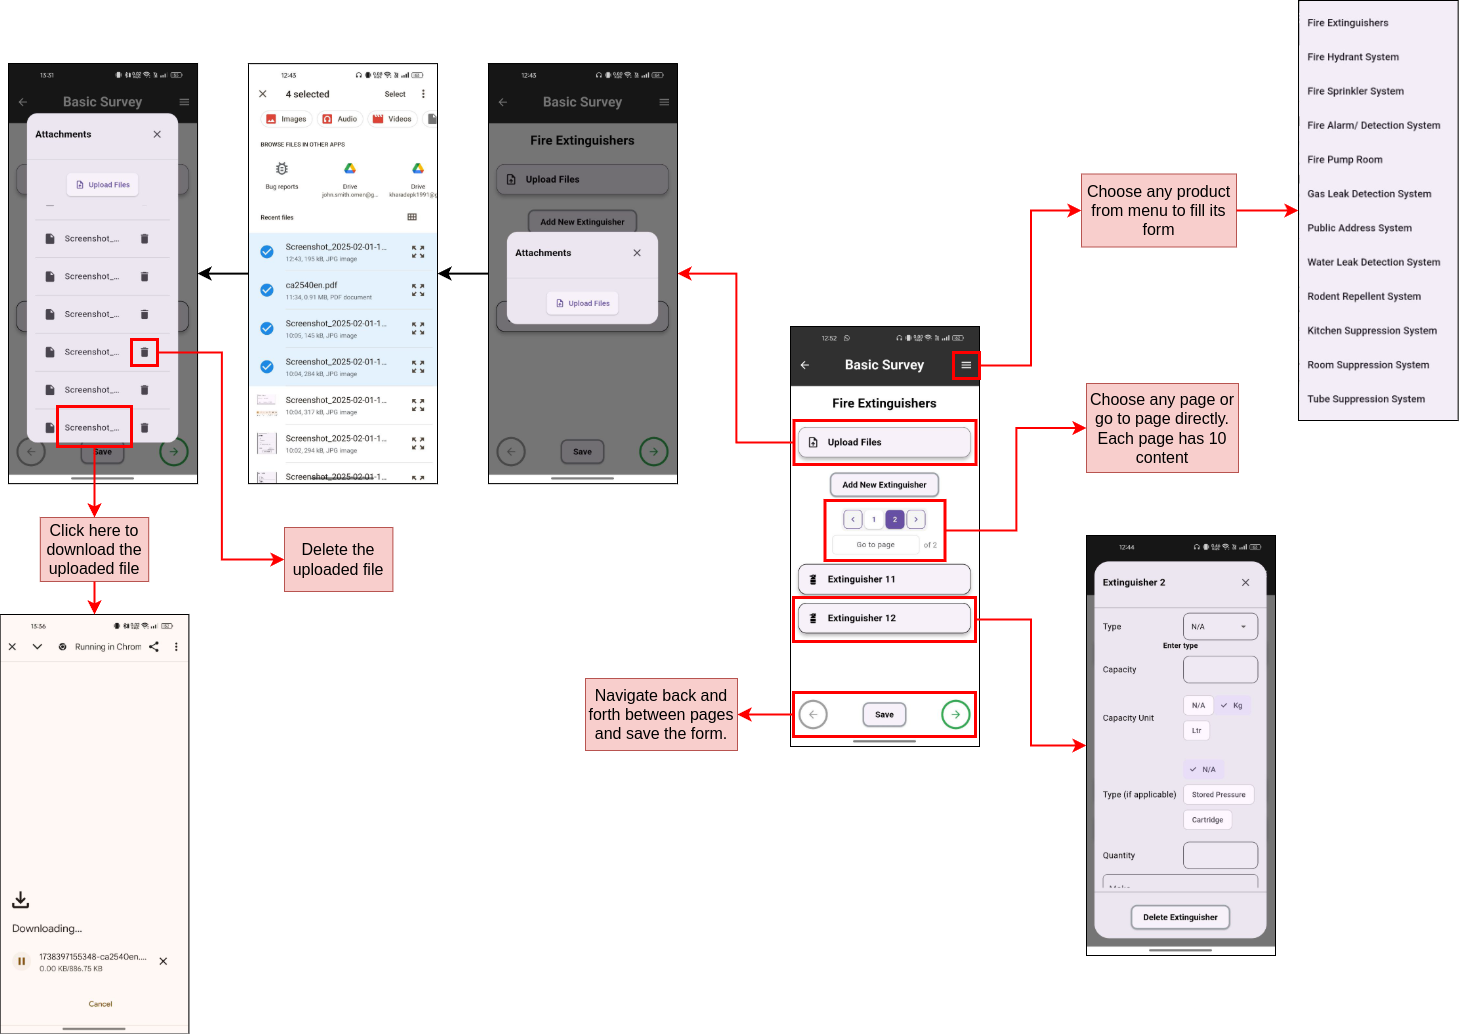
The form for the Basic Survey is straightforward and user-friendly.
-
Detailed Survey
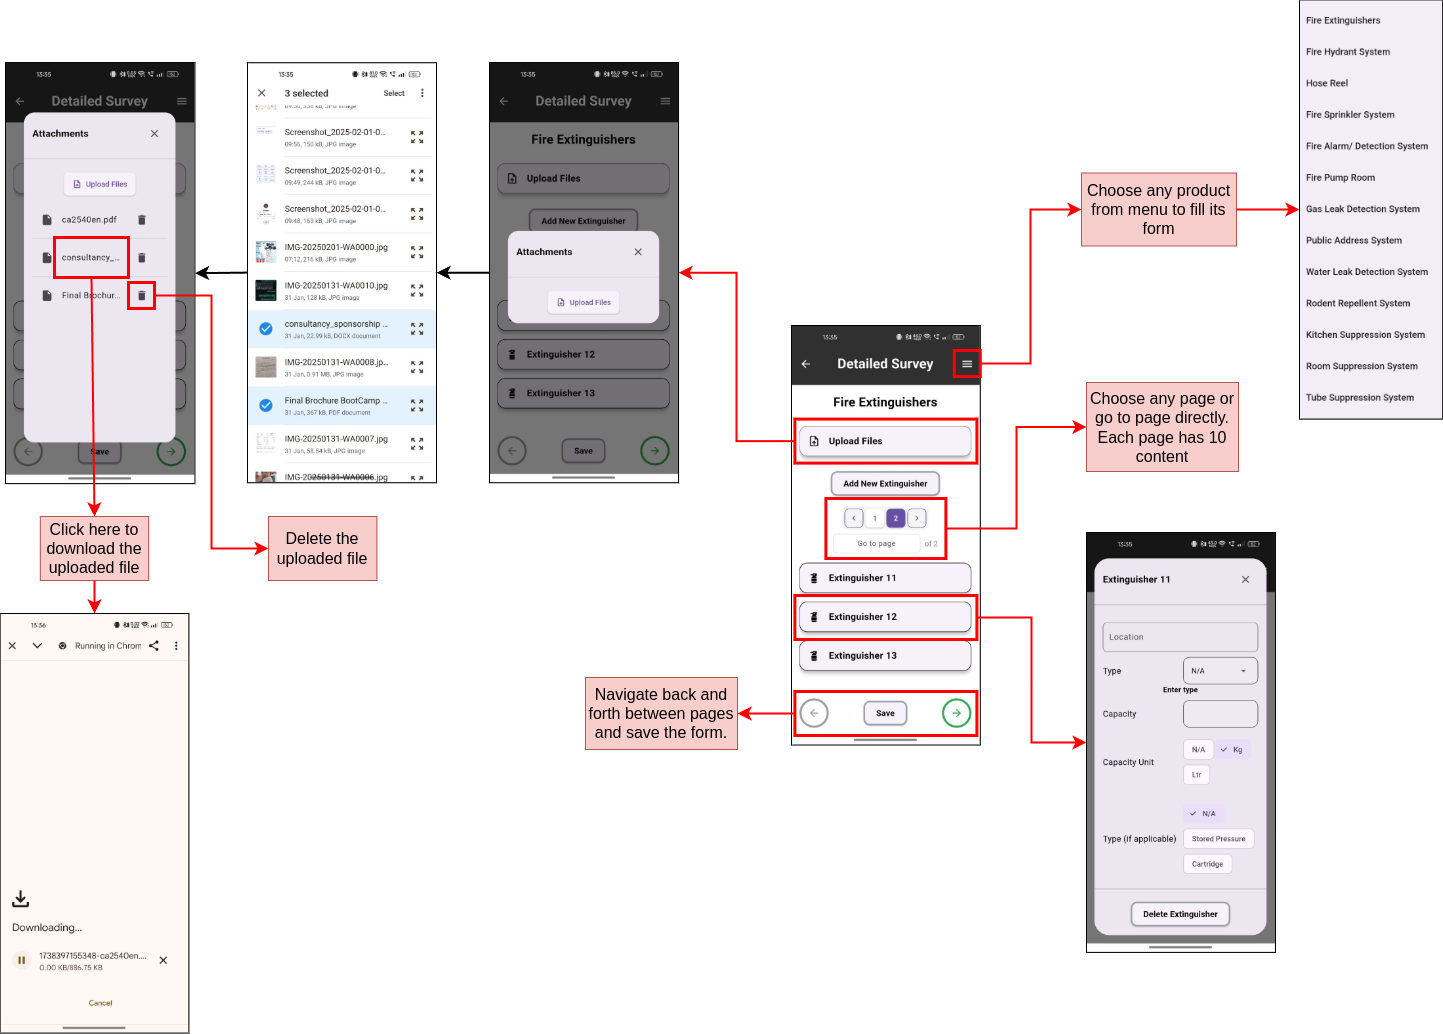
The Detailed Survey form is more comprehensive.
-
Form B
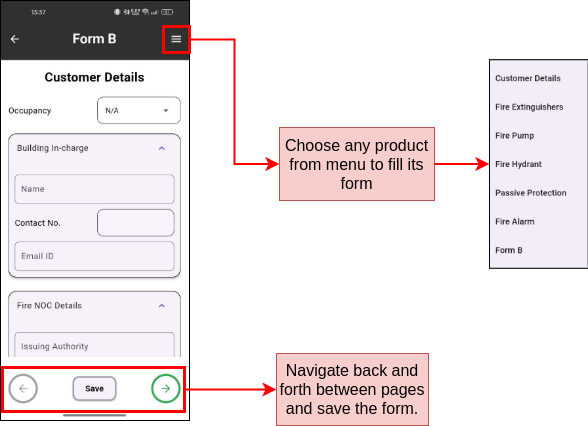
Form B is another type of survey form. Fill in the details as prompted.
Functionalities included
- Adding multiple products.
- Using pagination to navigate between products within a system.
- Selecting specific systems.
- Navigating between systems.
- Uploading multiple files.
- Downloading or deleting uploaded files.
The images provided in the documentation are self-explanatory and illustrate these functionalities.
Editing Surveys
To edit a survey, follow the same process as mentioned above. Select the client, branch, and survey type, and make the necessary changes. Save the changes.
Future Scope
The following functionalities can be implemented in the future to enhance the application:
- Duplicate Product Functionality:
- Add a 'Duplicate' button for each extinguisher or product. When clicked, a new product will be added at the end of the list.
- This feature is simple but has not been requested yet.
- Location-Based Product Entry:
- Allow engineers to create locations (e.g., Office 1, Office 2) and then add products to those locations.
- This will enable multiple users to fill surveys simultaneously and make the application more industry-grade.
- Multi-User Survey Filling:
- Currently, multiple users cannot fill the same survey simultaneously. A proposed solution involves:
- Display a form to specify the number of engineers working on the survey.
- Create corresponding web sockets for the form.
- Implement a system where the first user to add a product (e.g., extinguisher 51) gets priority to fill it.
- Ensure proper numbering adjustments if any product is deleted.
- This functionality is similar to a group chat system, where users can work concurrently without conflicts.
Implementing these features may require significant changes to the existing codebase, as each survey file currently exceeds 6,000 lines of code.
Monitor Surveys
-
Engineer
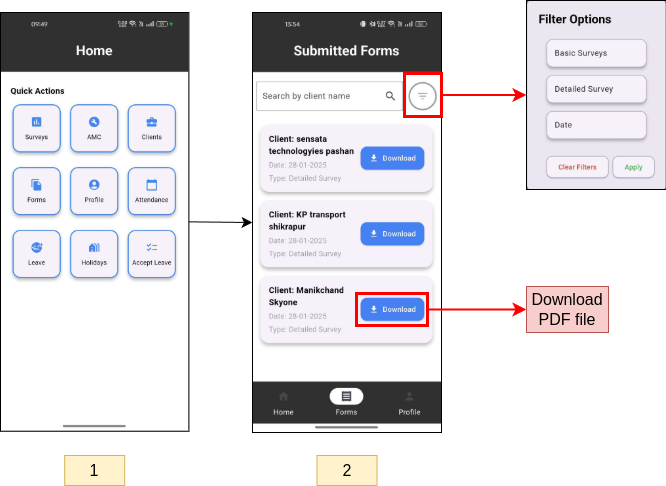
- From the home page, click on the 'Forms' button.
- You will see a list of survey forms filled by you. Use the search bar to filter surveys by end client names.
- Apply additional filters (e.g., survey type, date) using the filter button.
- Download the PDF file of any survey using the 'Download' button.
This step is applicable for both the mobile app and the Cross platform website.
-
Manager
The Surveys Website provides additional features for managers:
-
Dashboard
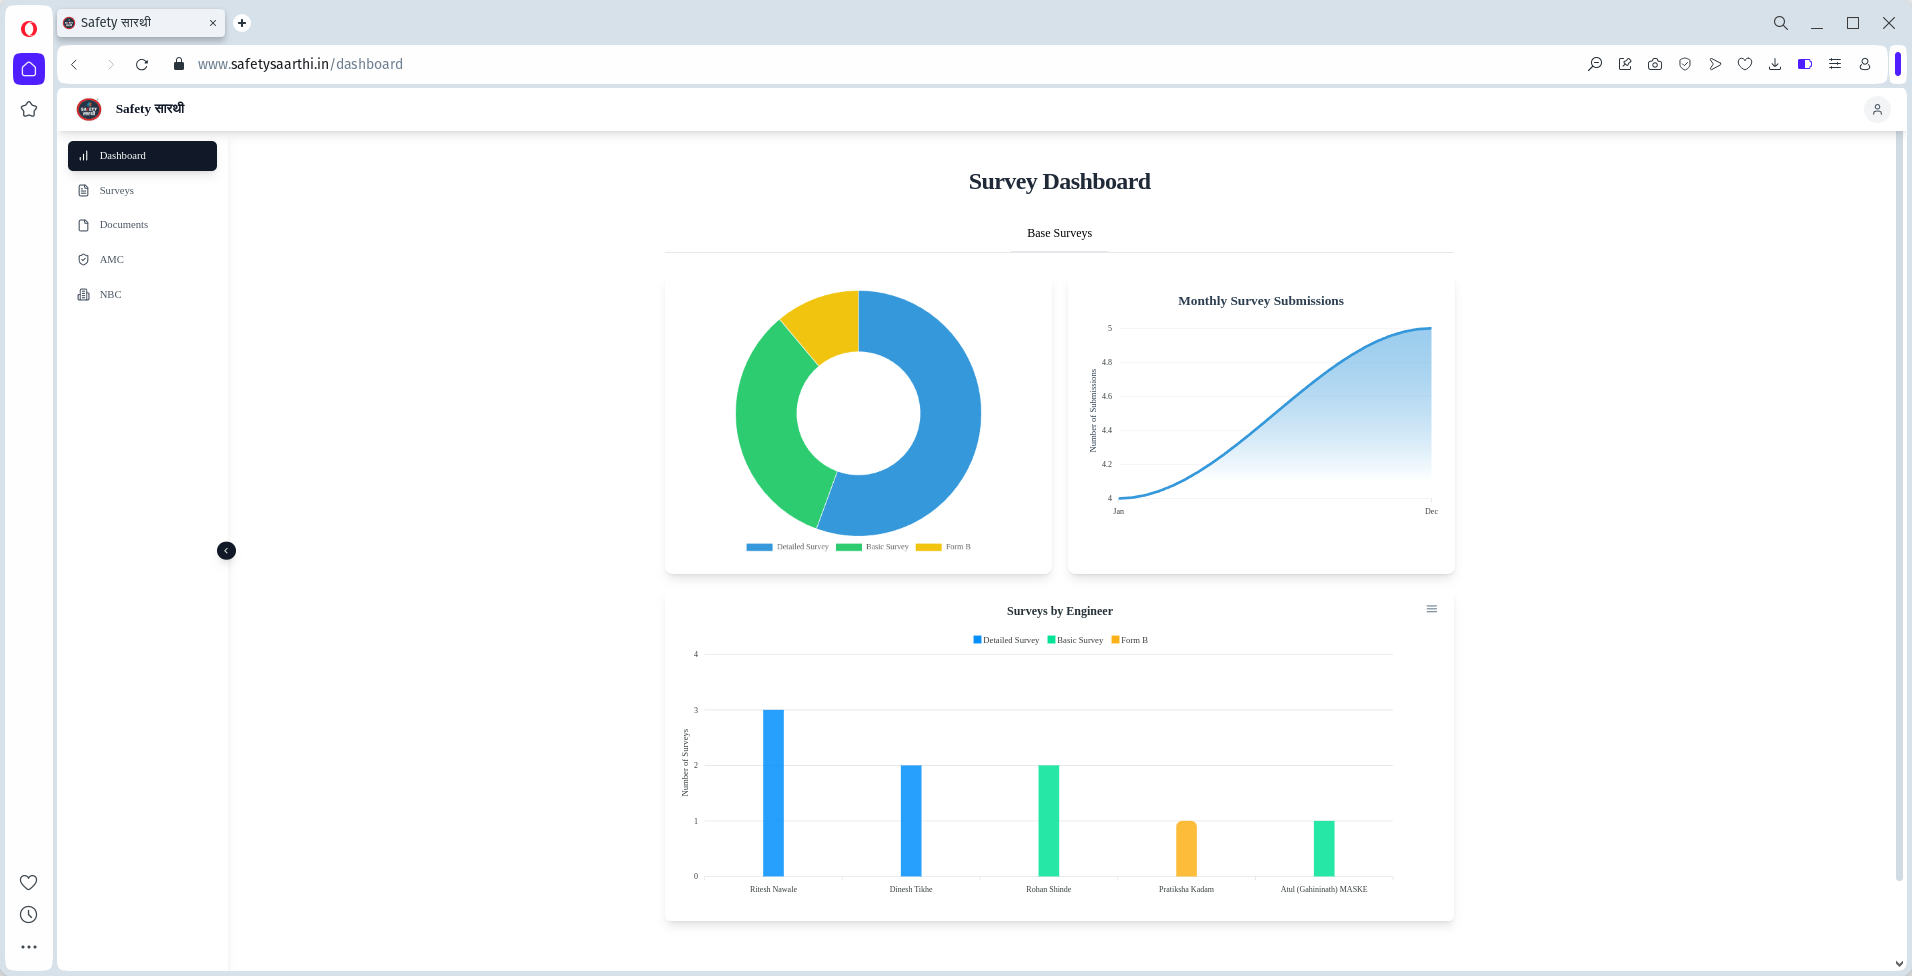
- Pie Chart: Shows the share of each type of surveys filled.
- Area Graph: Shows how many surveys are filled in a month.
- Bar Graph: Shows the comparison between engineers using number of each type of surveys filled by them.
-
Surveys Page
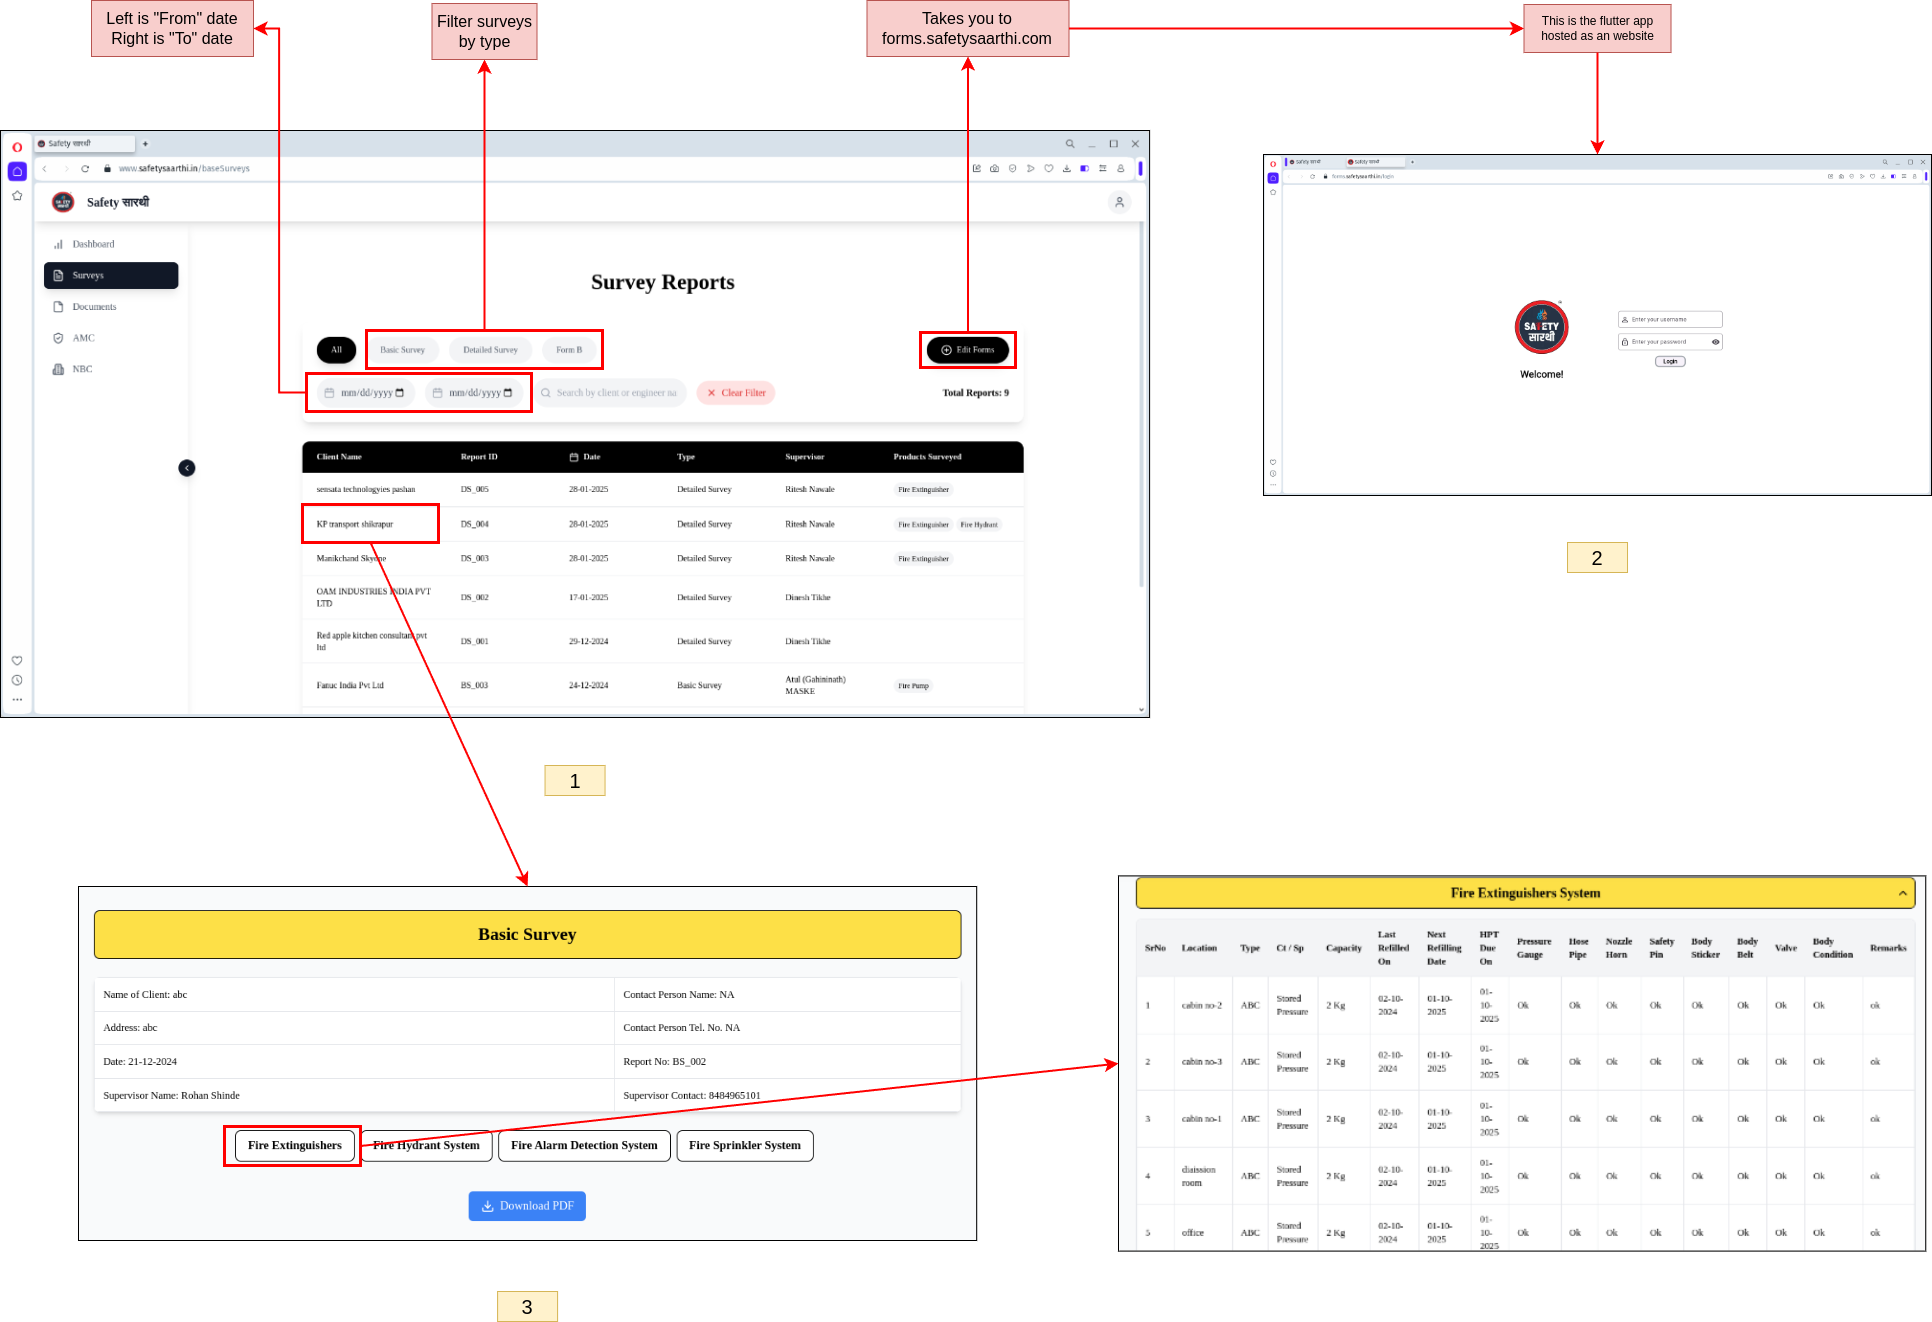
- Open the 'Surveys' page to view a list of all surveys in descending order of date.
- Use filters to narrow down the list.
- Click on 'Edit forms' button to navigate to the Cross platform website for editing.
- Click on a specific survey to view its details and download the PDF file.
-
Dashboard
AMC
Initialize AMC
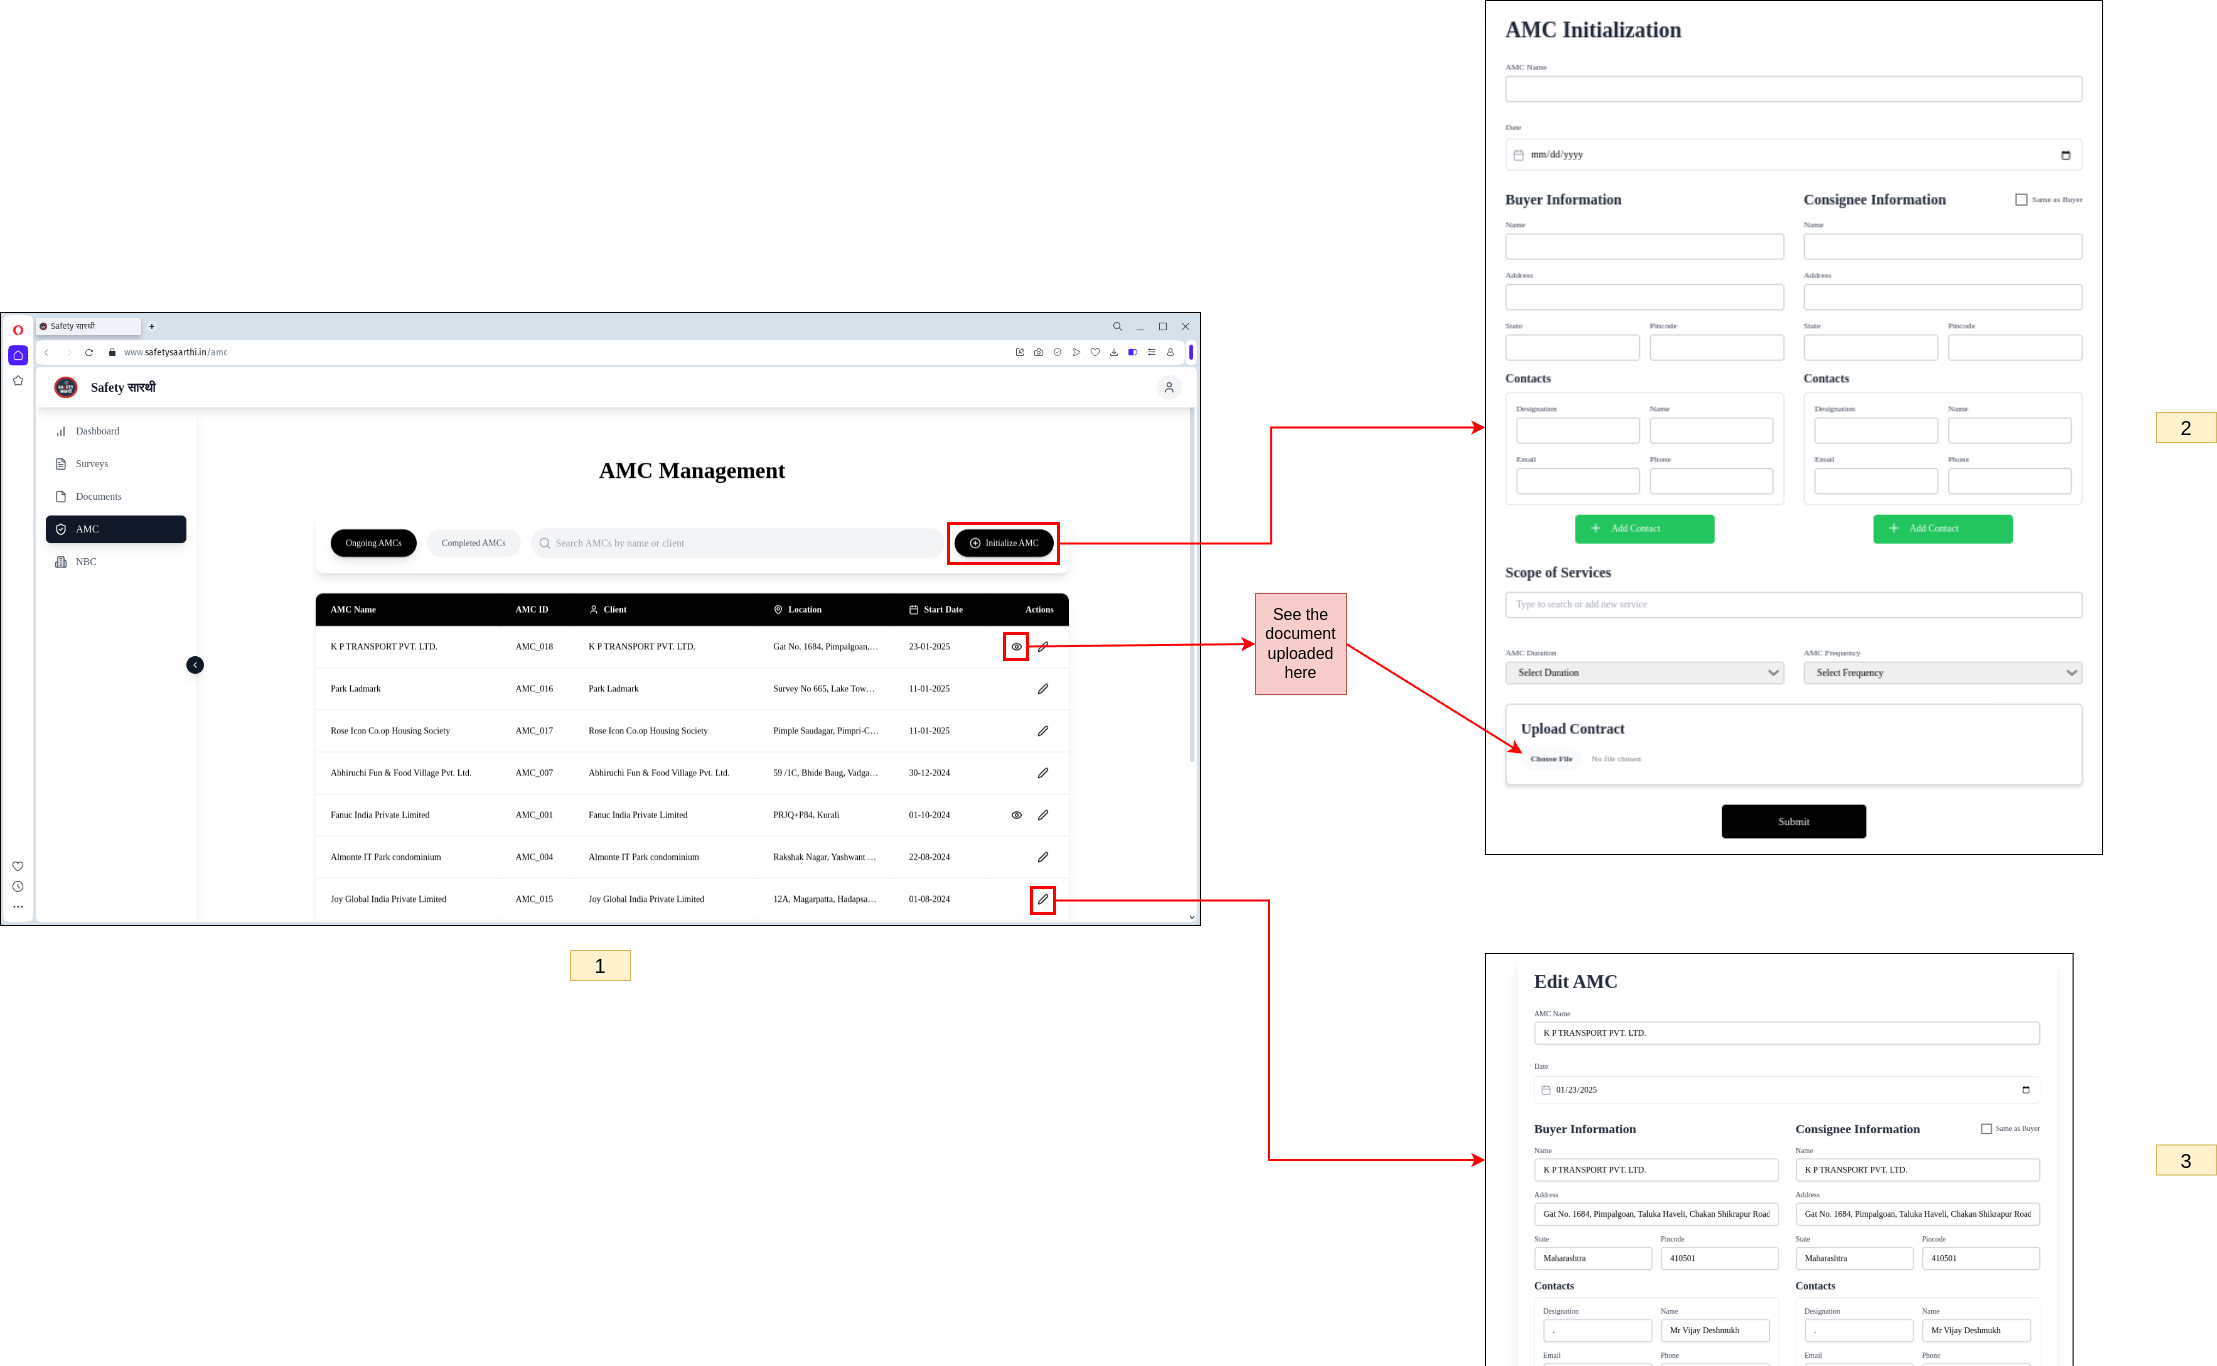
- Visit Surveys Website and open the 'AMC' page. Here, you will see a list of all ongoing AMCs.
- Click on the 'Initialize AMC' button to create a new contract. Fill in the required details to initialize a new AMC.
- You can also edit existing AMC contracts by selecting the desired contract and making the necessary changes.
Select contract
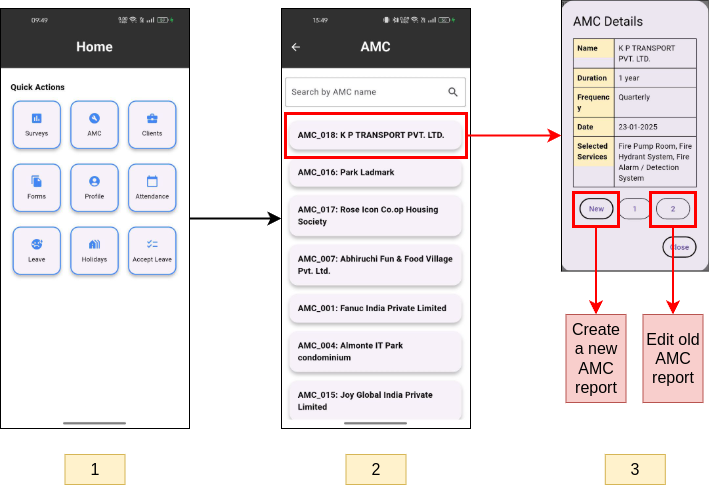
- From the home page, click on the 'AMC' button.
- You will see a list of all ongoing AMCs. Use the search bar to find a specific AMC by its name.
- Click on an AMC to view its contract details. You can choose to create a new AMC or edit an existing one.
This step is applicable for both the mobile app and the Cross platform website.
Fill survey
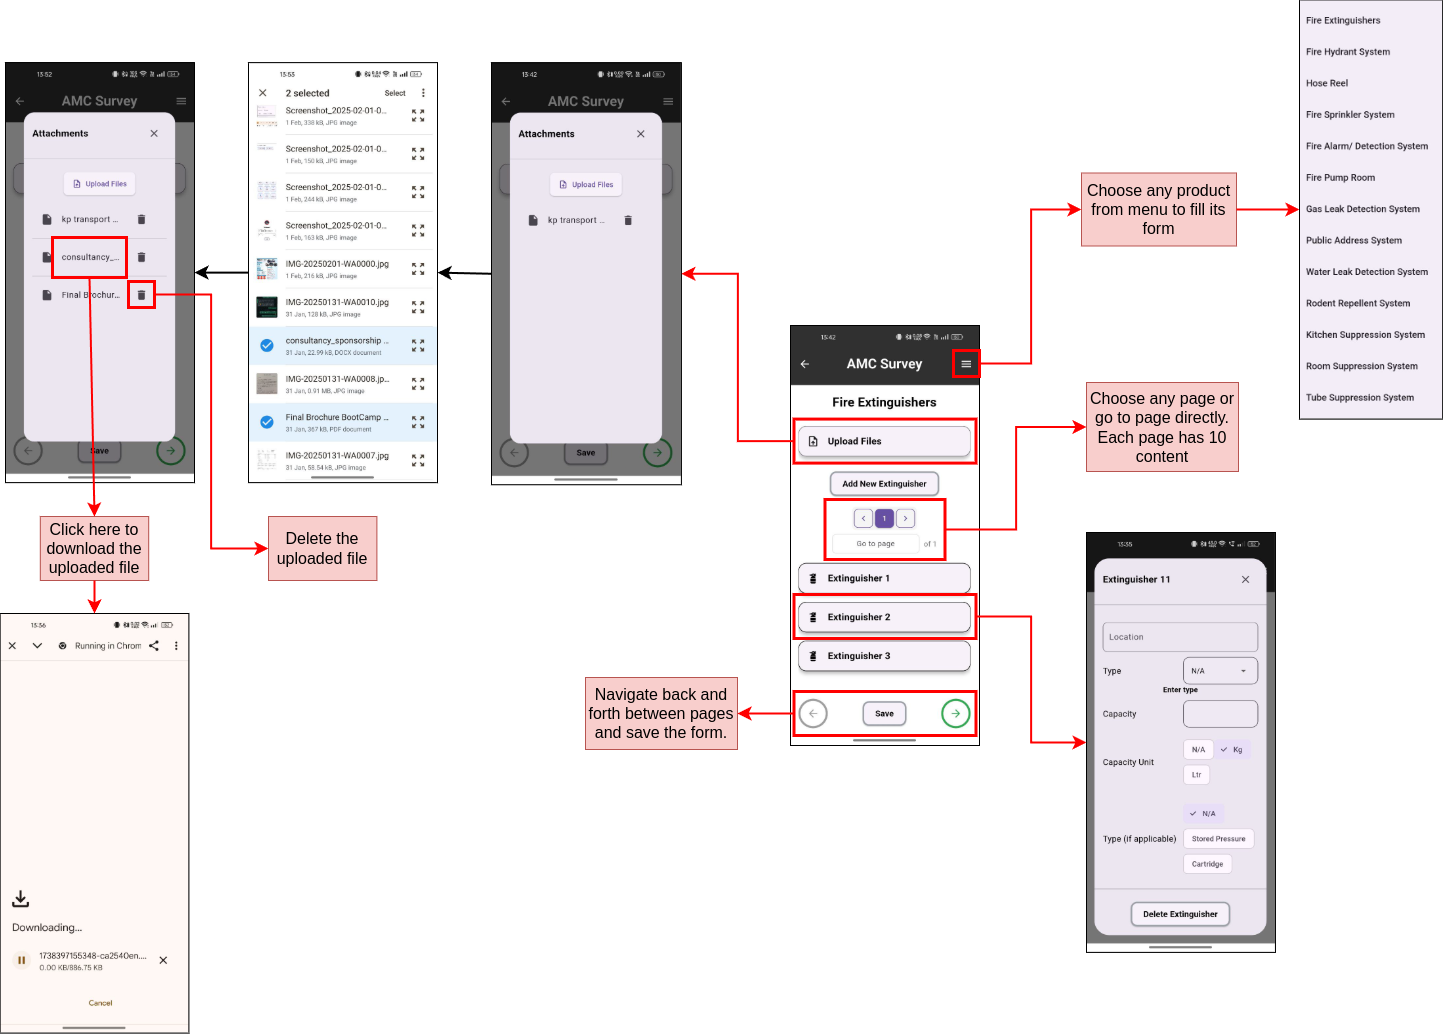
Once you select an AMC contract, you will be directed to the corresponding survey form.
Functionalities included
- Adding multiple products.
- Using pagination to navigate between products within a system.
- Selecting specific systems.
- Navigating between systems.
- Uploading multiple files.
- Downloading or deleting uploaded files.
The images provided in the documentation are self-explanatory and illustrate these functionalities.
Monitor contracts
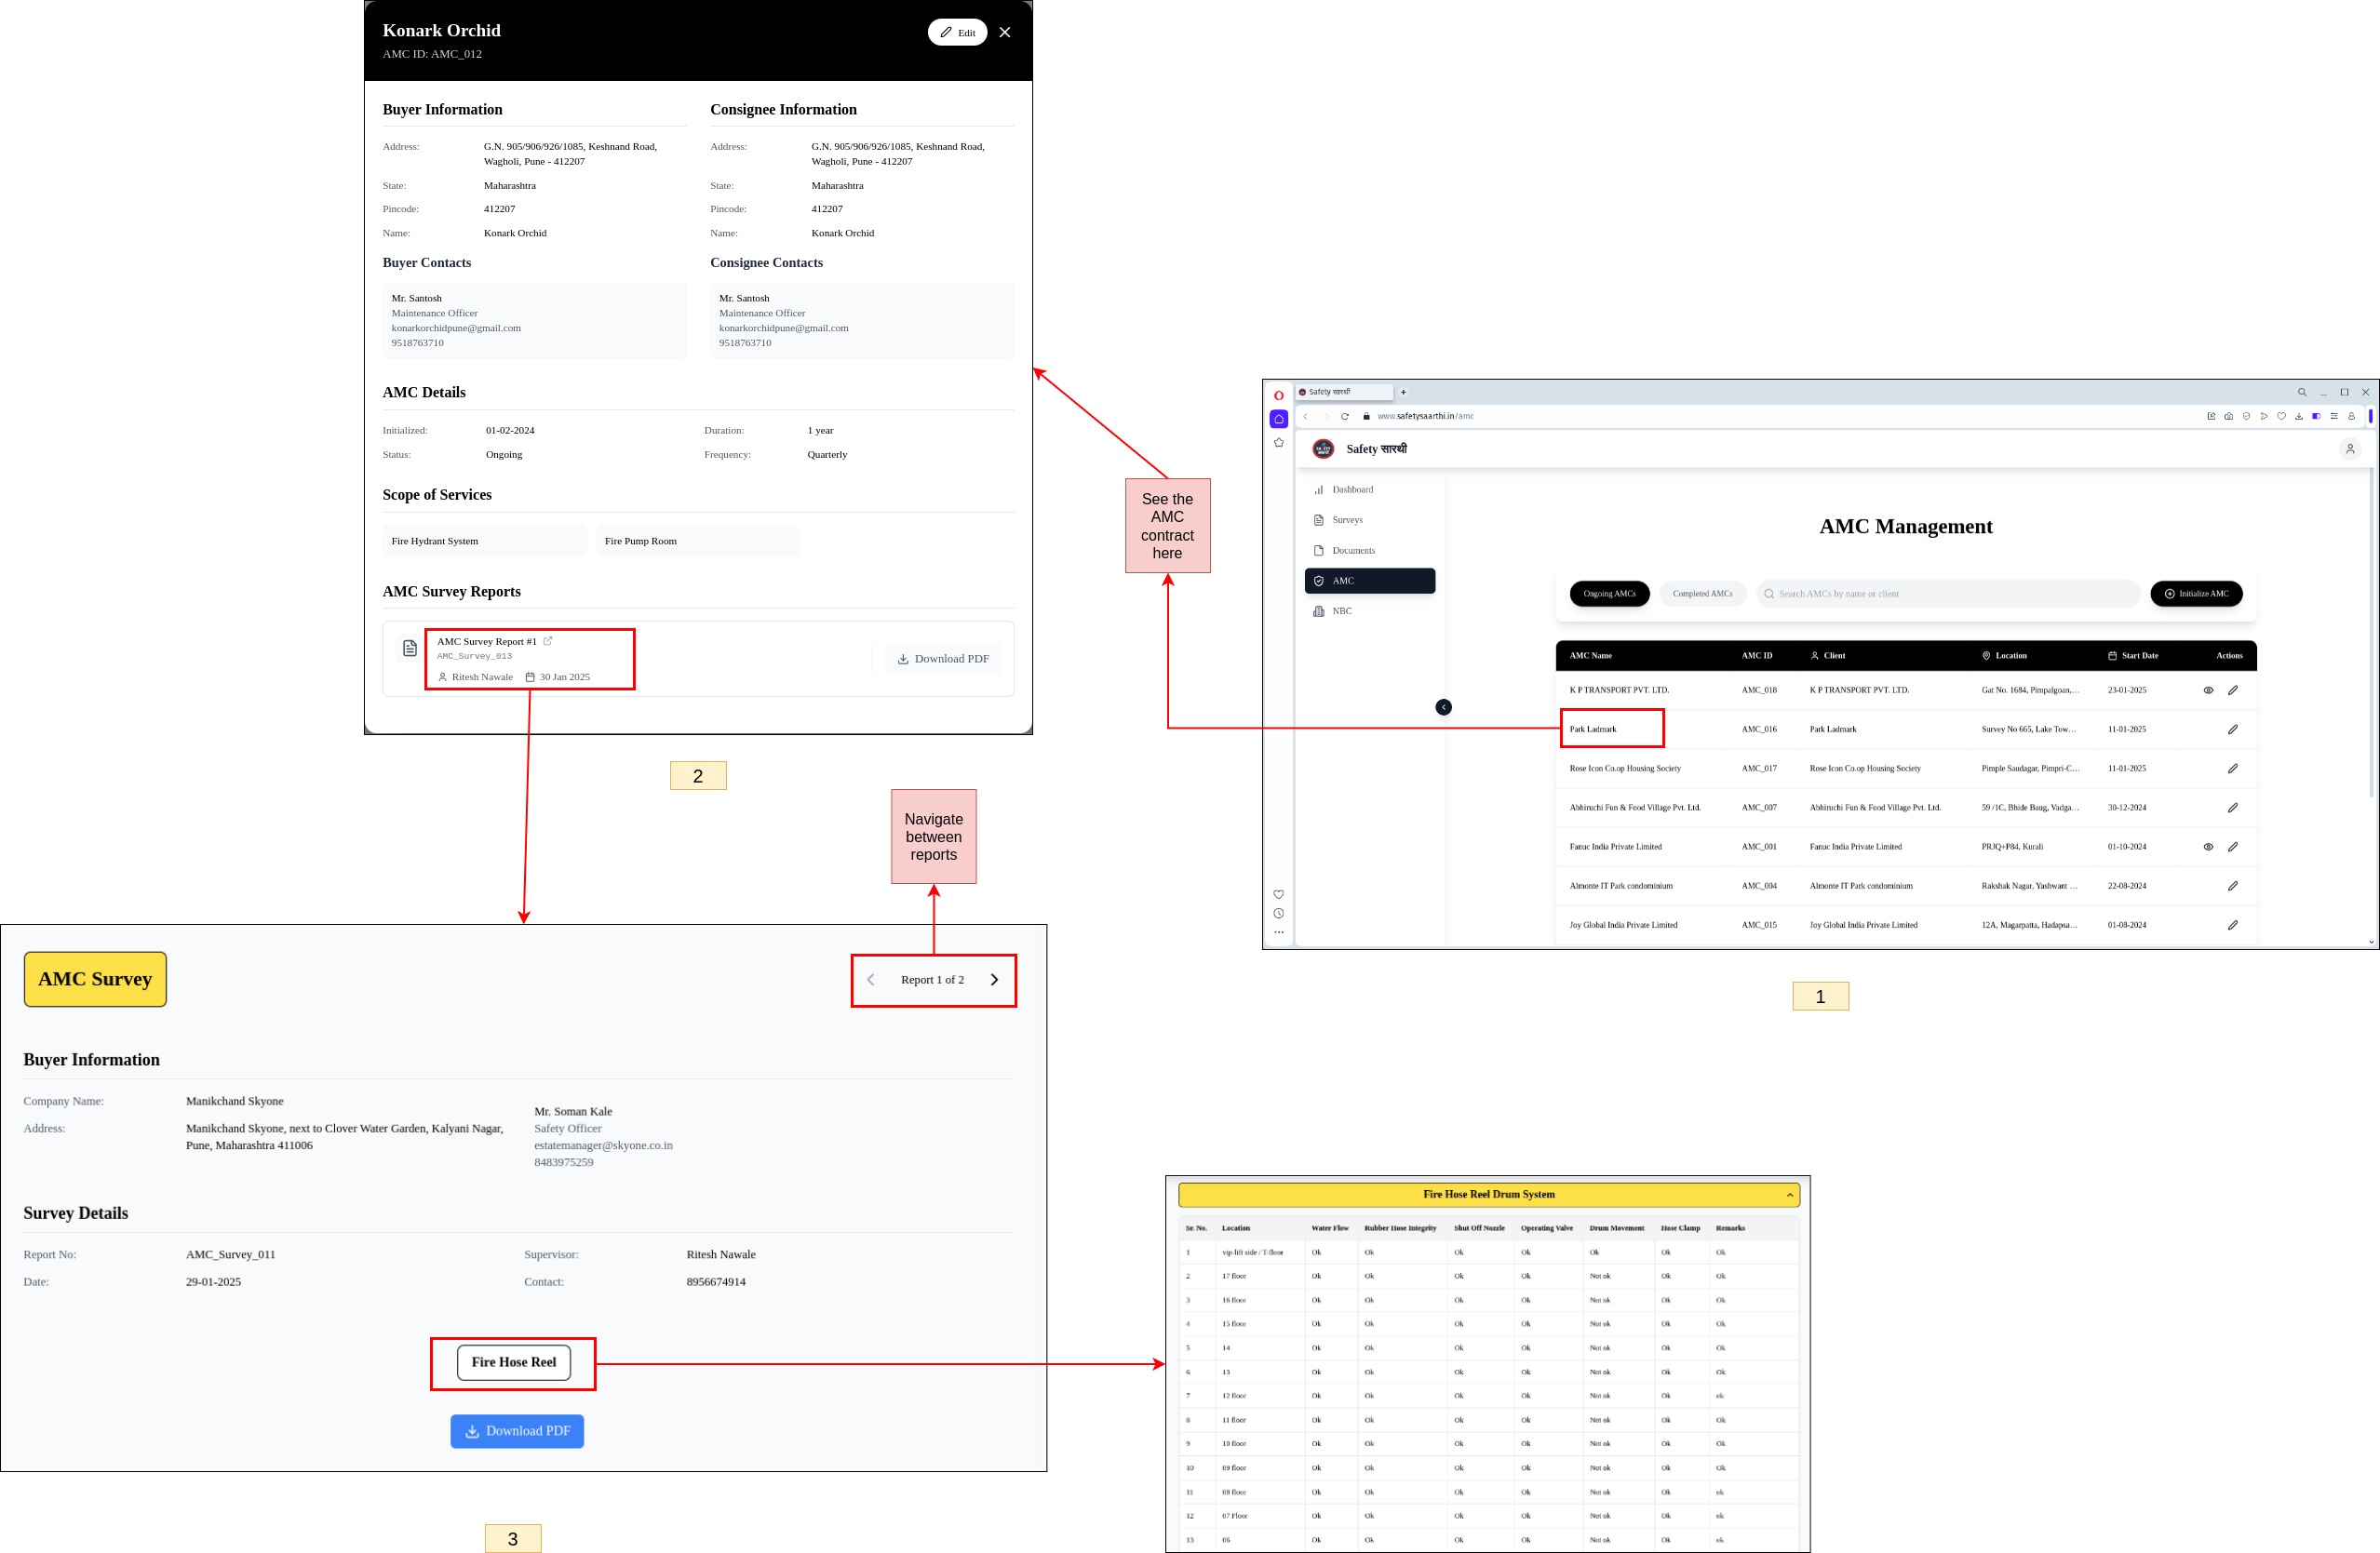
- From the home page, click on the 'AMC' button. Here, you will see a list of all ongoing AMCs.
- Click on an AMC to view its contract details and all surveys filled under that contract.
- Click on a specific survey to view its form and download the PDF file.
Renew contract
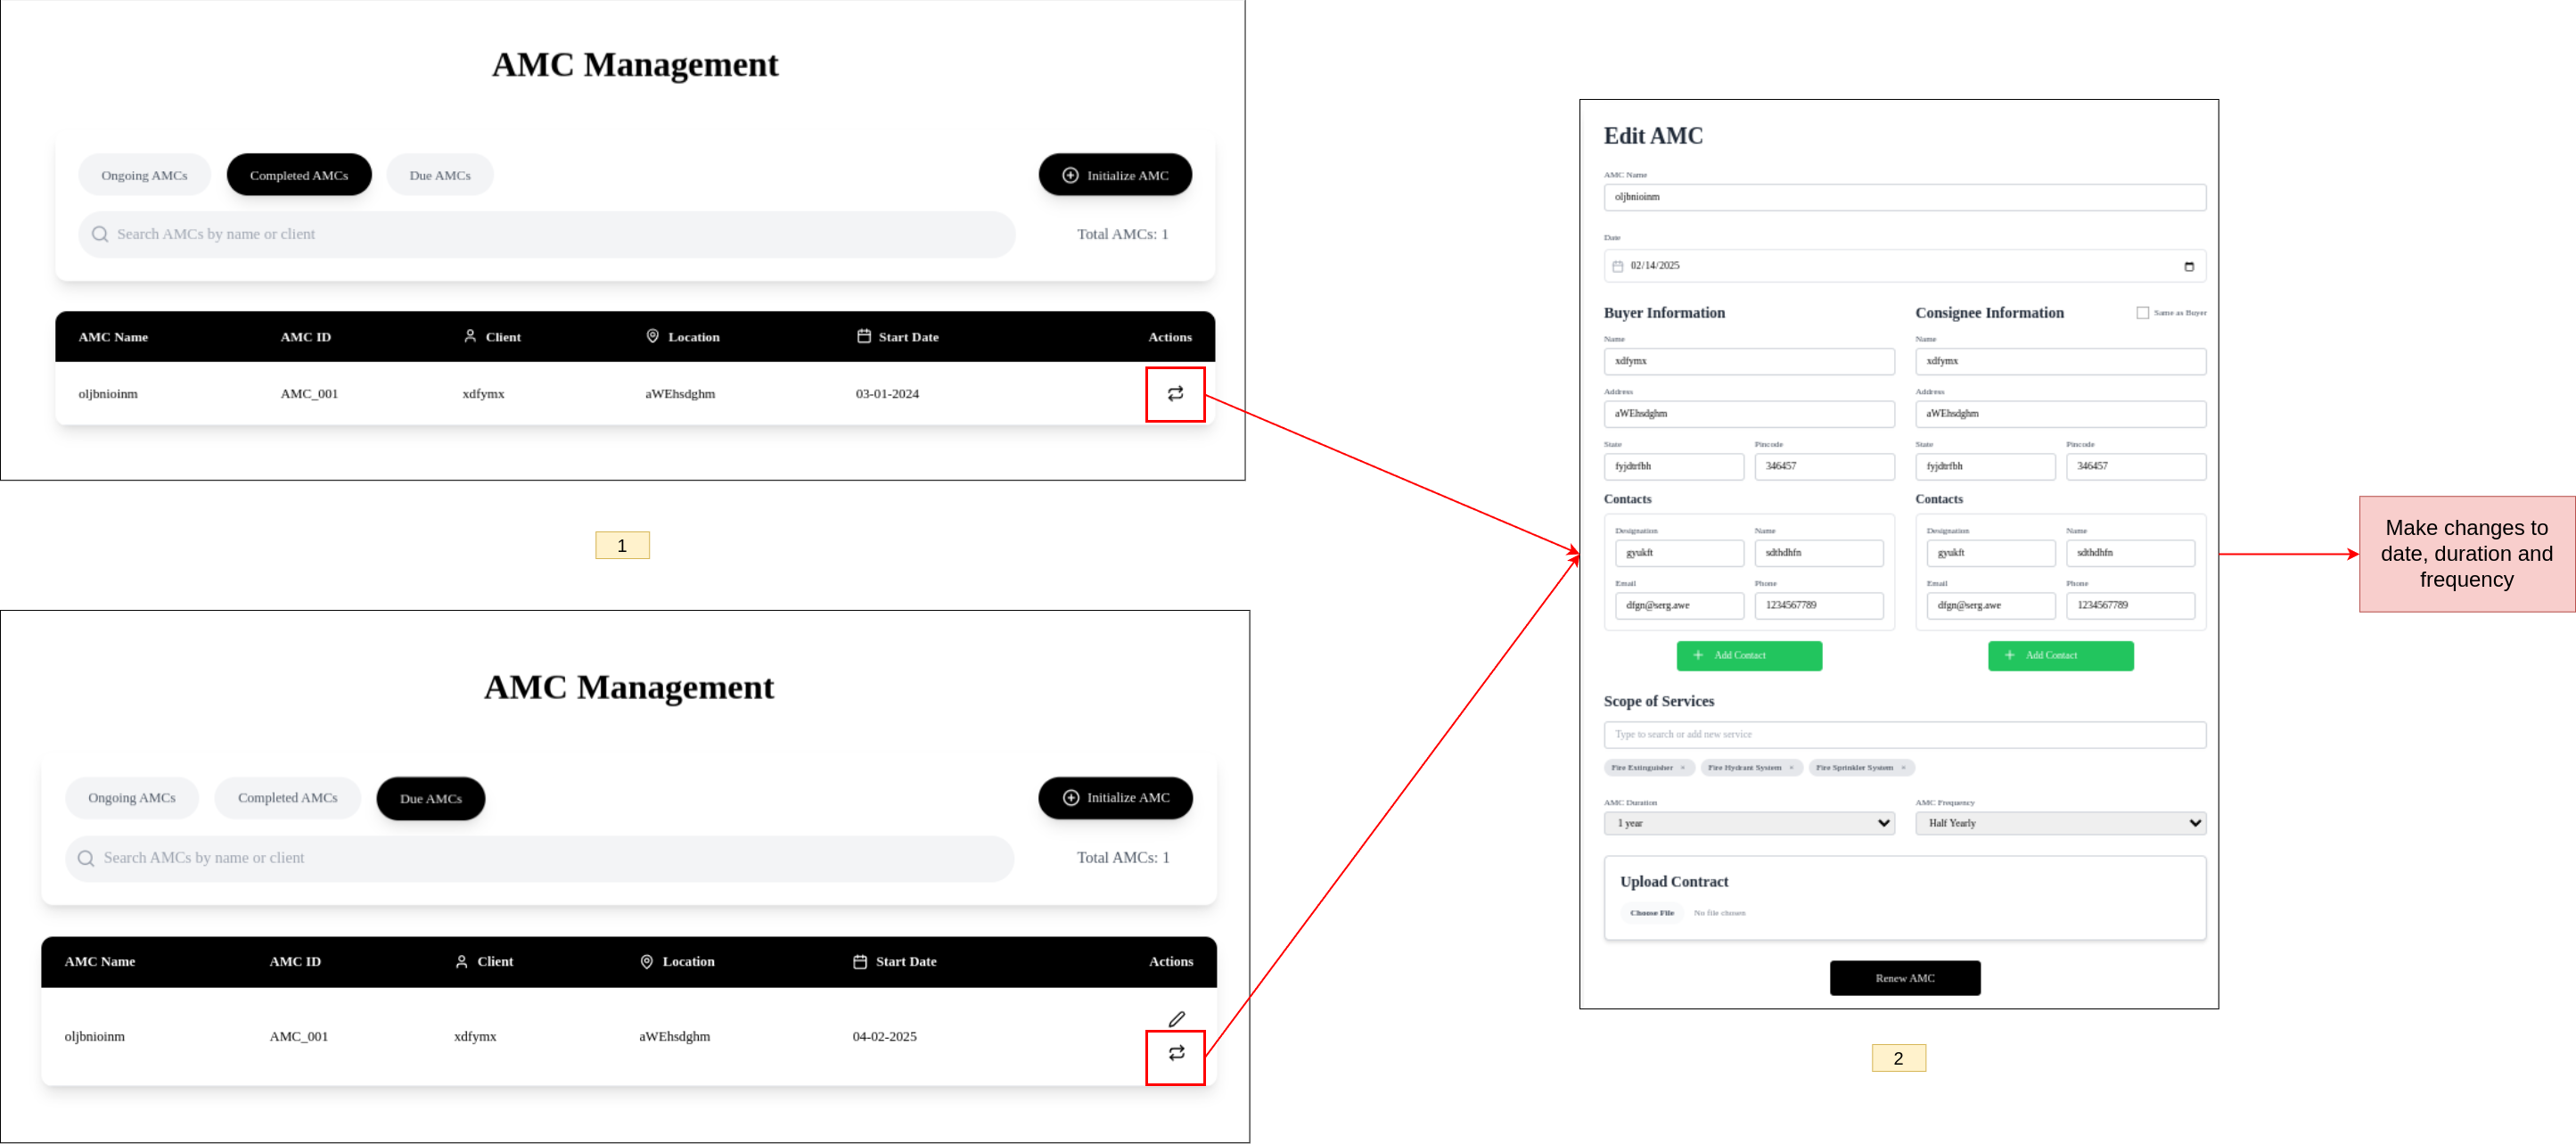
- From the home page, click on the 'AMC' button. Use the filters to select either 'Completed AMCs' or 'Due AMCs'.
- Click on the desired AMC to open its contract.
- Renew the contract by following the on-screen instructions.
Documents
Fill documents
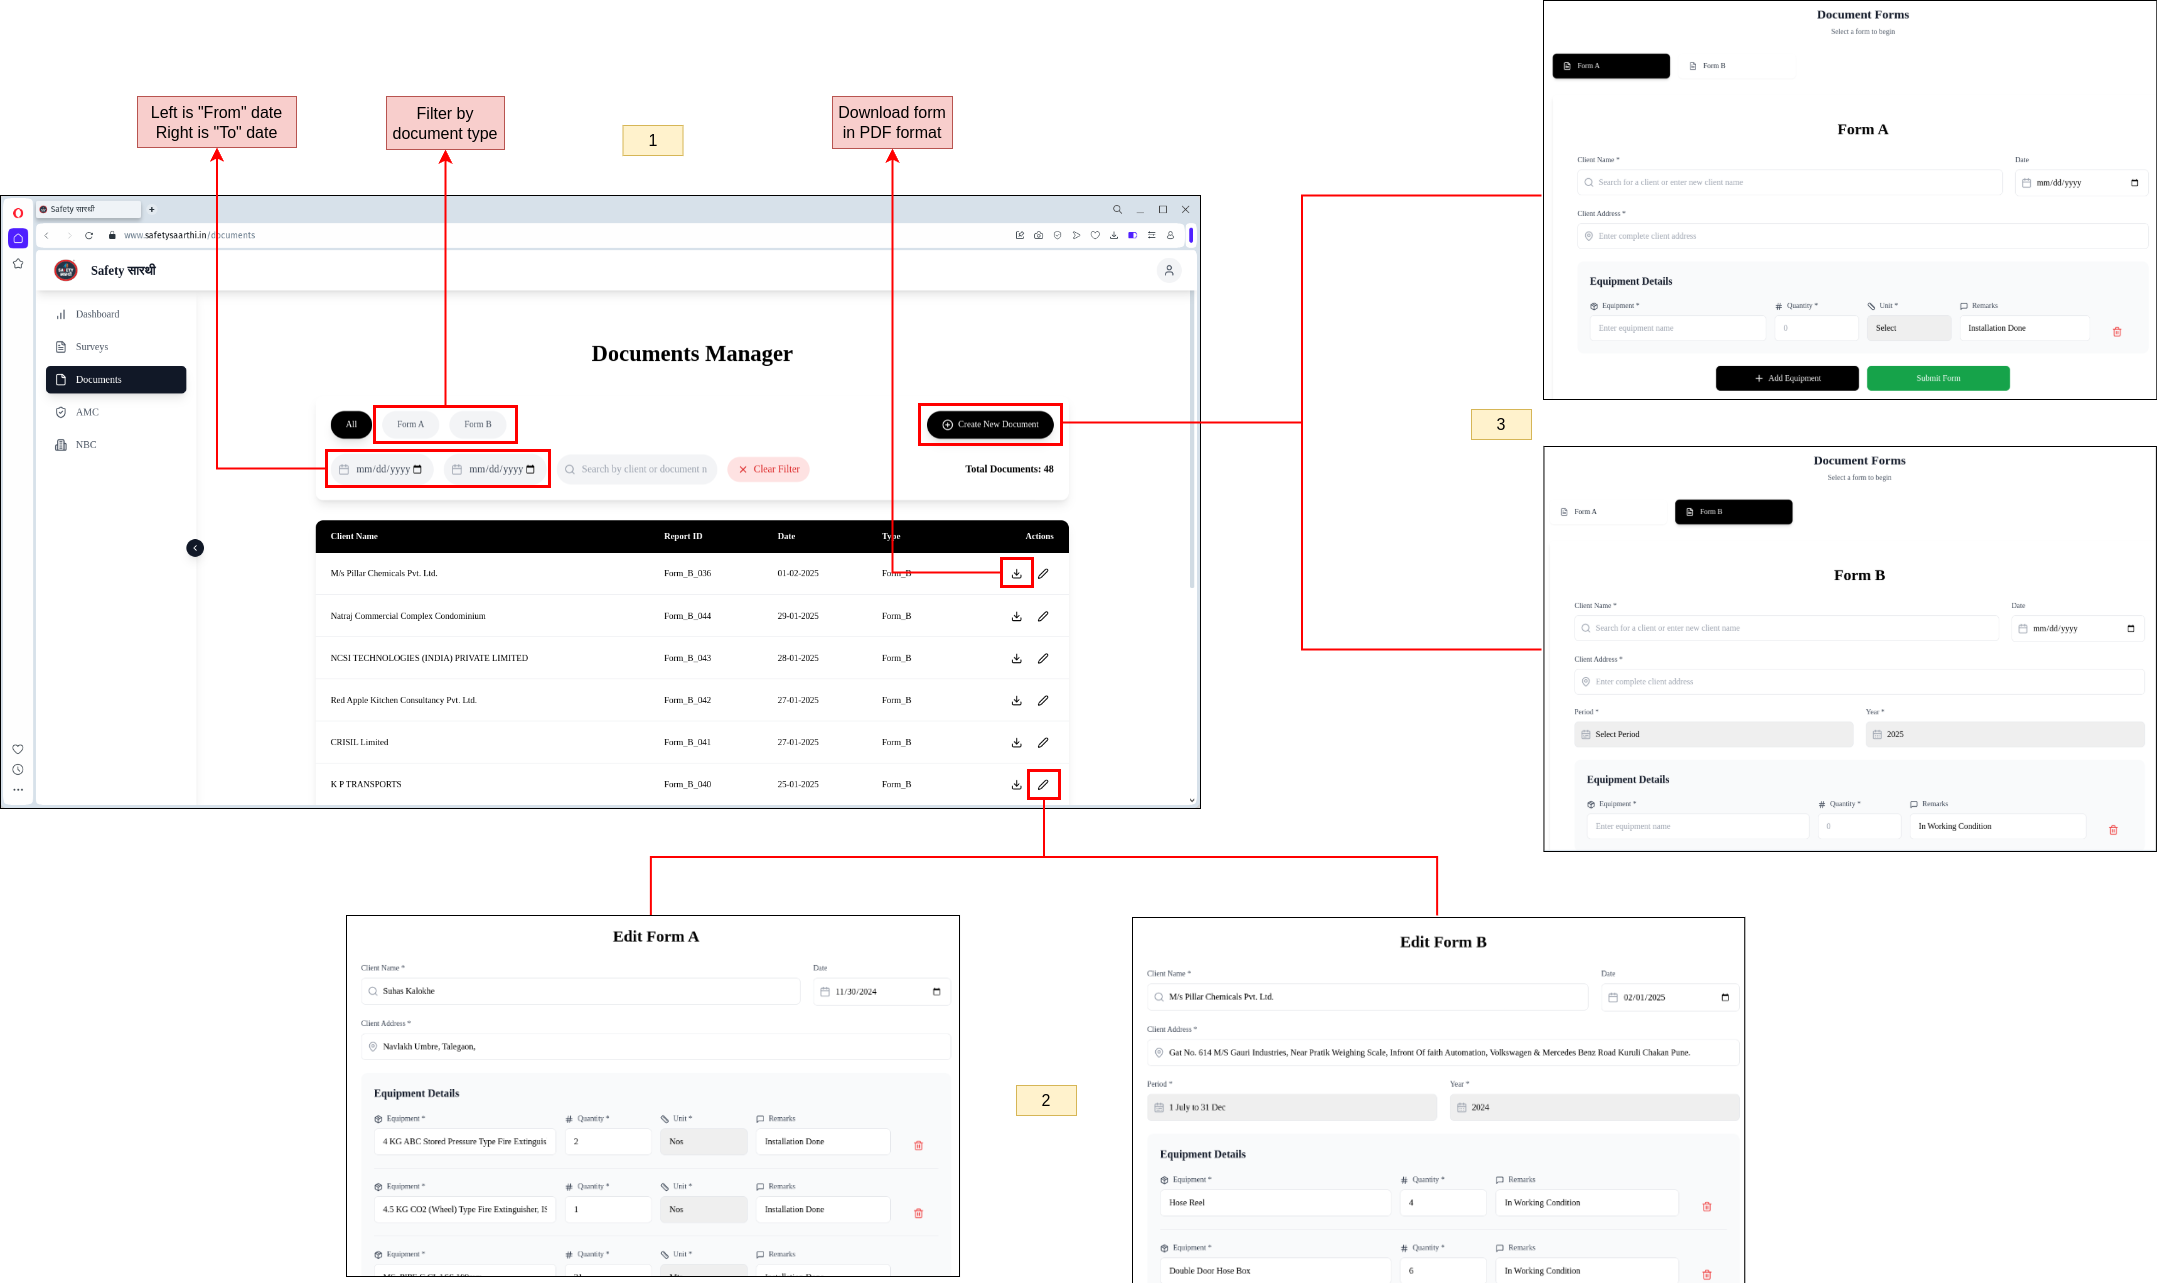
- Visit Surveys Website and open the 'Documents' page. Here, you will see a list of all documents sorted in descending order of date. Use the type and date range filters to narrow down the list.
- Click on the 'Create New Document' and select the type of document (e.g., Form A or Form B). Fill in the required details.
- You can also edit existing documents by selecting the desired document and making the necessary changes.
Renew documents
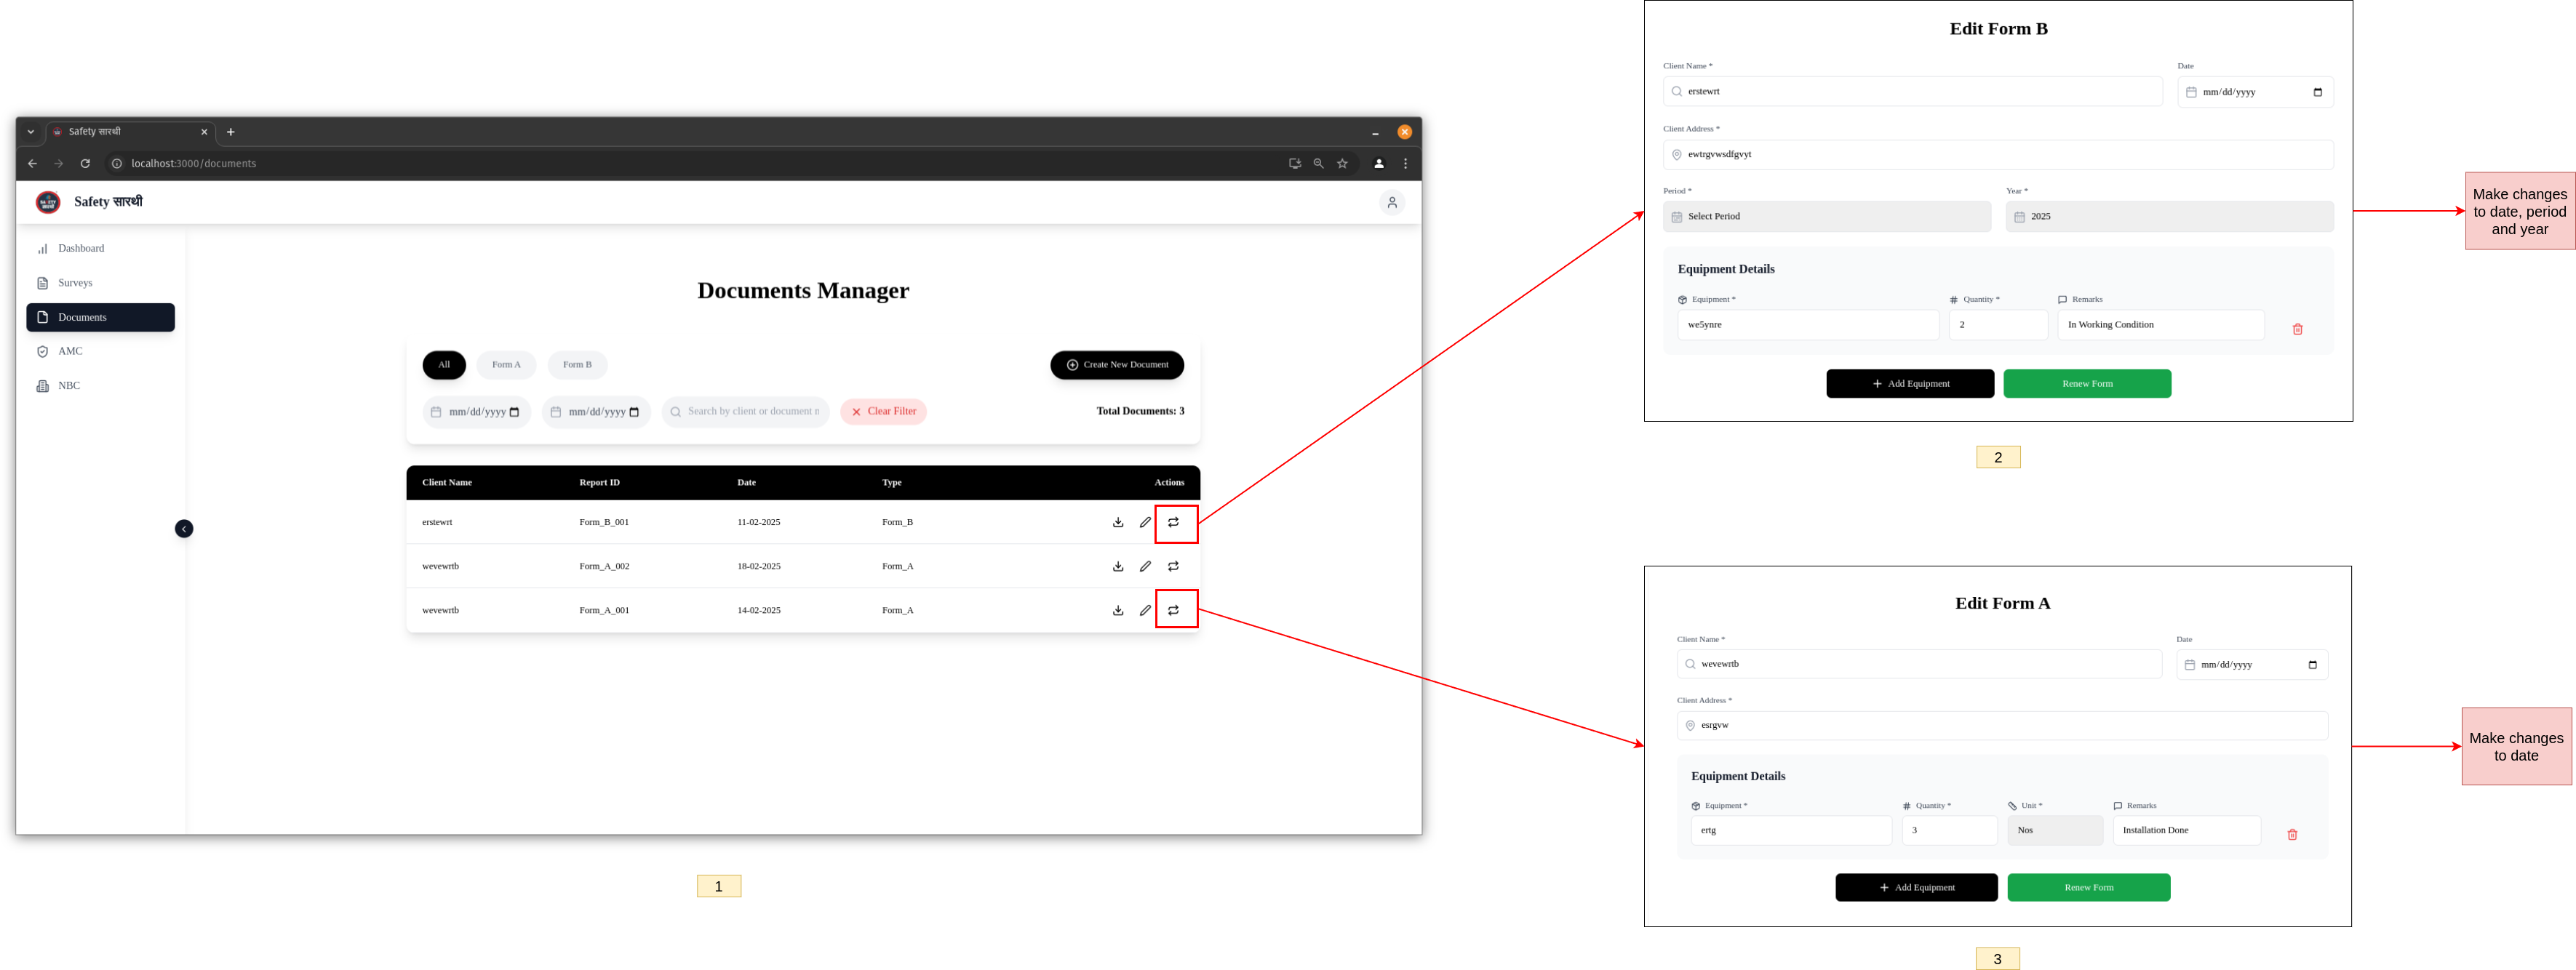
- From the home page, click on the 'Documents' button. Select the document you want to renew.
- Click on the document to edit Form A or Form B as needed.
NBC Table 7

- From the home page, click on the 'NBC' button.
- This page provides a visual representation of the complex NBC Table 7. Select the occupancy type and answer the questions.
- At the end, you will receive a list of required systems and additional instructions based on your inputs.
Employee
Register
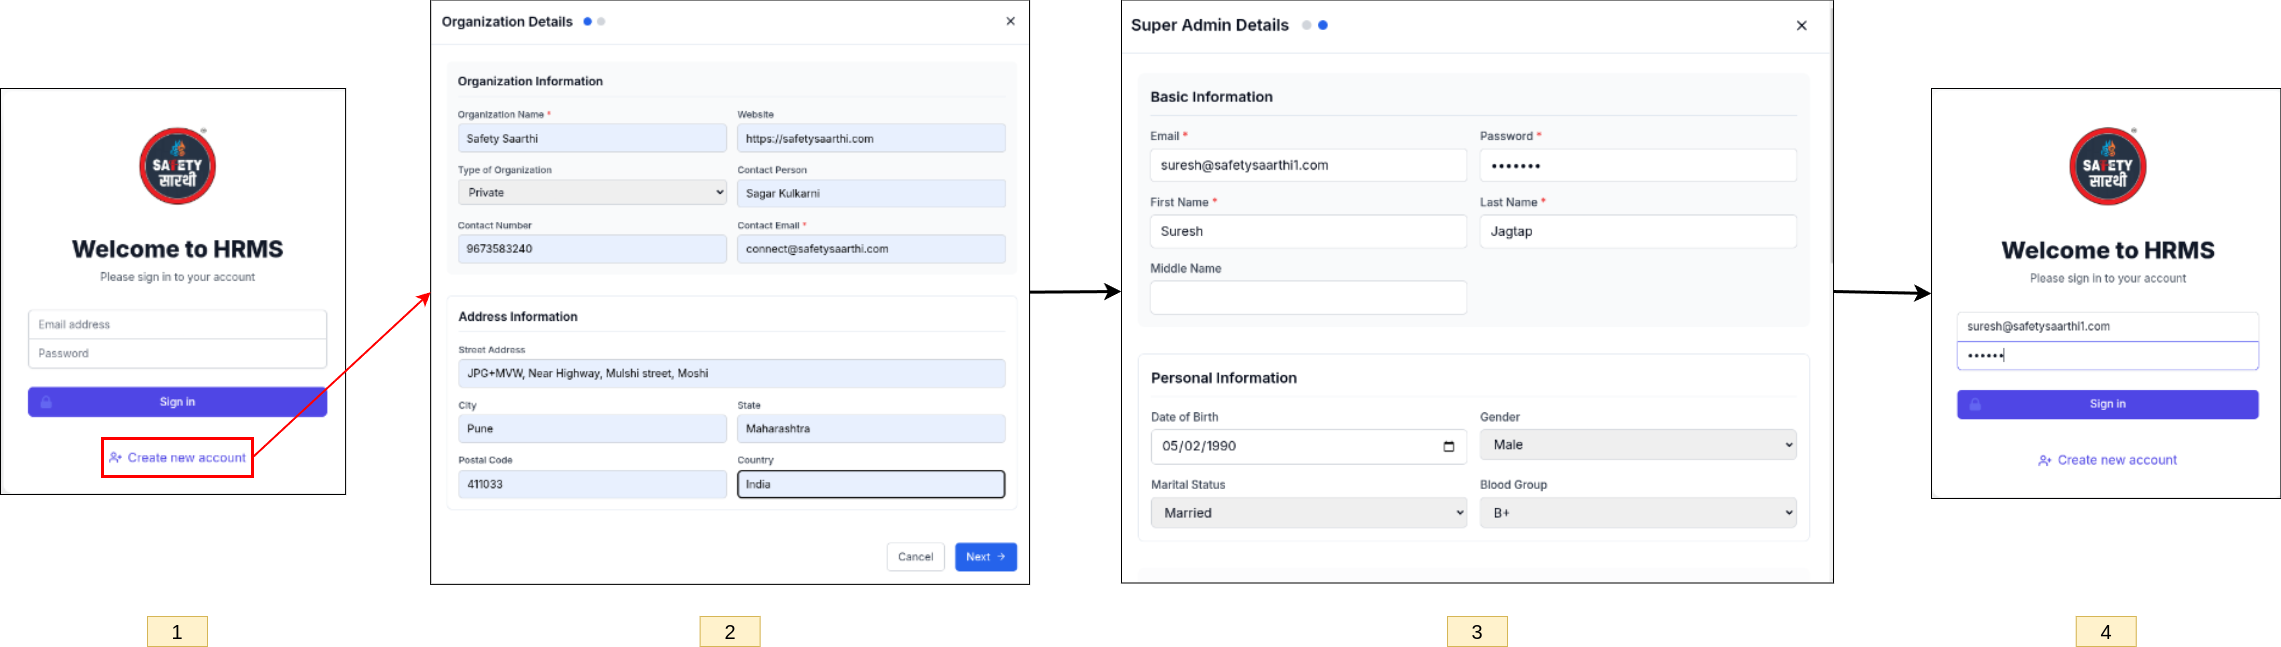
- Visit HRMS Website and click on 'Create New Account'.
- Fill in the details of your organization.
- Enter the details of the Super Admin.
- Set up your login credentials by entering your email and password.
Settings
-
Organization
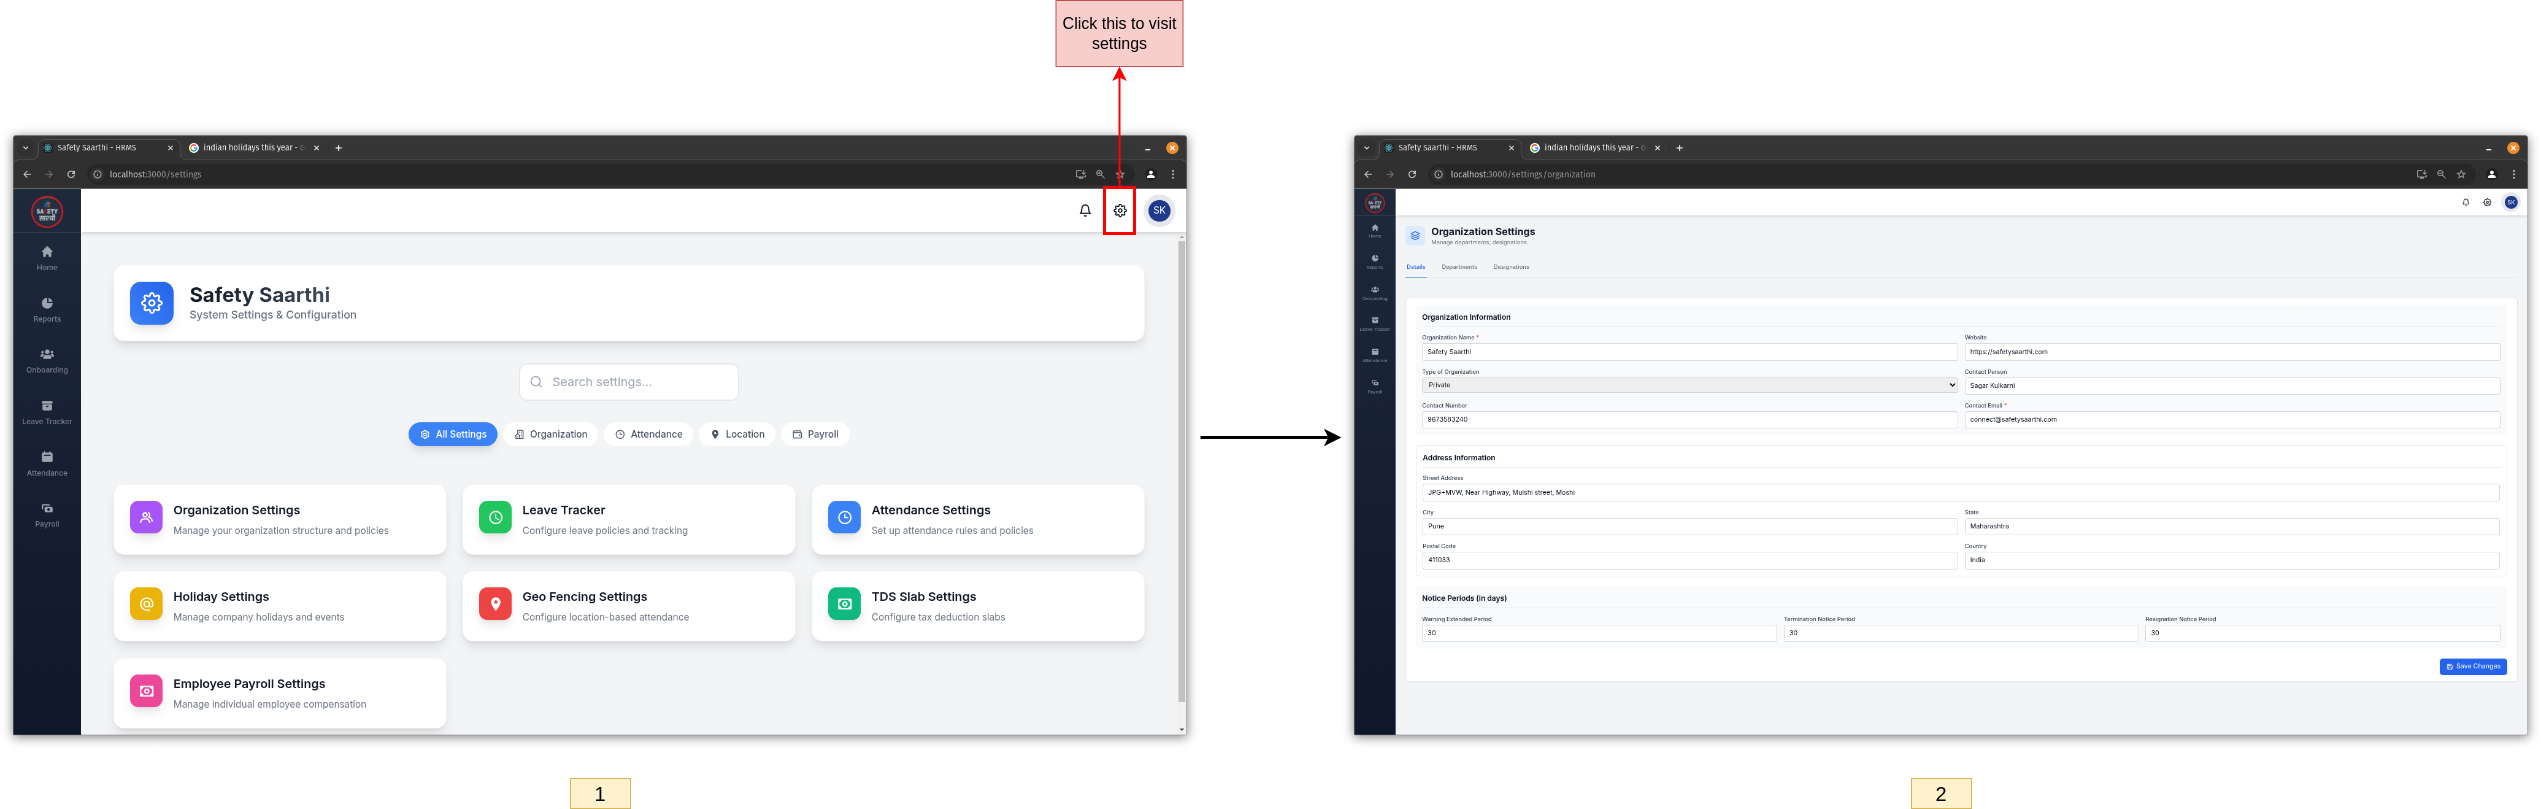
- Click on the gear icon to access the settings page. Click on 'Organization Settings'.
- Update your organization's details, including the logo and letterhead. These will be used in PDFs for surveys, documents, AMC surveys, and payment slips.
-
Department
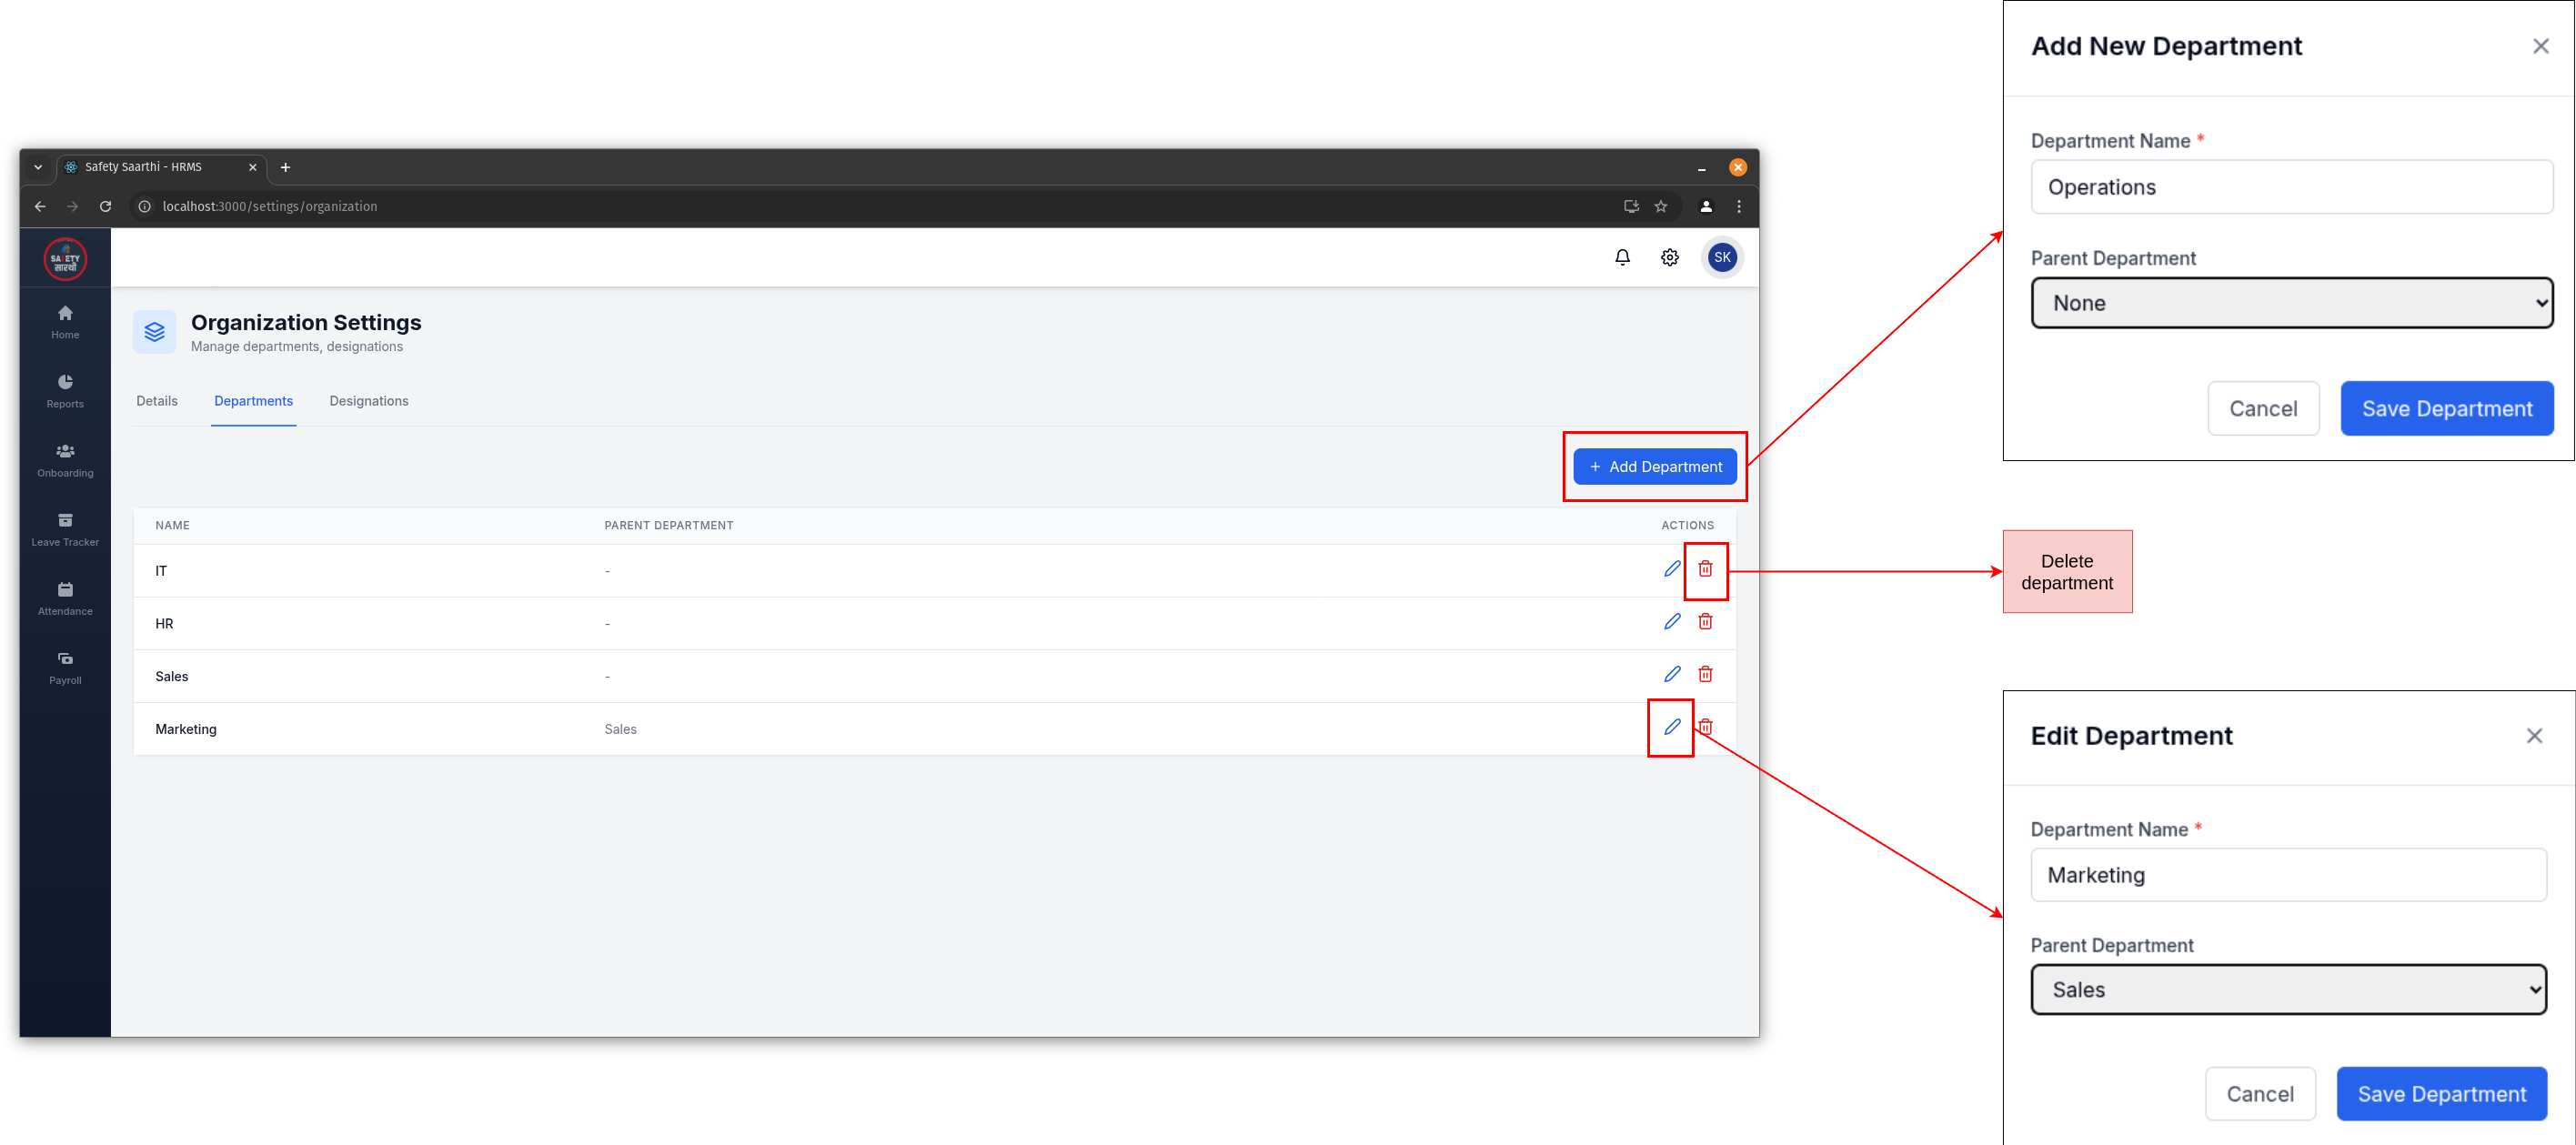
- Go to 'Departments' section.
- You can:
- Add a new department.
- Add a parent department.
- Edit or delete an existing department.
-
Designation
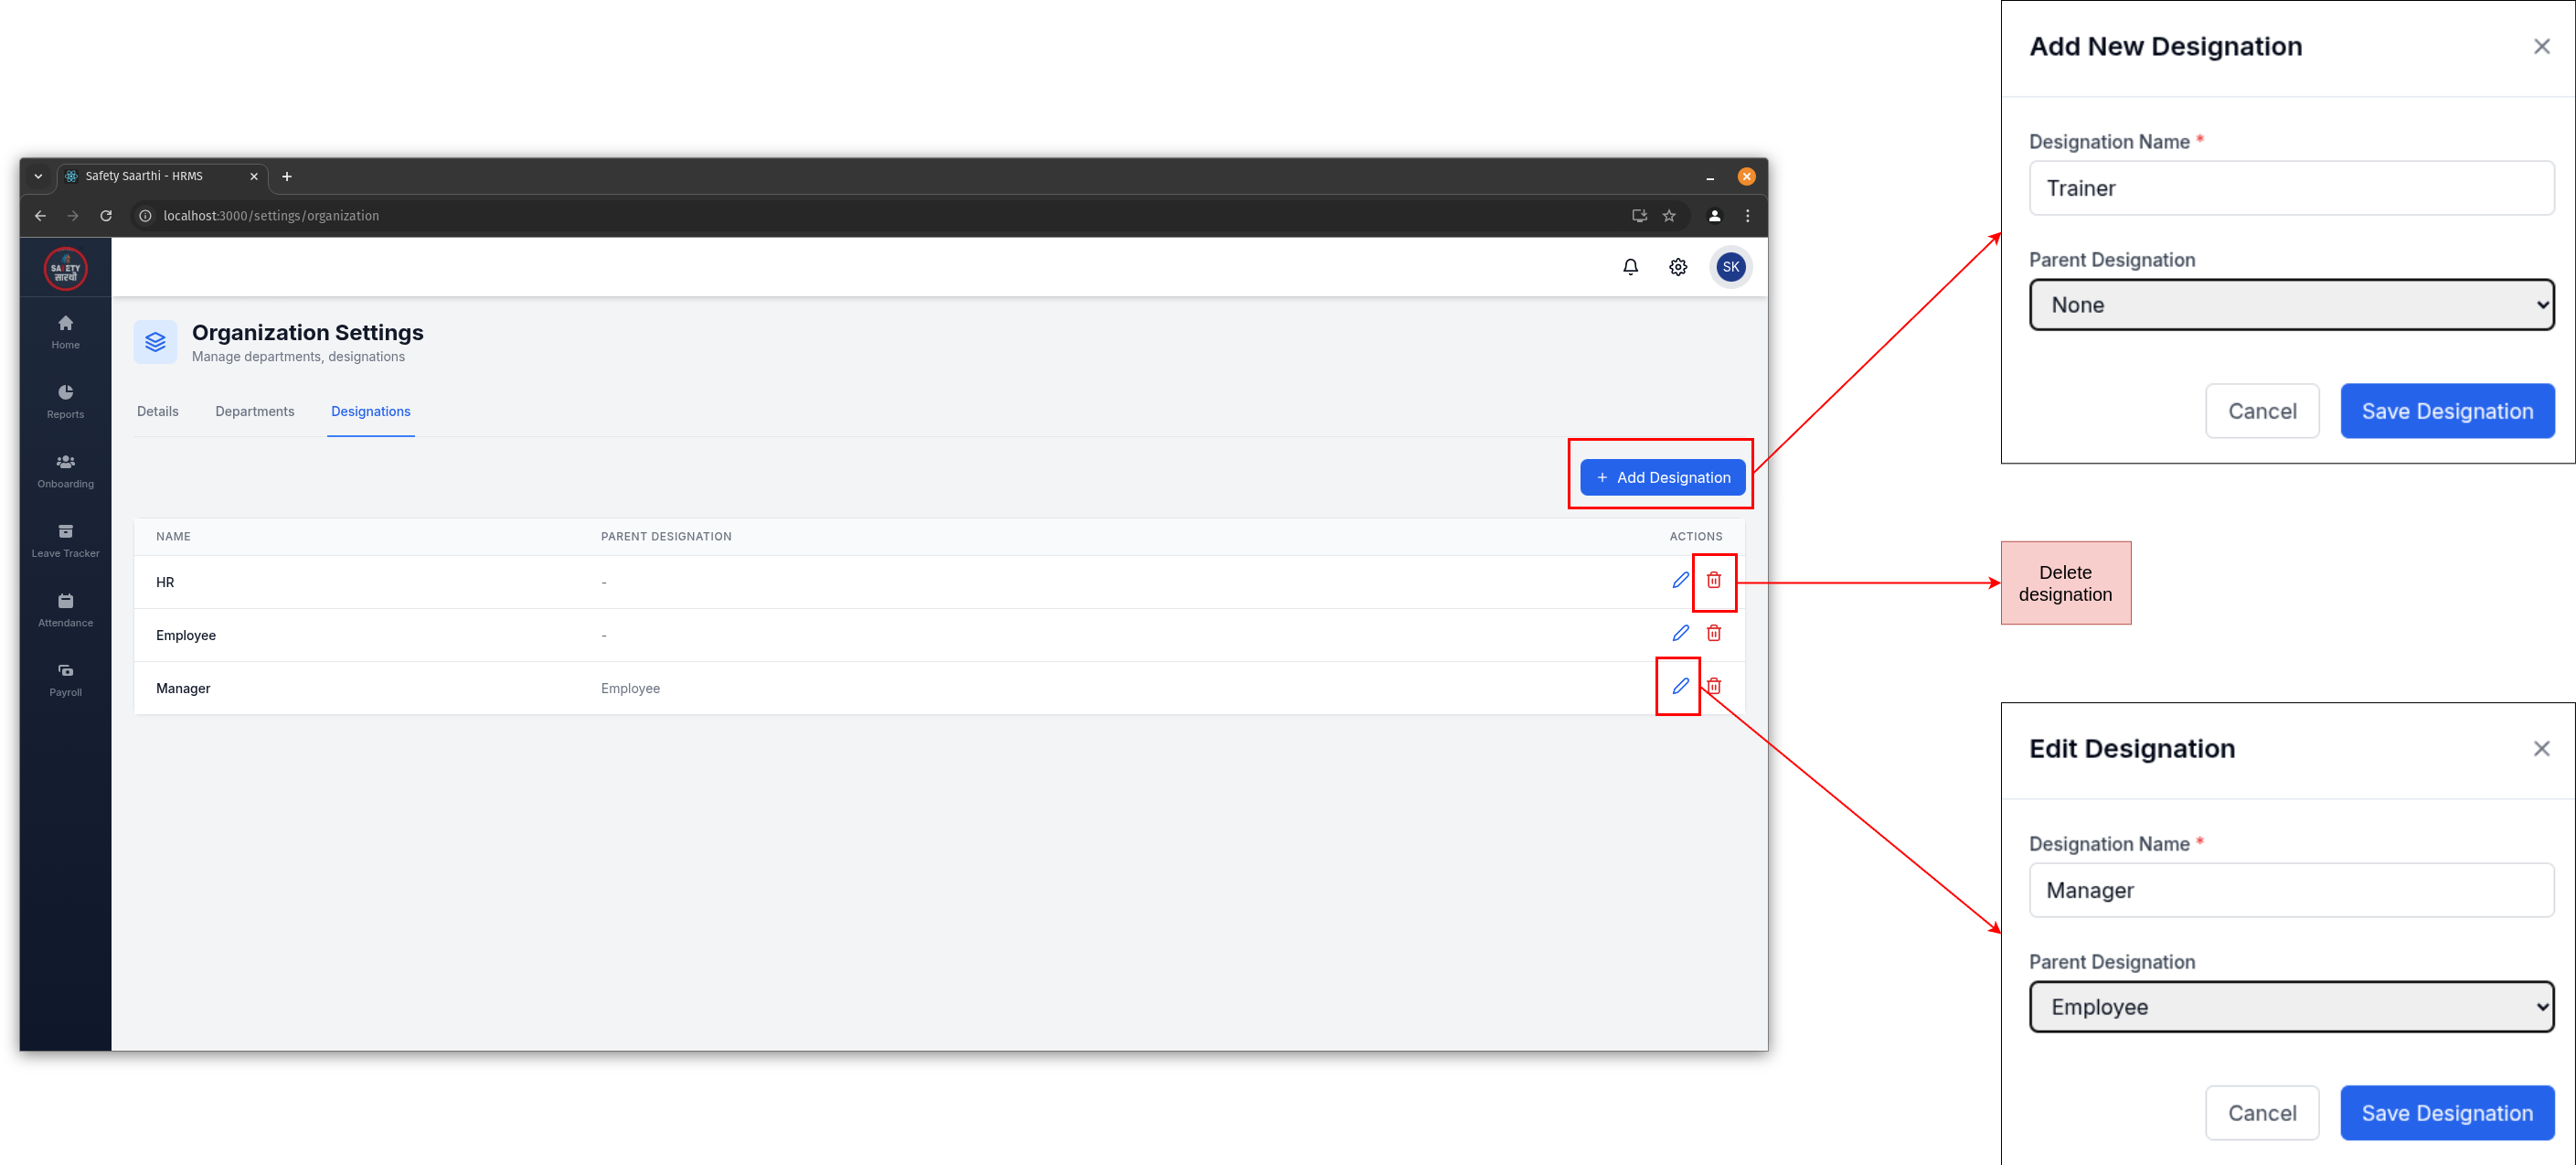
- Go to 'Designations' section.
- You can:
- Add a new designation.
- Add a parent designation.
- Edit or delete an existing designation.
Profile
-
Mobile
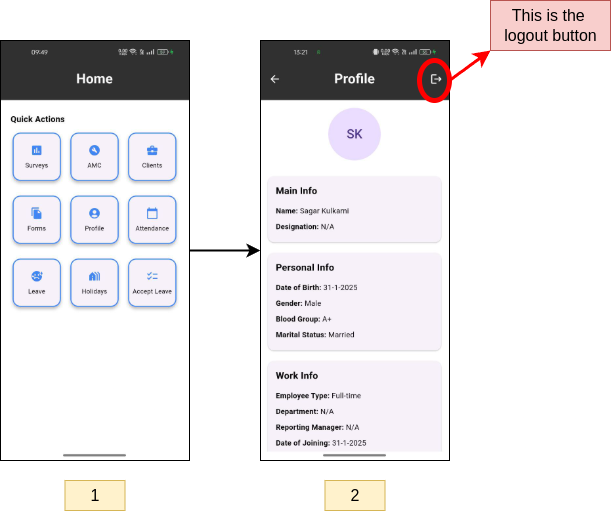
- From the home page, click on the 'Profile' button.
- View your personal information and use the logout button if needed.
-
HRMS Website
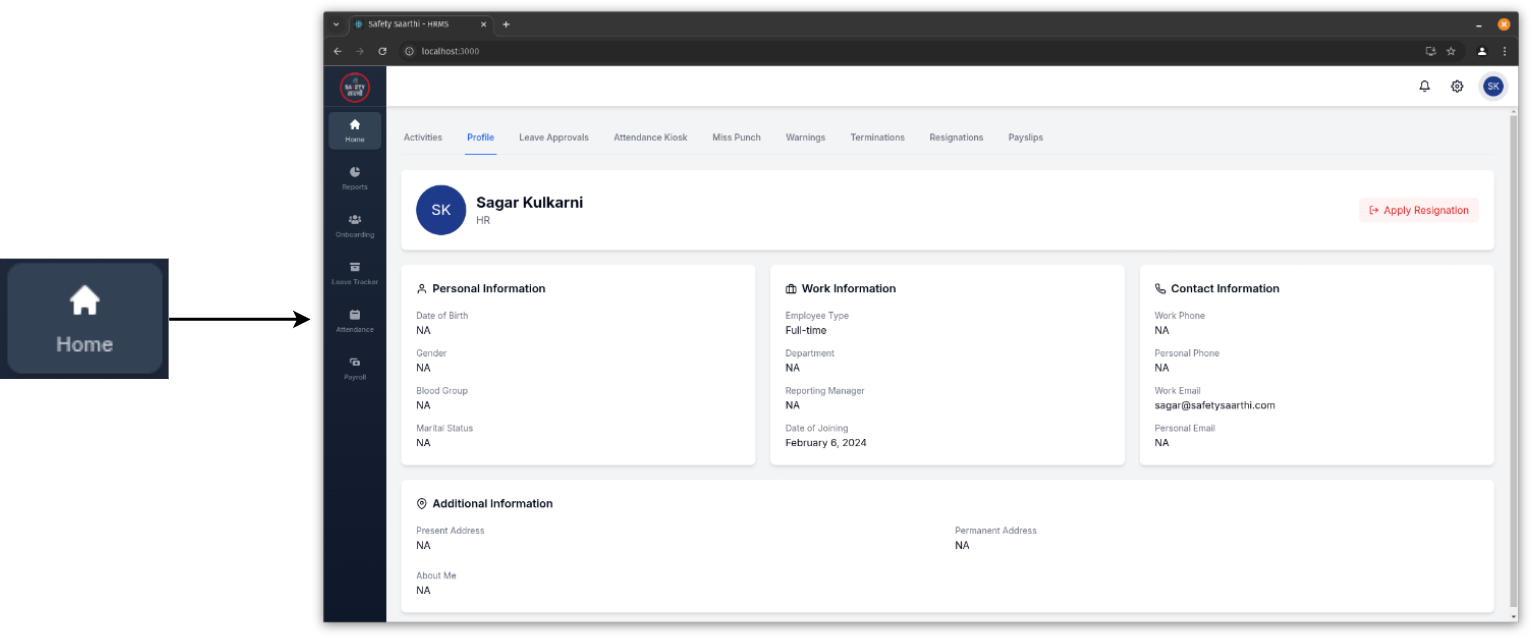
- From the home page, click on the 'Profile' button.
- View your personal information.
Onboarding
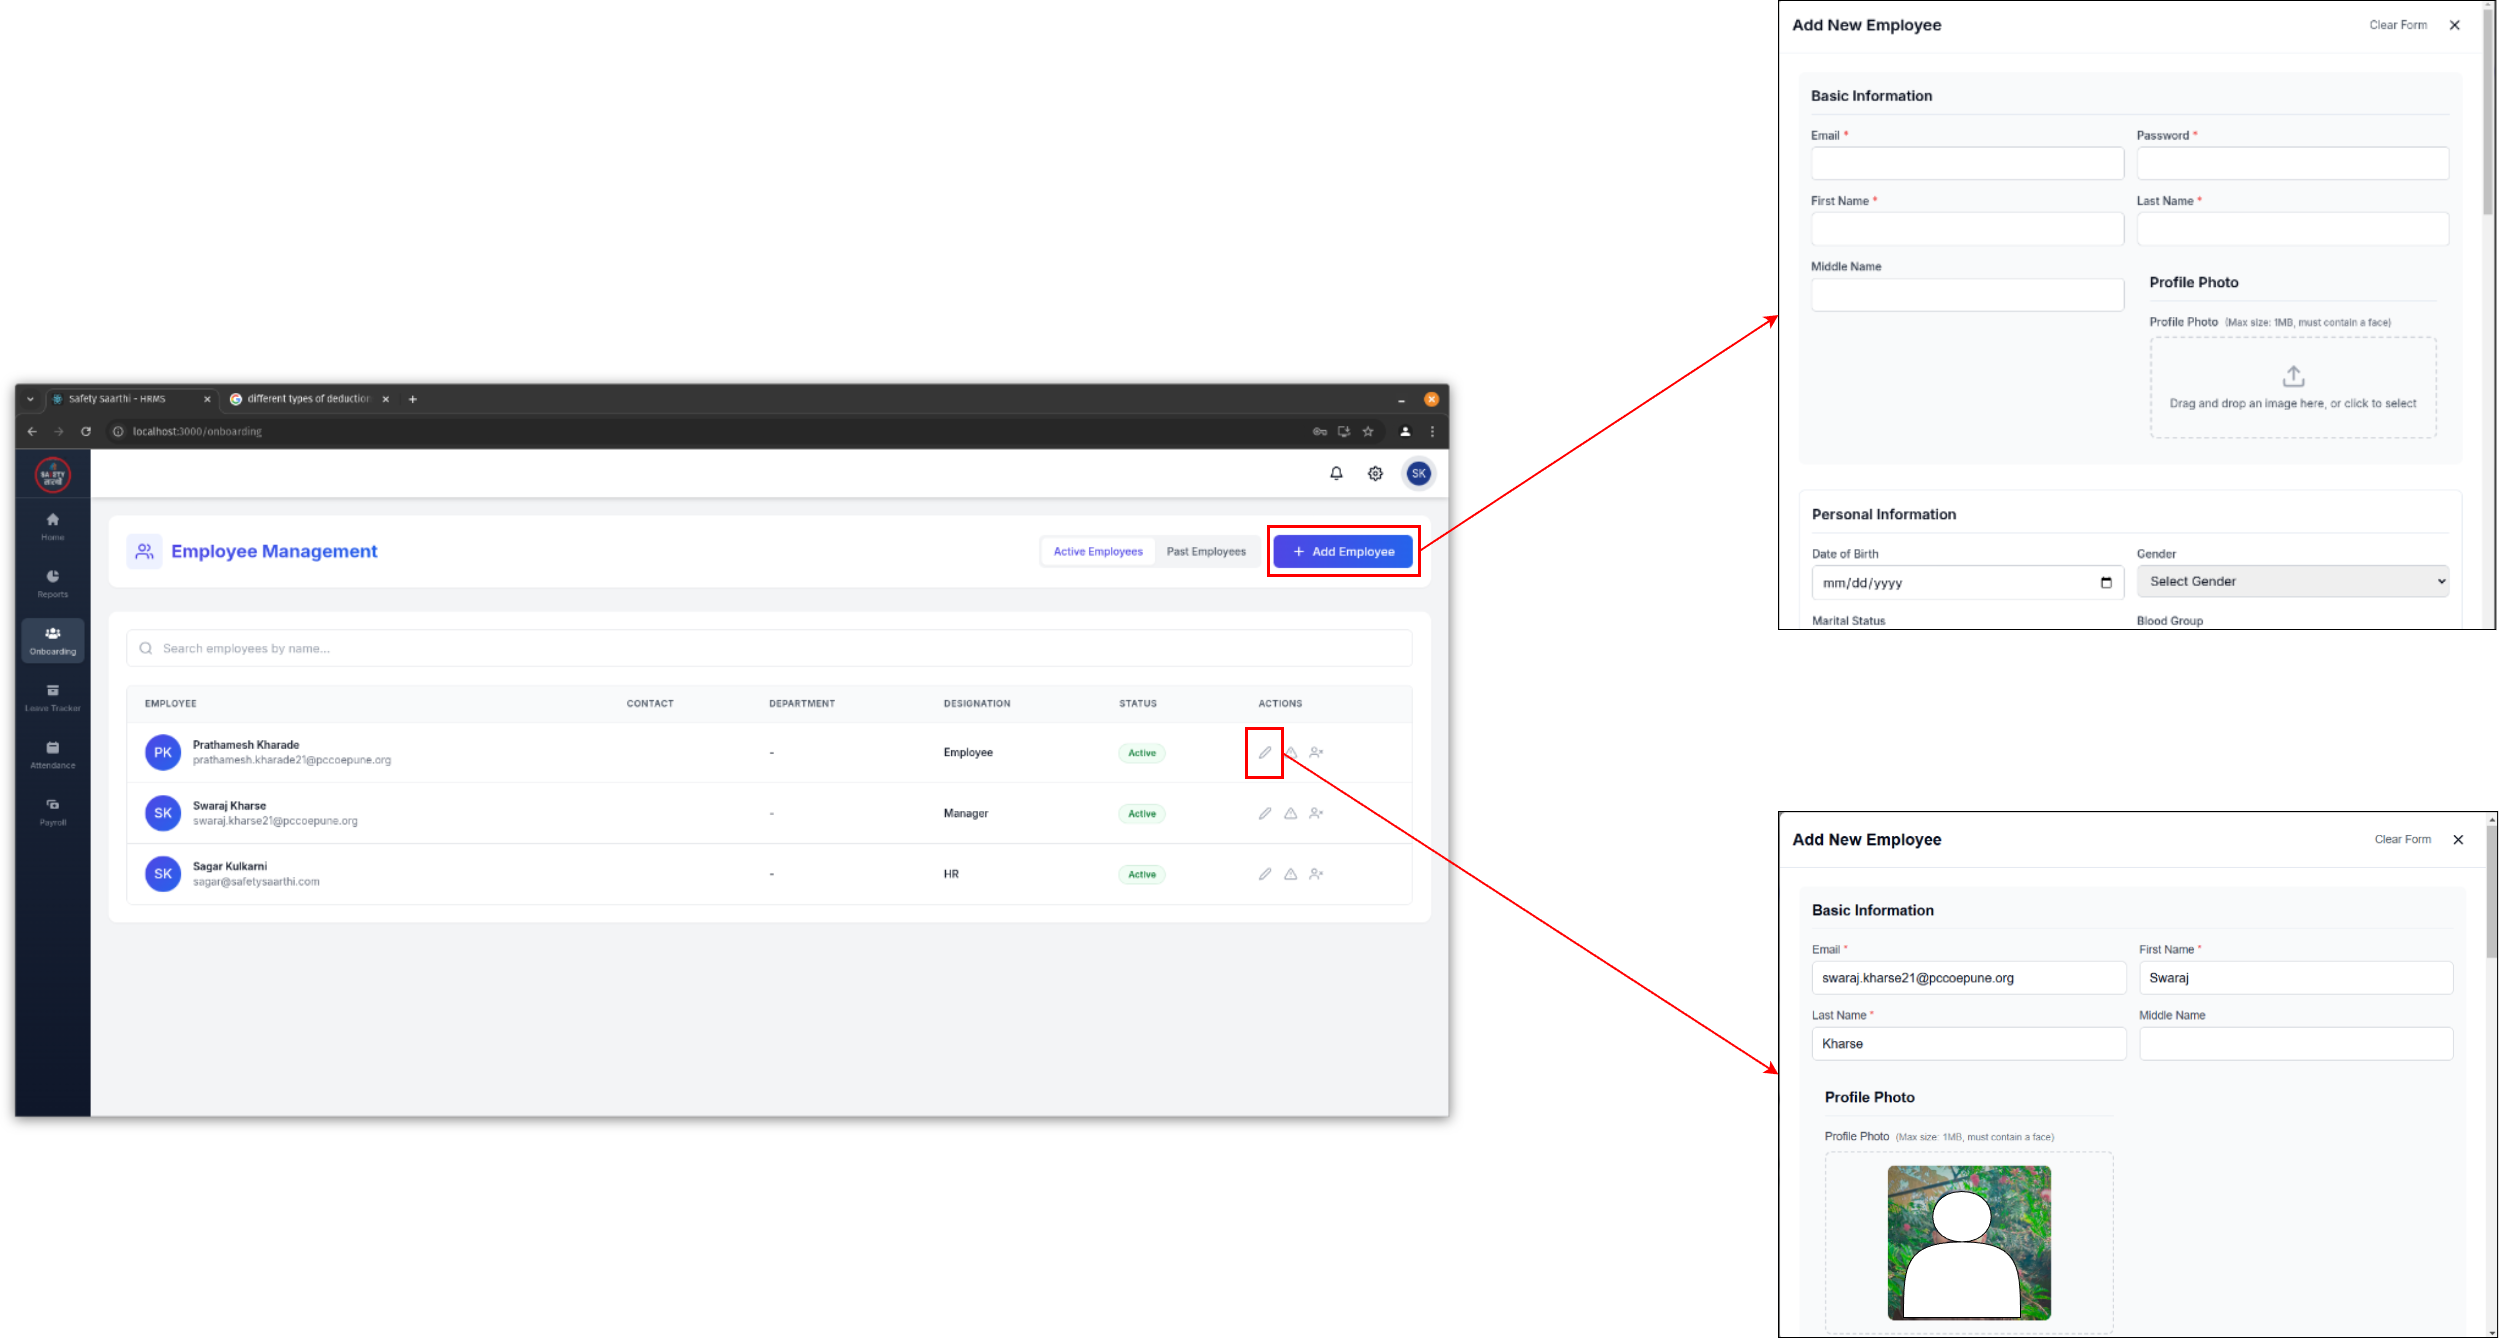
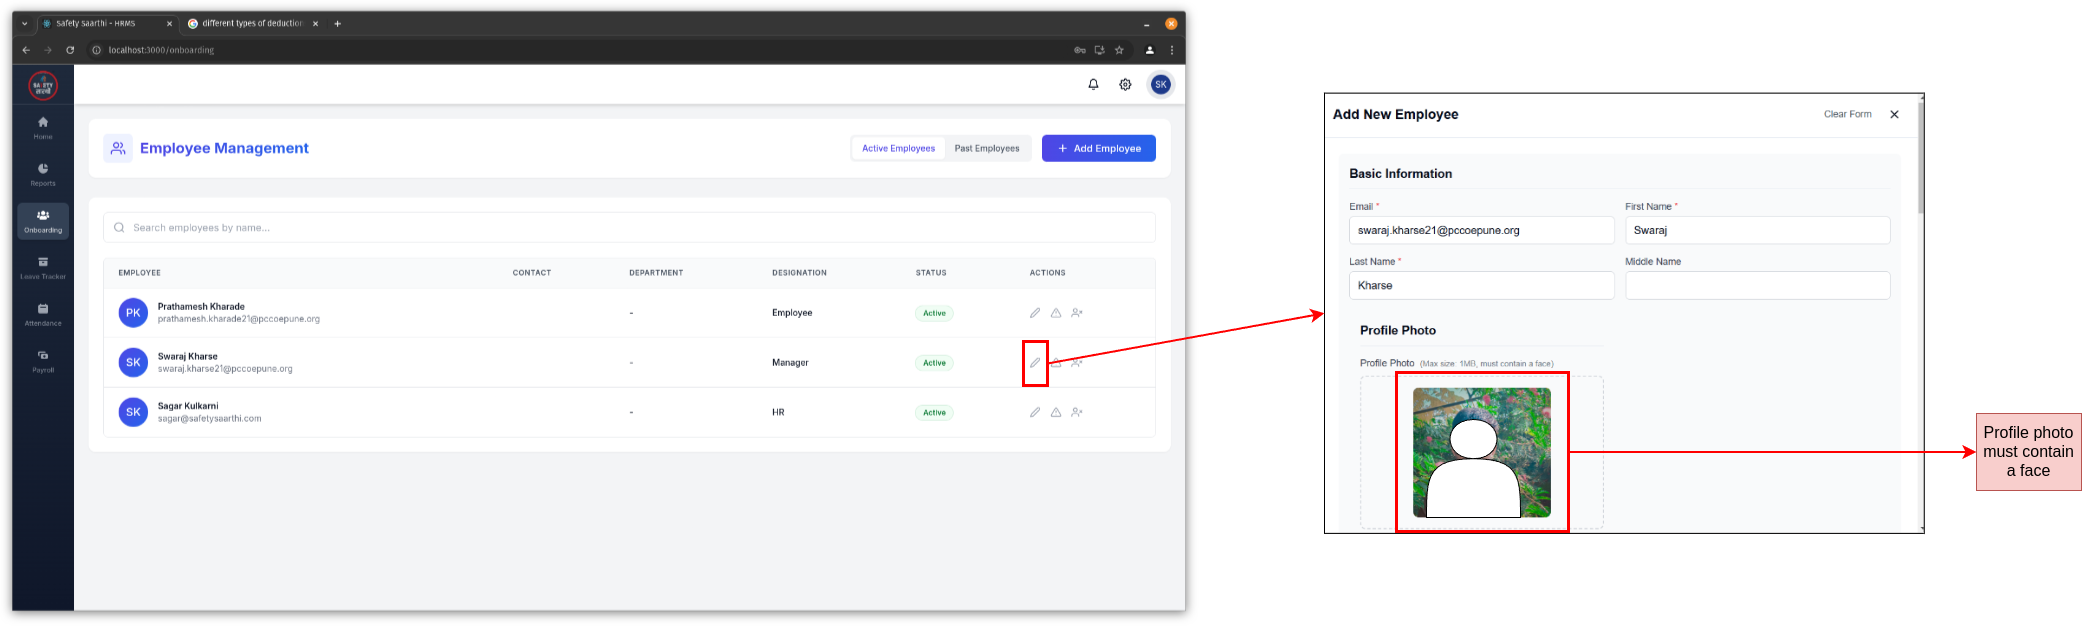
- Open the HRMS website and go to the 'Onboarding' tab on the sidebar.
- Use the functionalities to:
- Add a new employee.
- Edit an existing employee's details.
- The profile photo should be a maximum of 2 MB with the face clearly visible.
- A Face API is used to detect faces in the photo. If no face is detected, an error will occur.
- To maintain image quality, you can compress the image by sending it via WhatsApp and saving it again.
Warnings
-
Settings
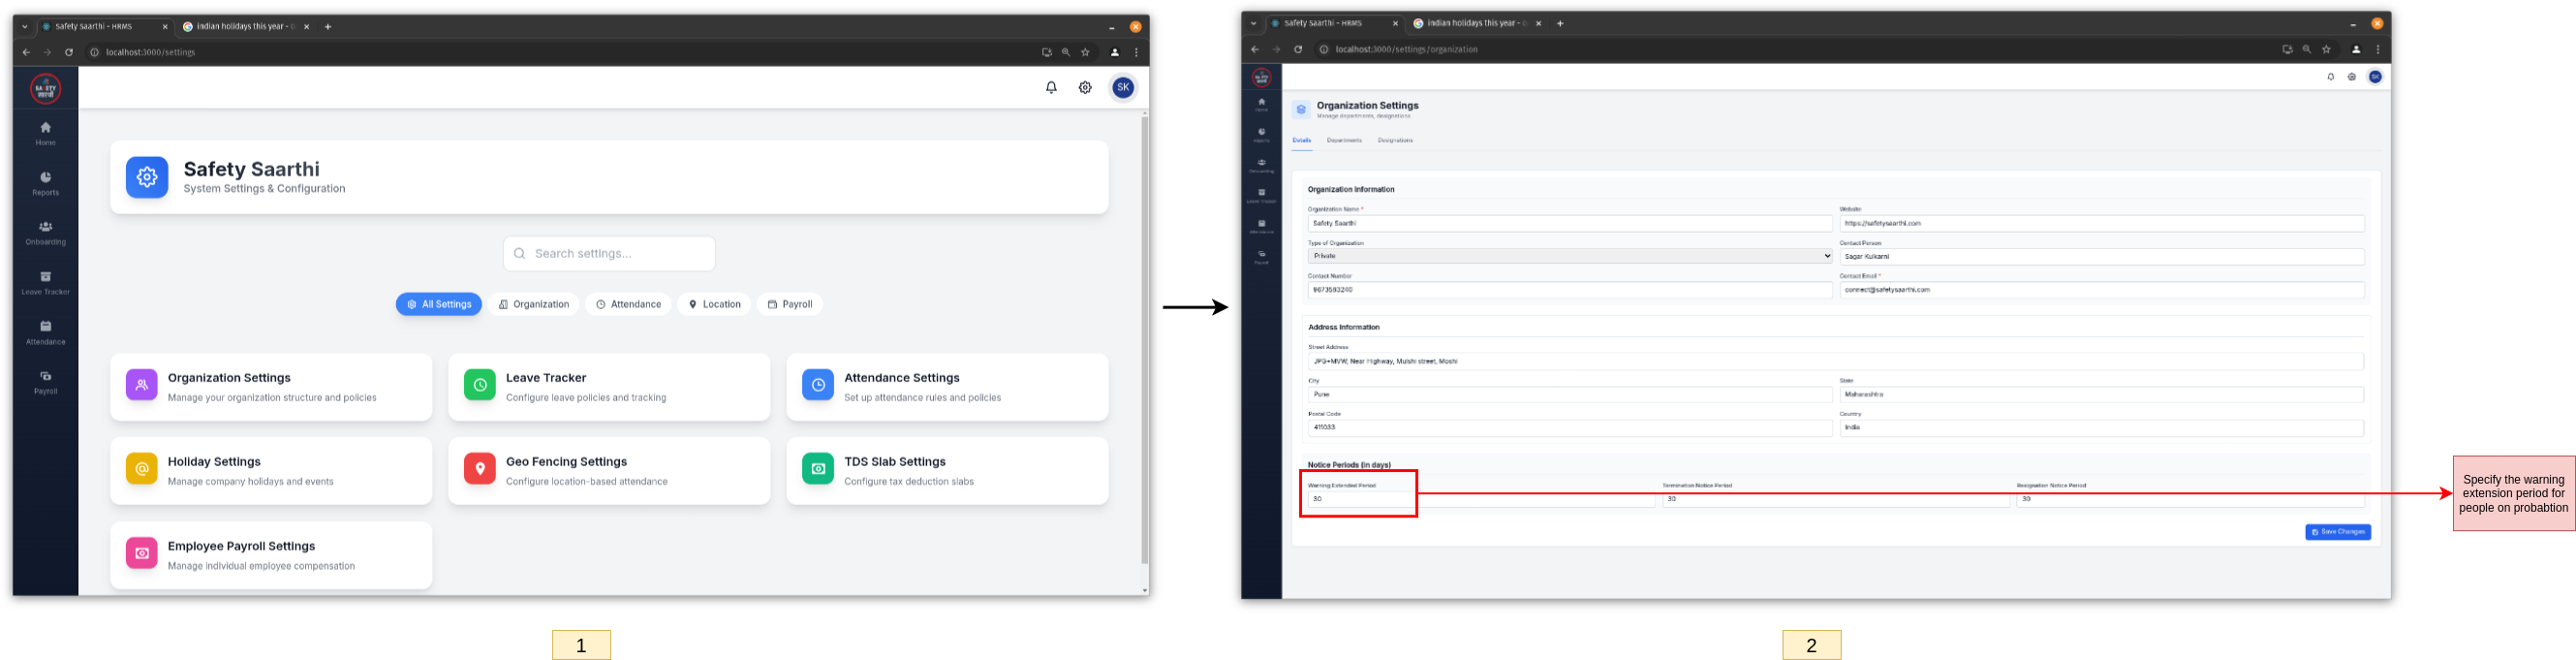
Open the settings page and click on 'Organization Settings'. Set the warning extended period (in days).
-
Issue Warning (HR)
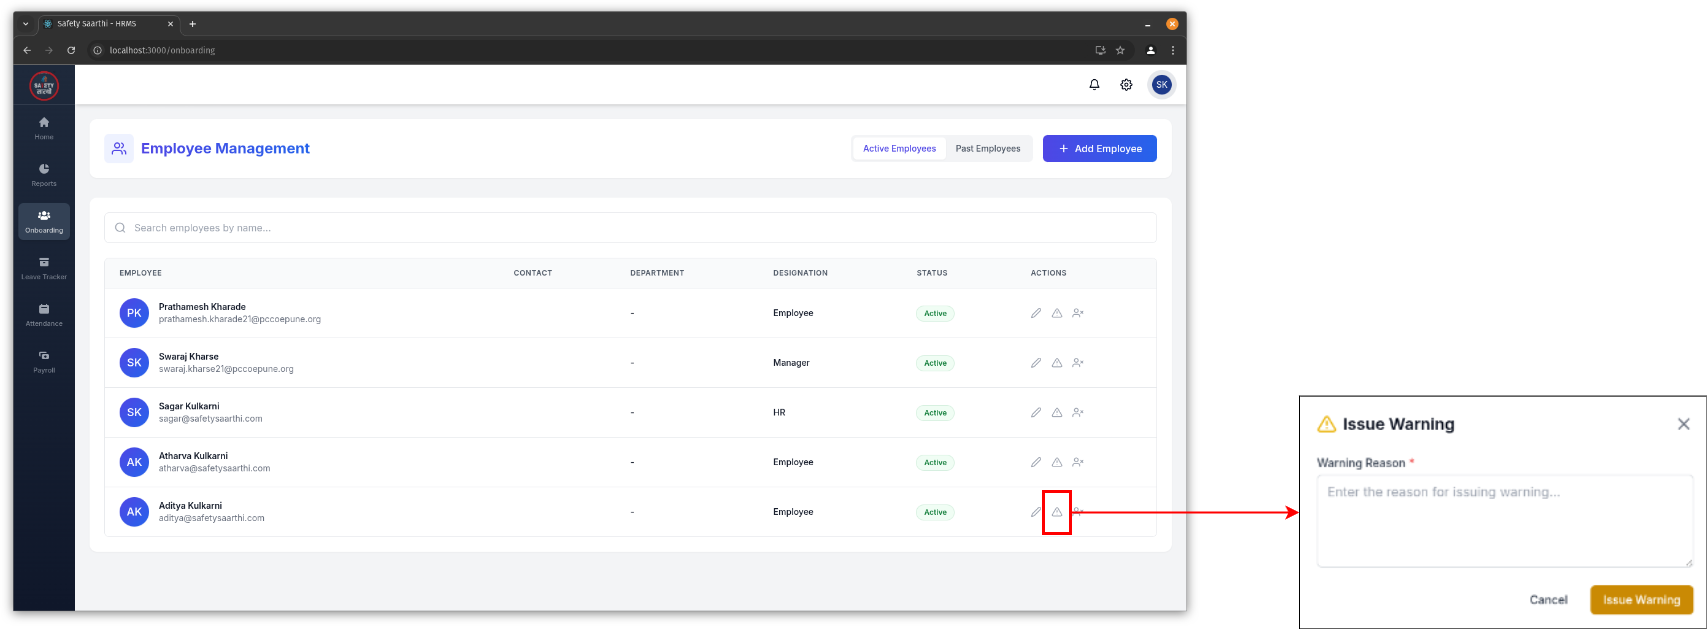
Go to 'Onboarding' tab on the sidebar. Click on the warning icon to issue a warning to an employee.
-
View warnings for individual employee (HR)
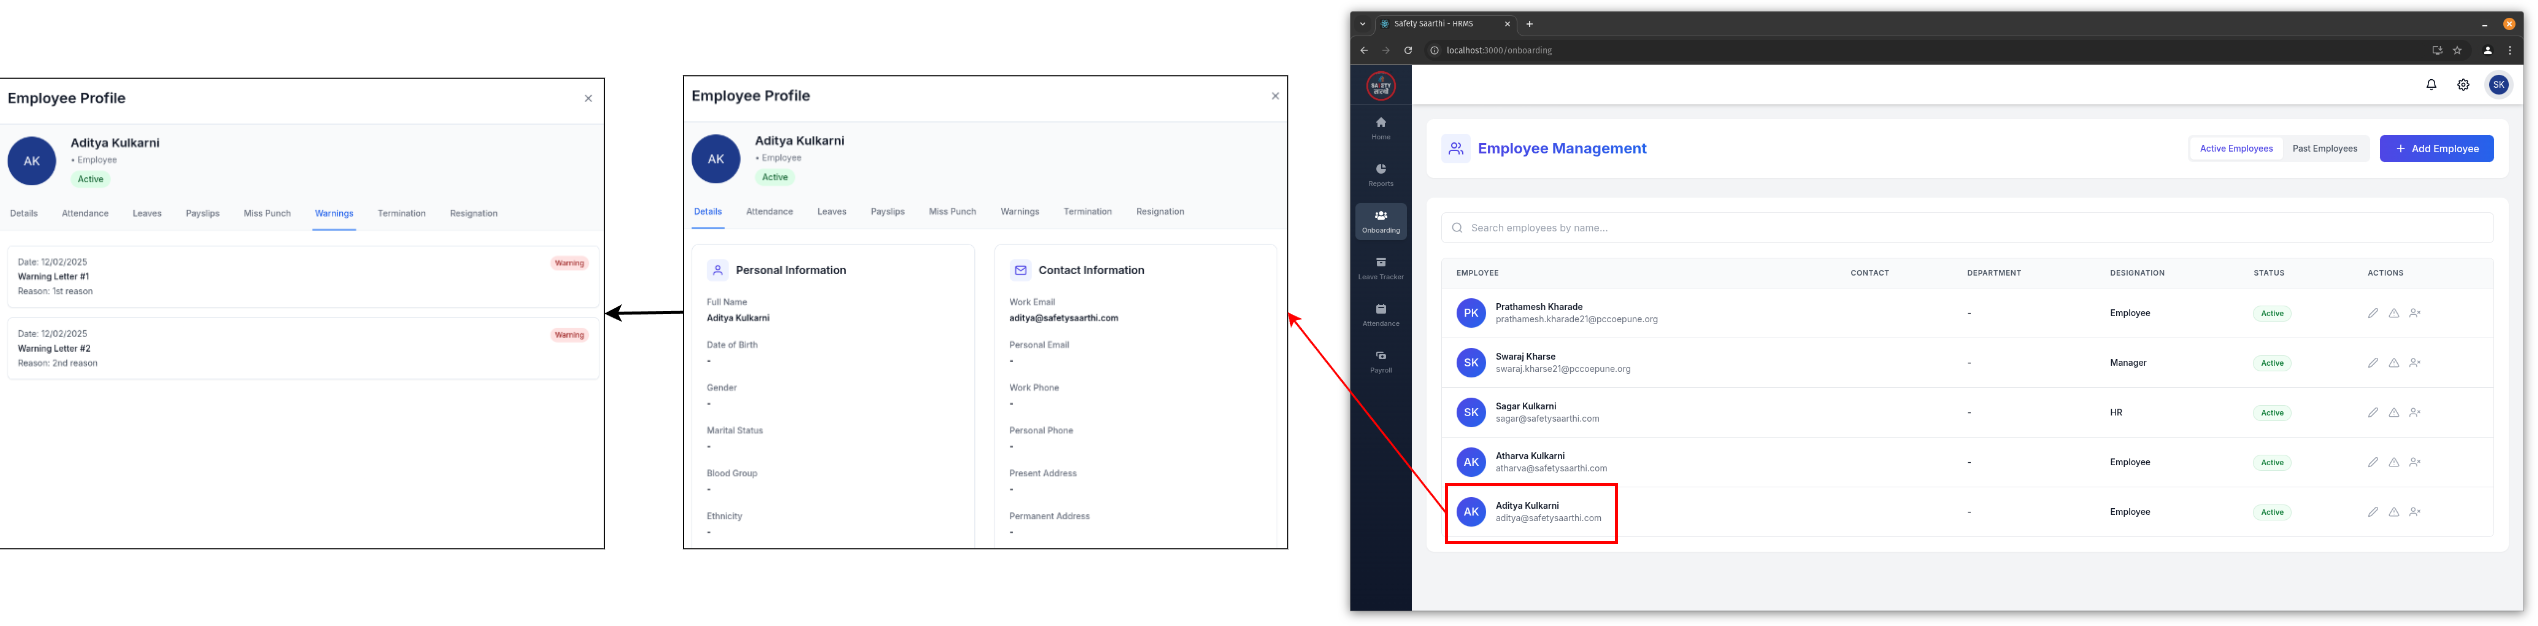
Go to 'Onboarding' tab on the sidebar. Select the employee and go to 'Warnings' to view their warnings.
-
View warnings for all employees (HR)
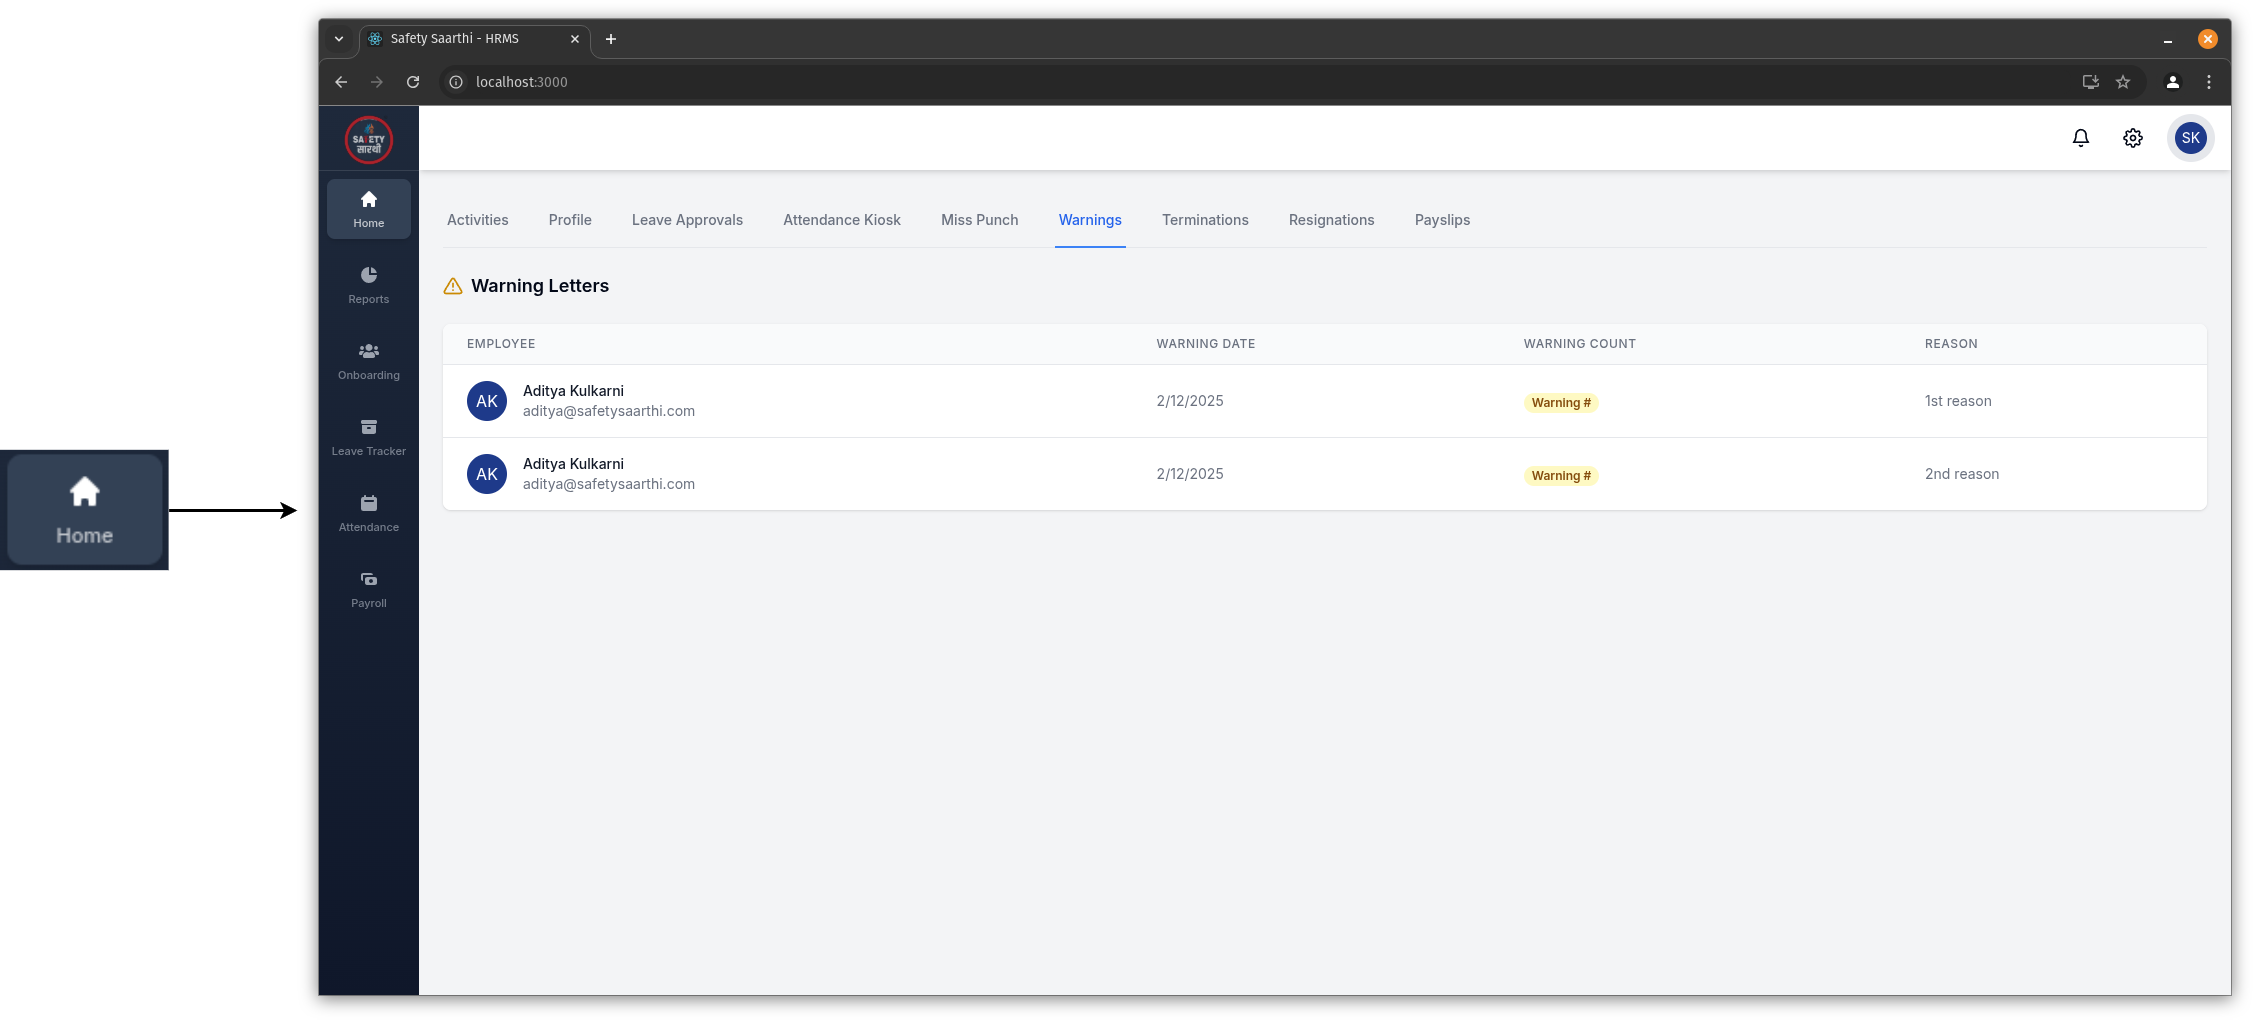
Go to 'Home' tab on the sidebar. Click on 'Warnings' to view all warnings issued.
-
After 3 warnings
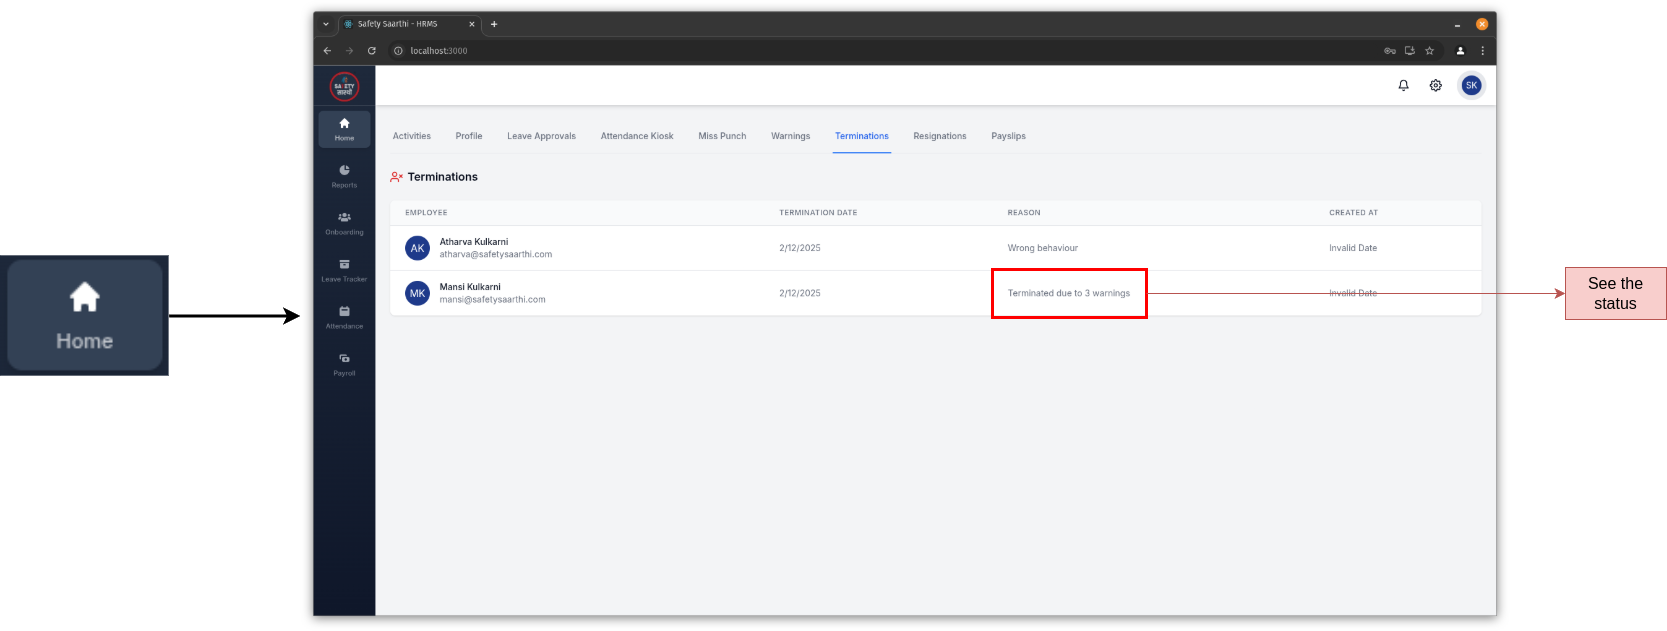
Go to 'Home' tab on the sidebar. Click on 'Terminations'. Employees with 3 warnings will have their status changed to 'Terminated due to 3 warnings'.
-
View warnings for individual employee (Employee)

Go to 'Home' tab on the sidebar. Visit the 'Profile' tab to view your warnings.
Termination
-
Settings

Open the settings page and click on 'Organization Settings'. Set the termination notice period (in days).
-
Termination (HR)
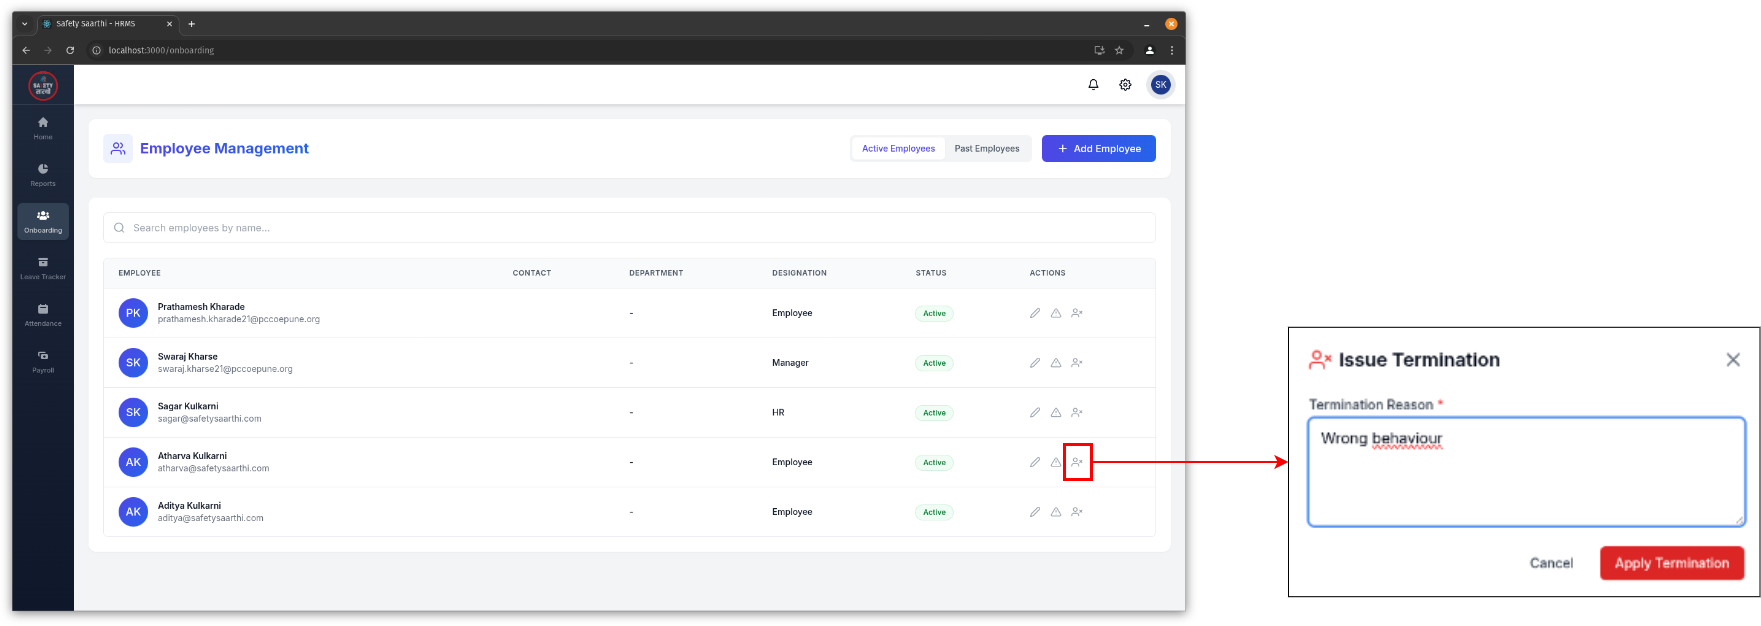
Go to 'Onboarding' tab on the sidebar. Click on the terminate icon to issue a termination.
-
View termination status of individual employee (HR)
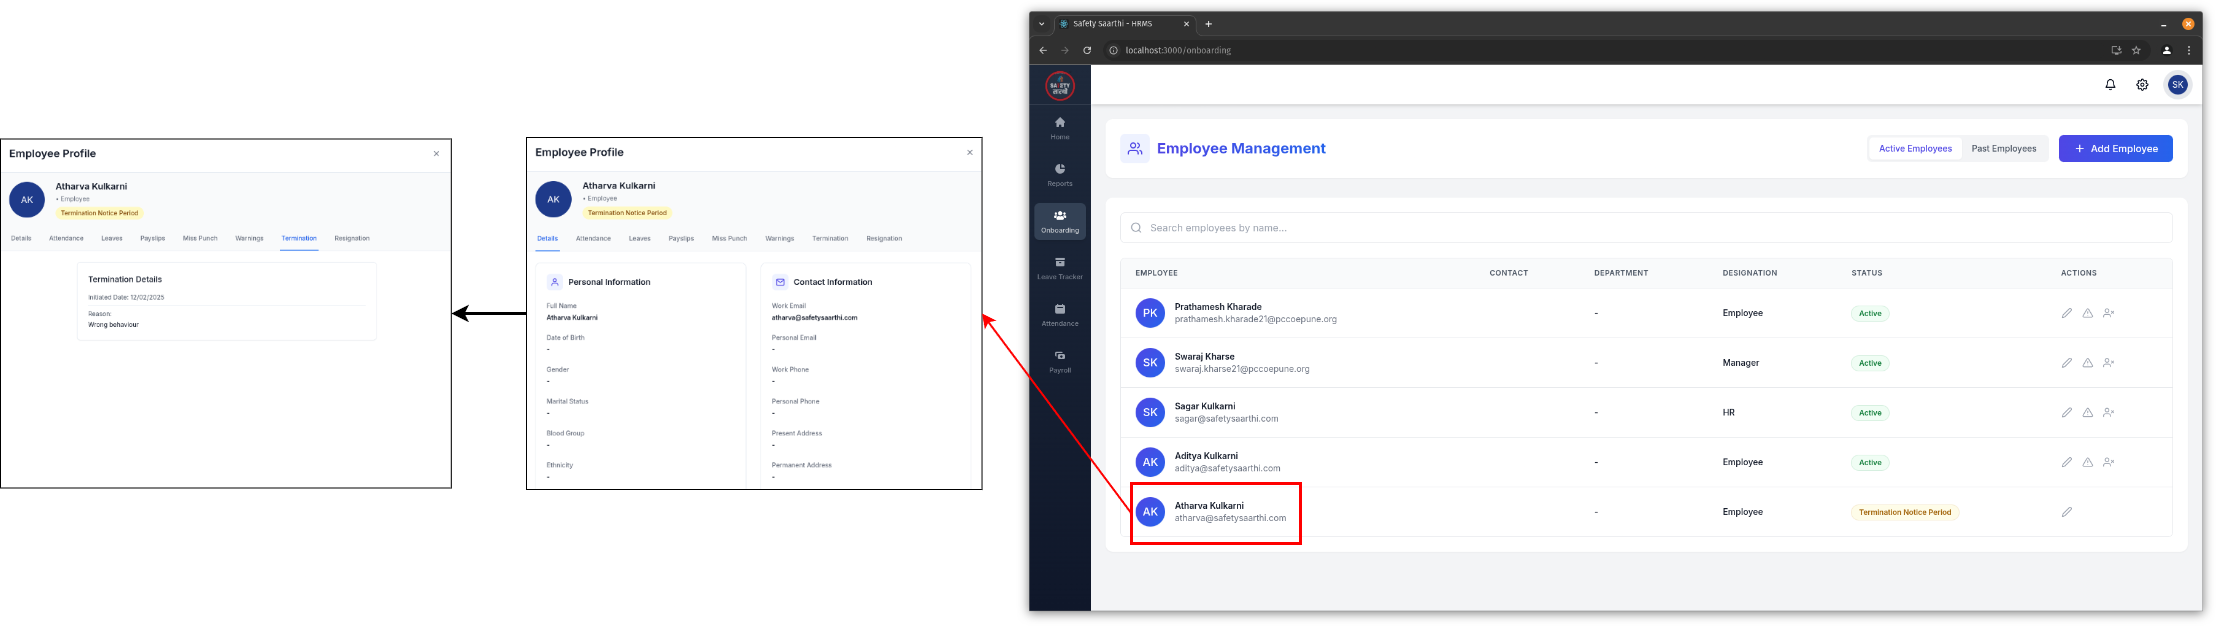
Go to 'Onboarding' tab on the sidebar. Select the employee and go to 'Terminations' to view their termination status.
-
View all terminated employees (HR)
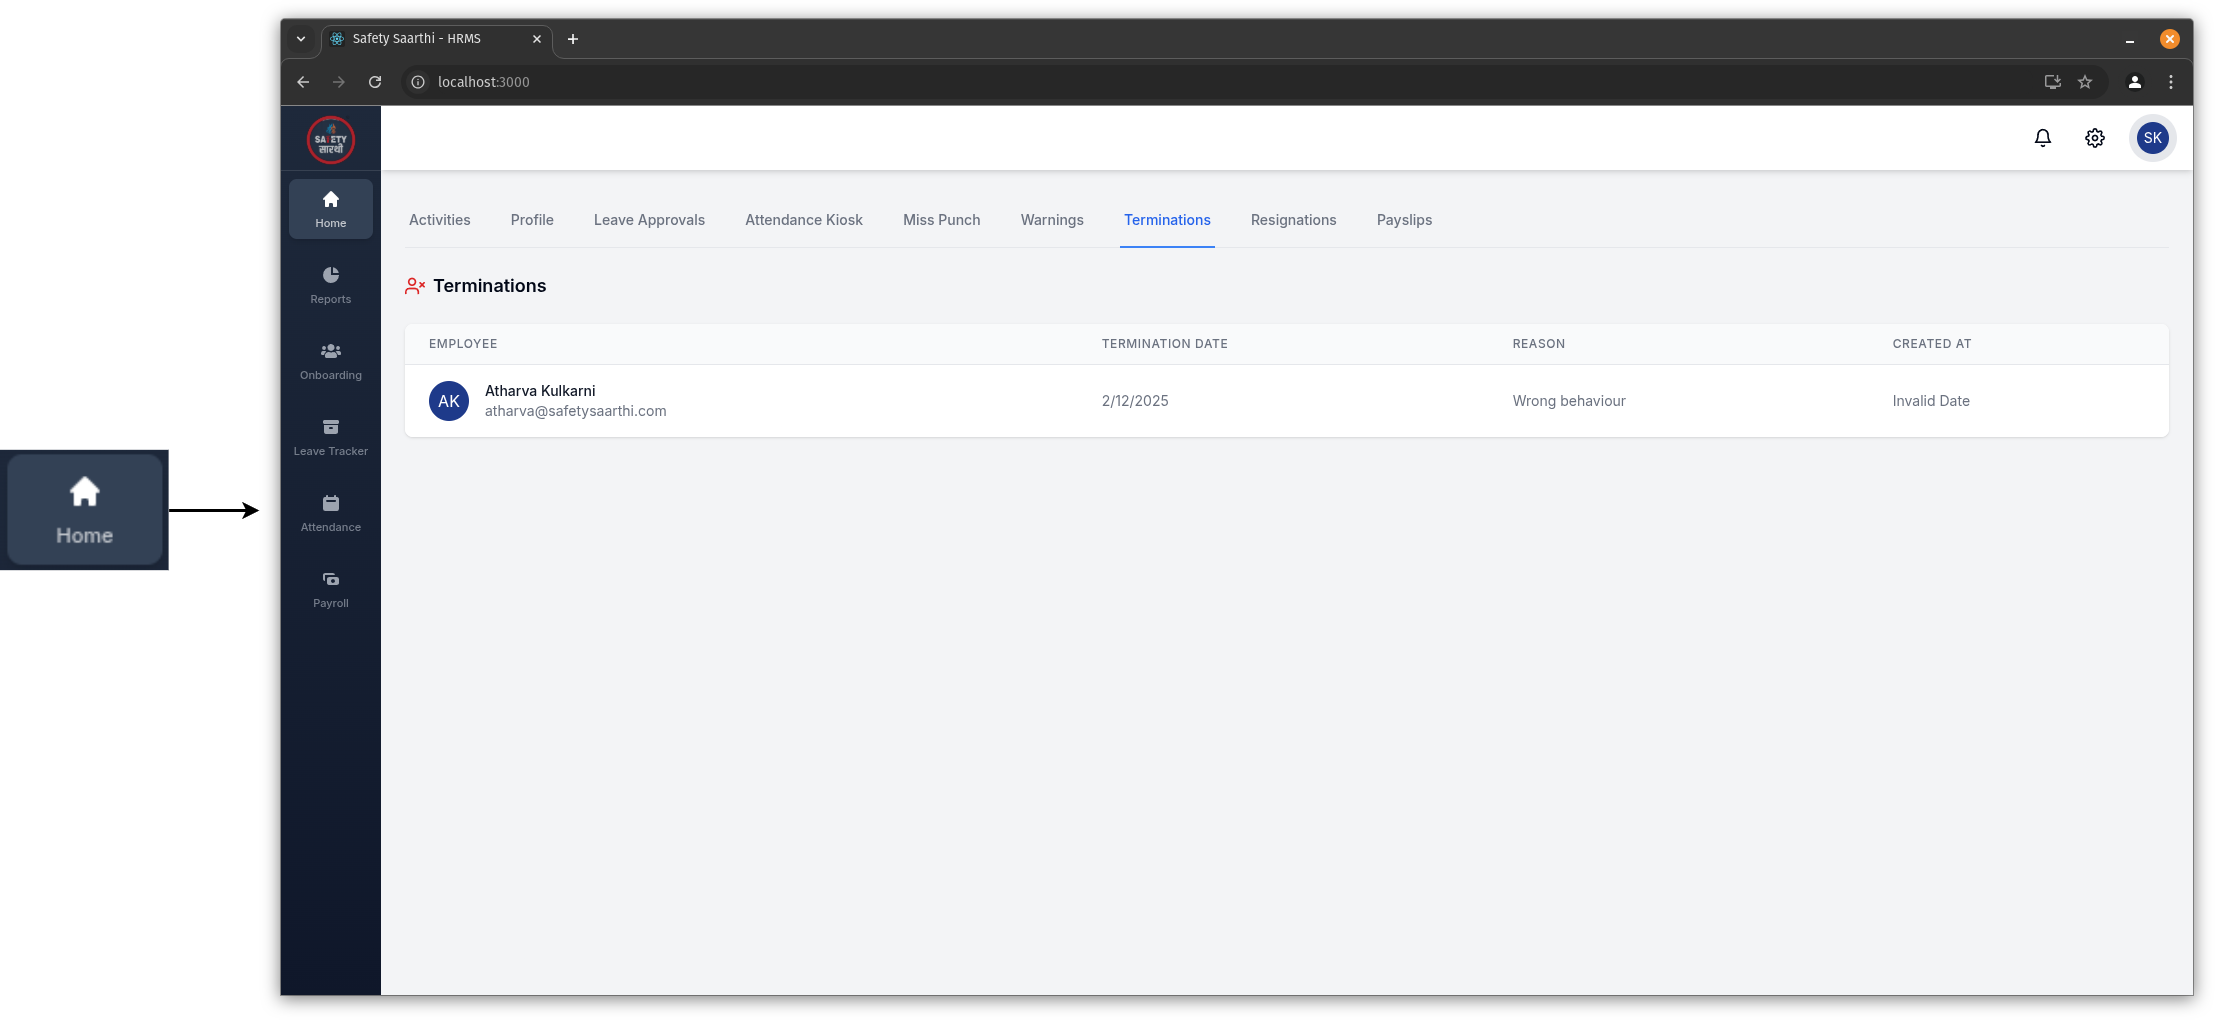
Go to 'Home' tab on the sidebar. Click on 'Terminations' to view all terminated employees.
-
View termination status of individual employee (Employee)
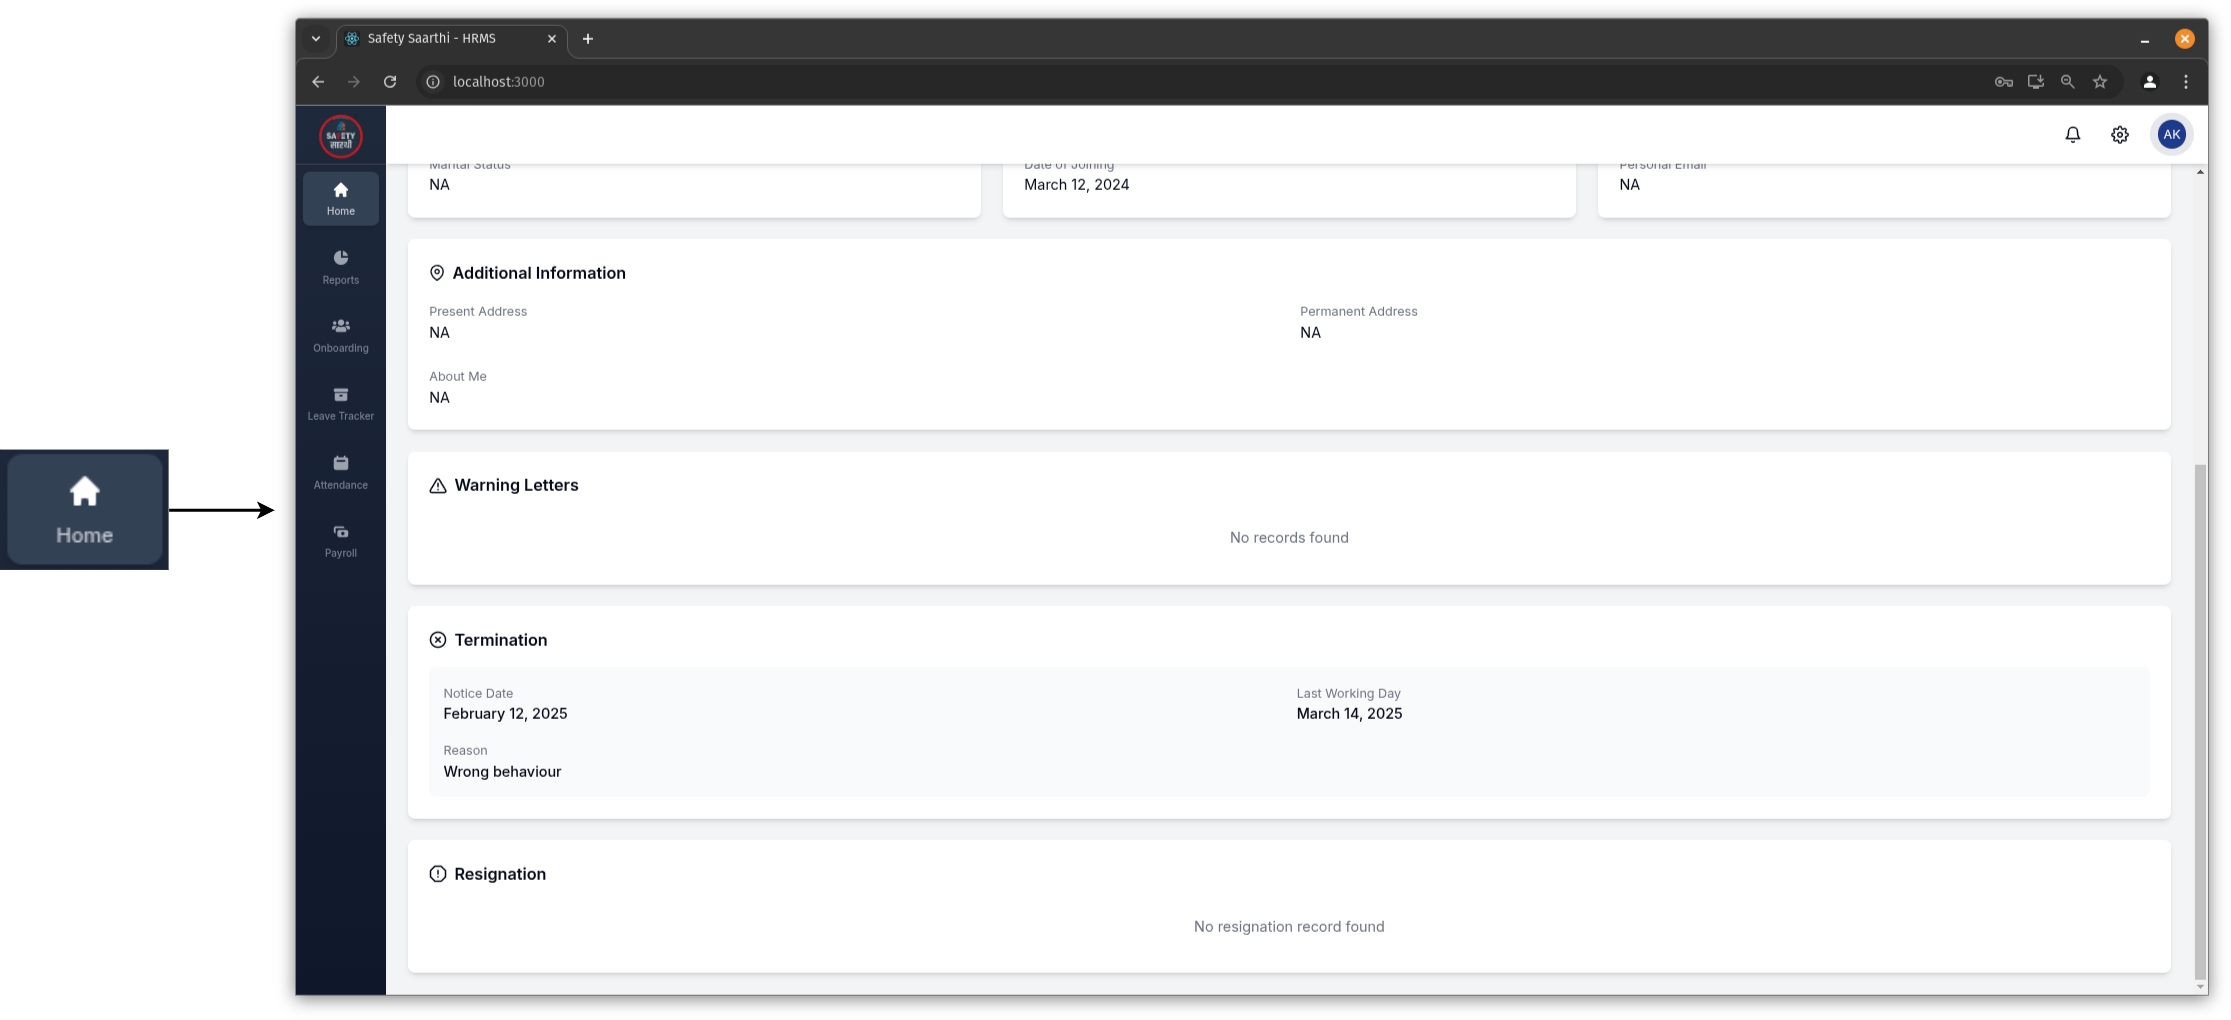
Go to 'Home' tab on the sidebar. Visit the 'Profile' tab to view termination status.
-
After notice period ends (HR)
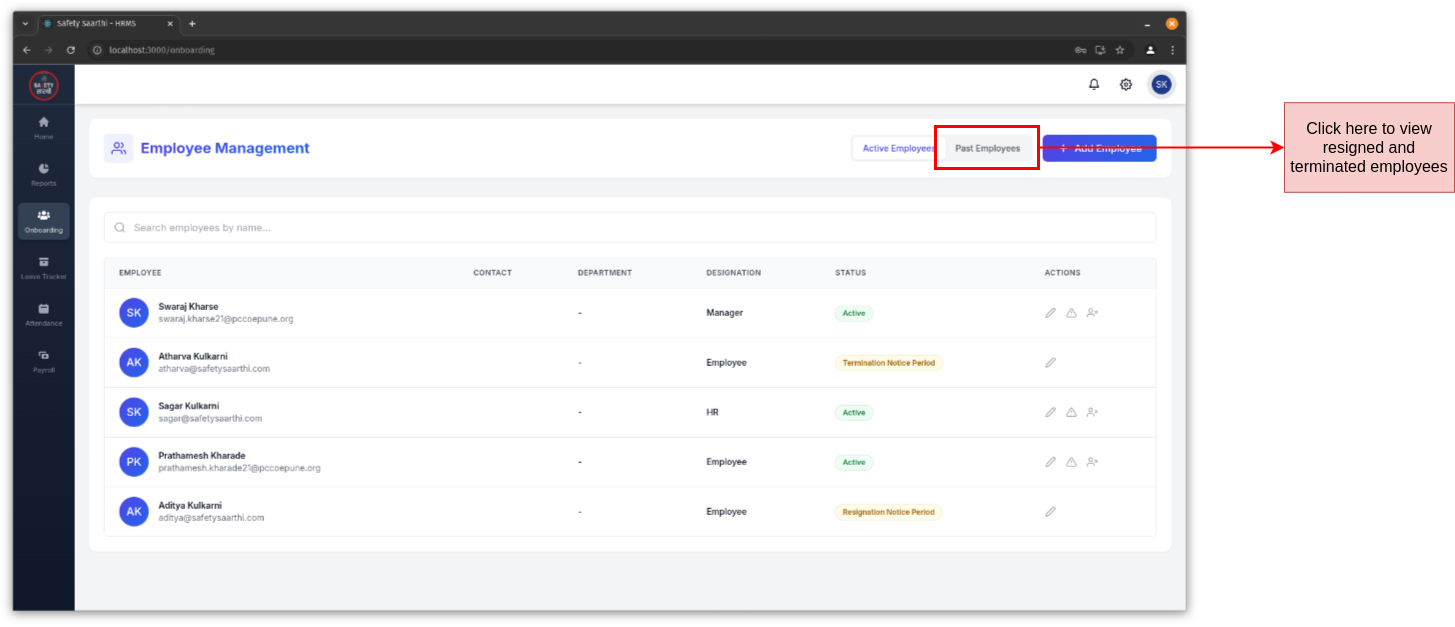
Go to 'Onboarding' tab on the sidebar. Click on 'Past Employees' to view employees whose notice period has ended.
Resignation
-
Settings
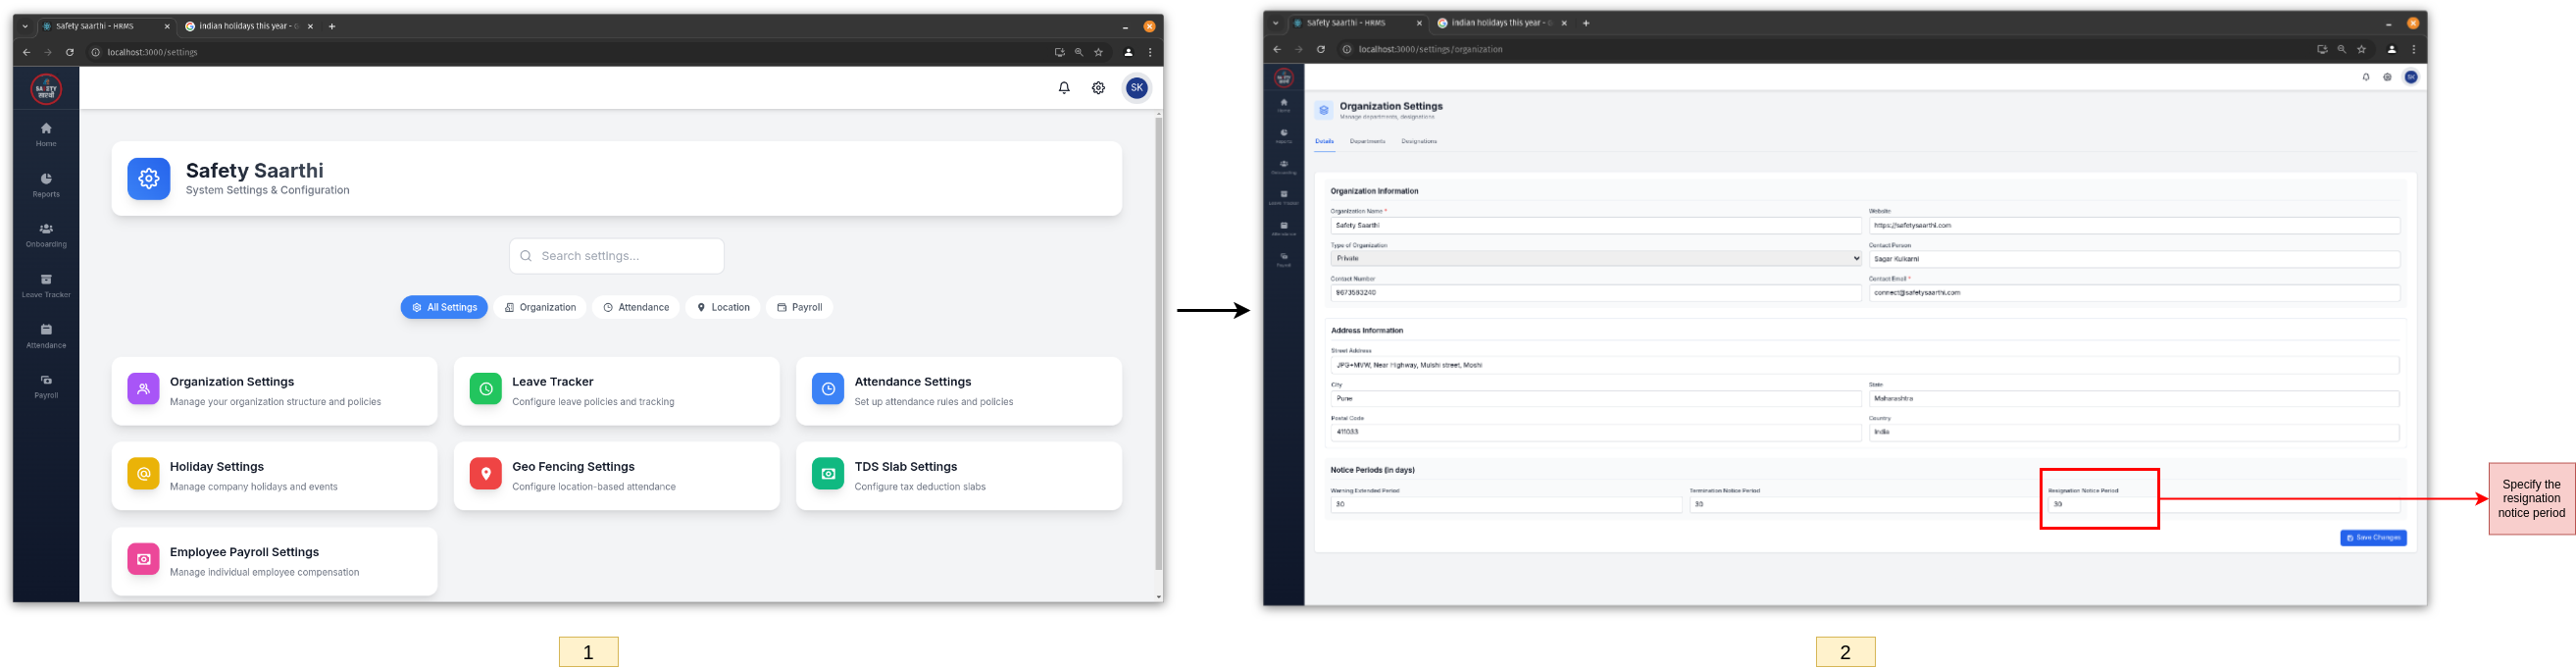
Open the settings page and click on 'Organization Settings'. Set the resignation notice period (in days).
-
Apply for resignation (Employee)
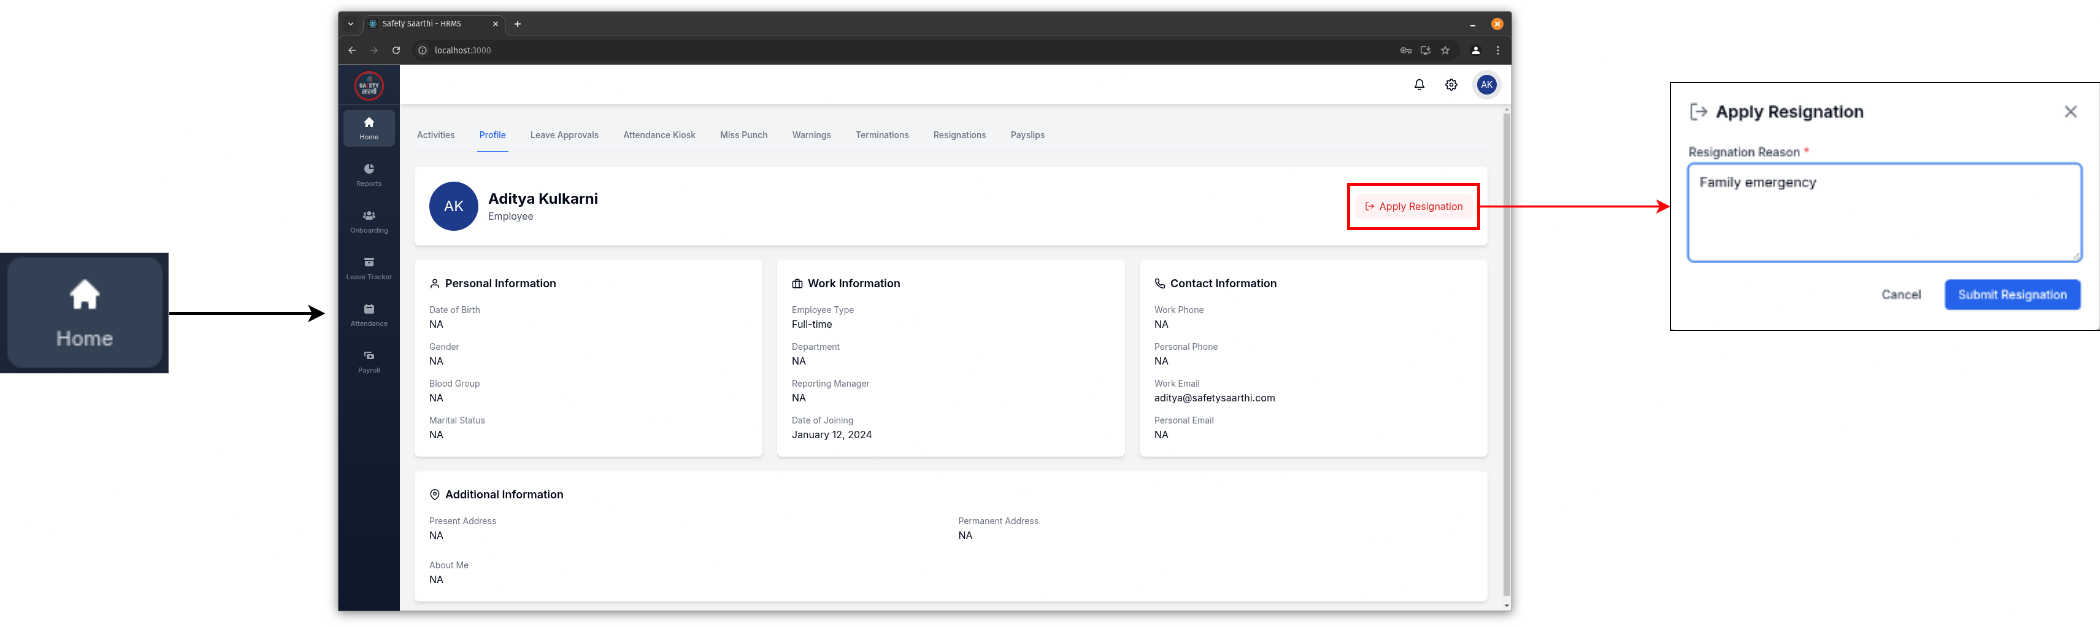
Go to 'Home' tab on the sidebar. Visit the 'Profile' tab and click on 'Apply Resignation'.
-
Review the resignation request (HR)
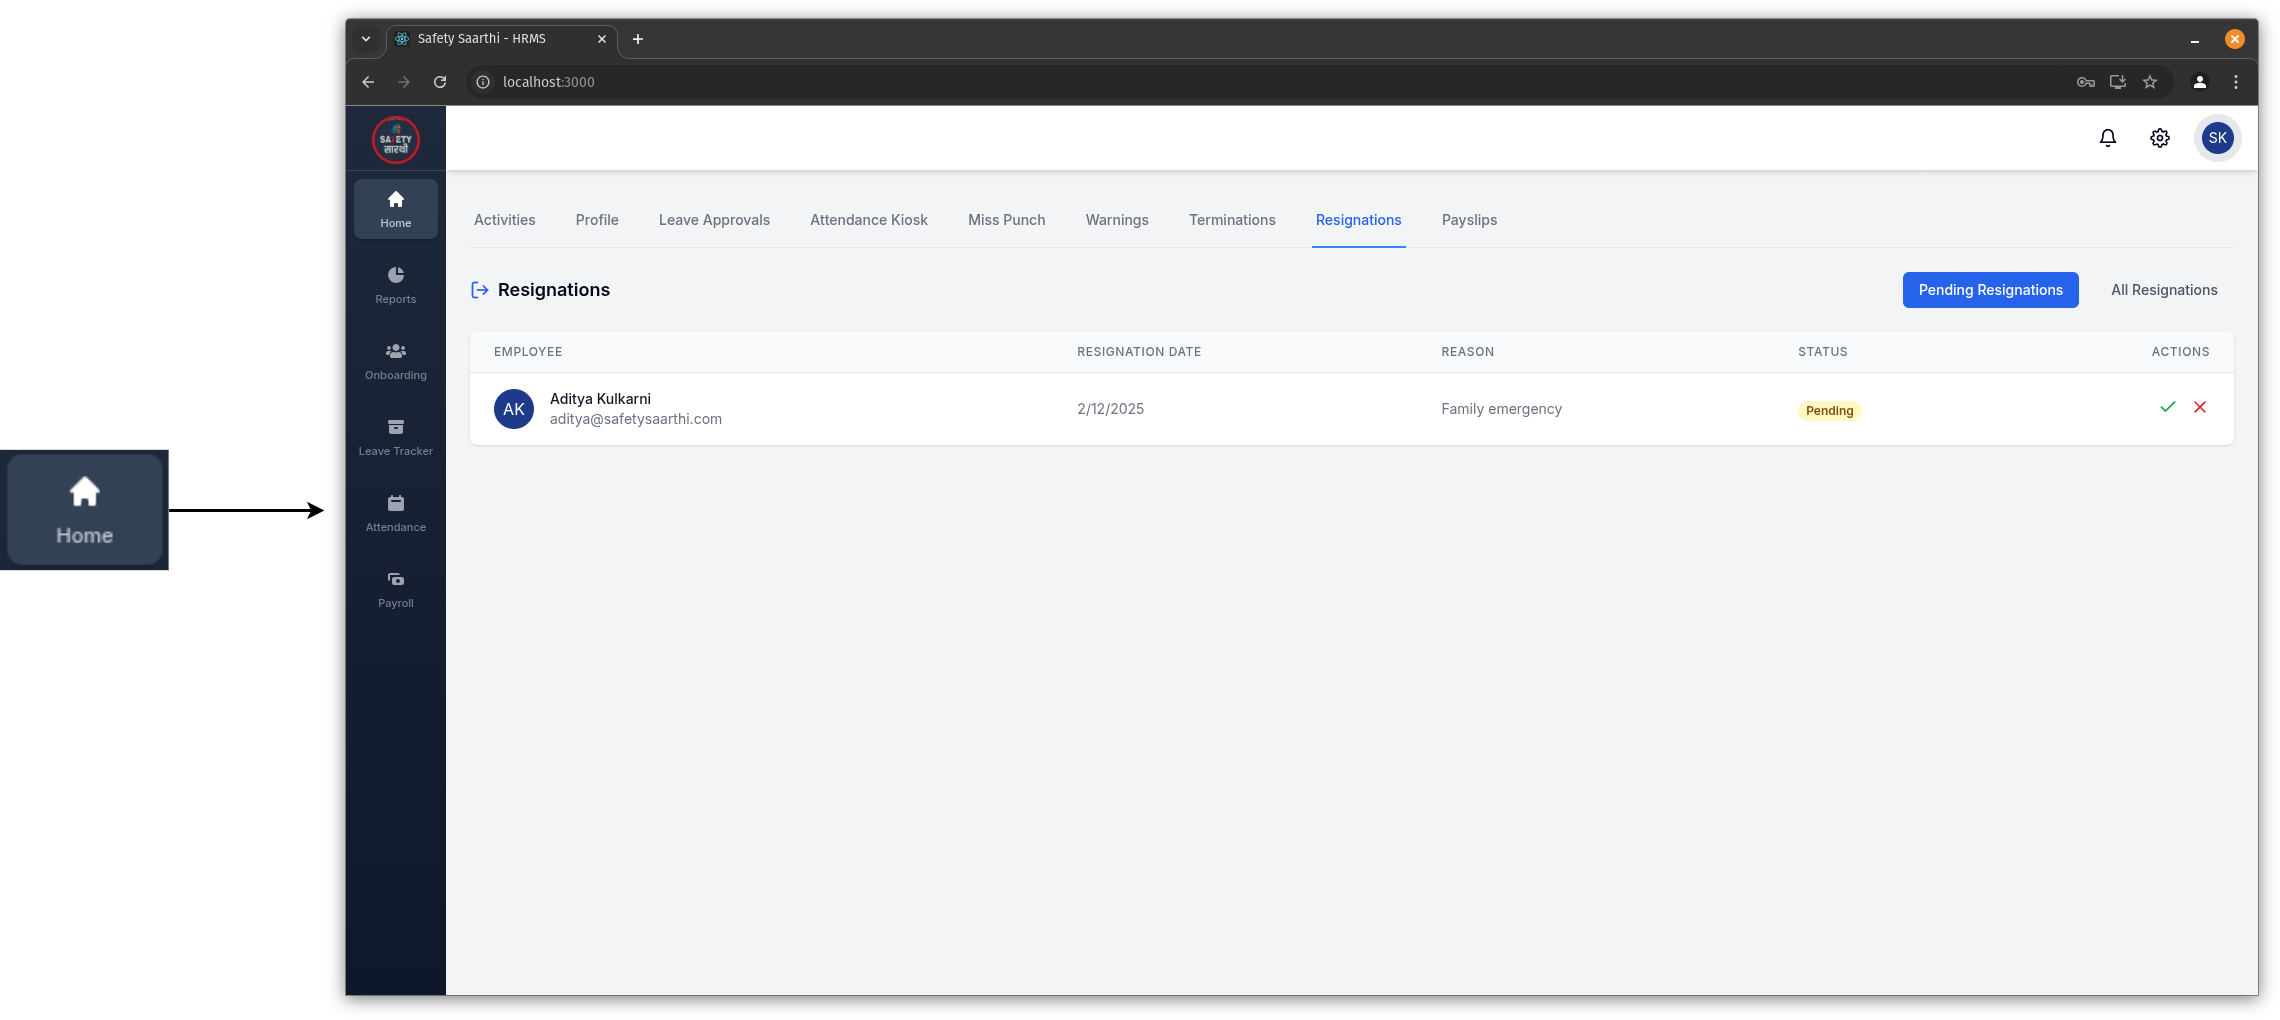
Go to 'Home' tab on the sidebar. Click on 'Resignations' to view a list of pending resignation requests. Accept or reject the request.
-
View resignation status of individual employee (HR)
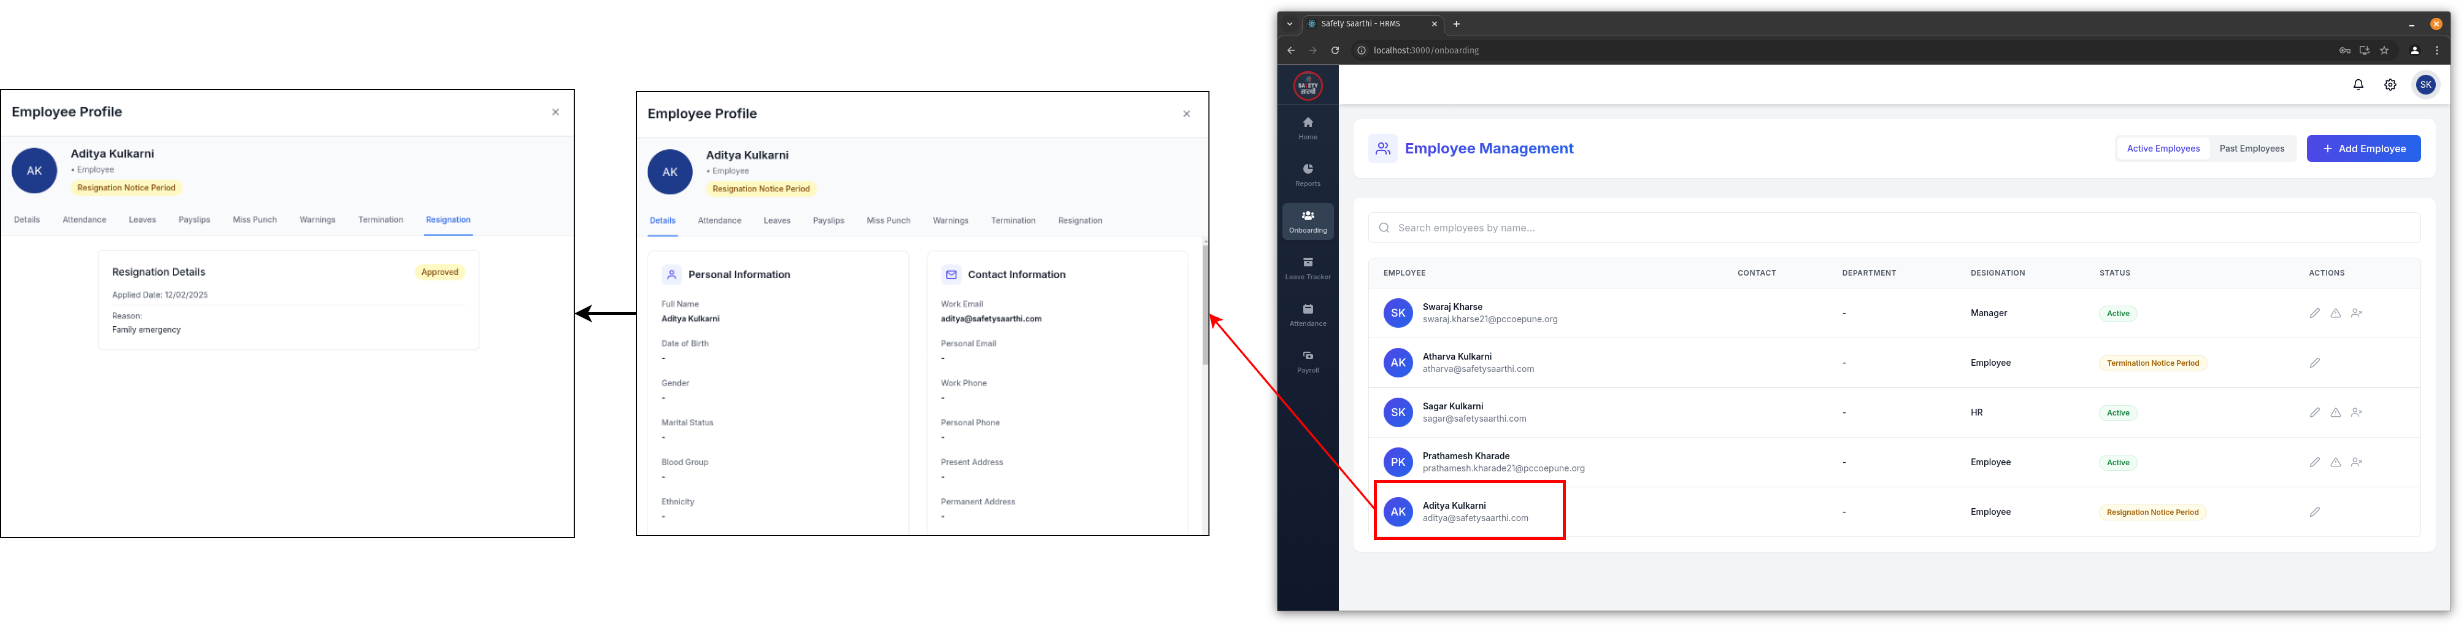
Go to 'Onboarding' tab on the sidebar. Select the employee and go to 'Resignation' to view their resignation status.
-
View resignation status of individual employee (Employee)
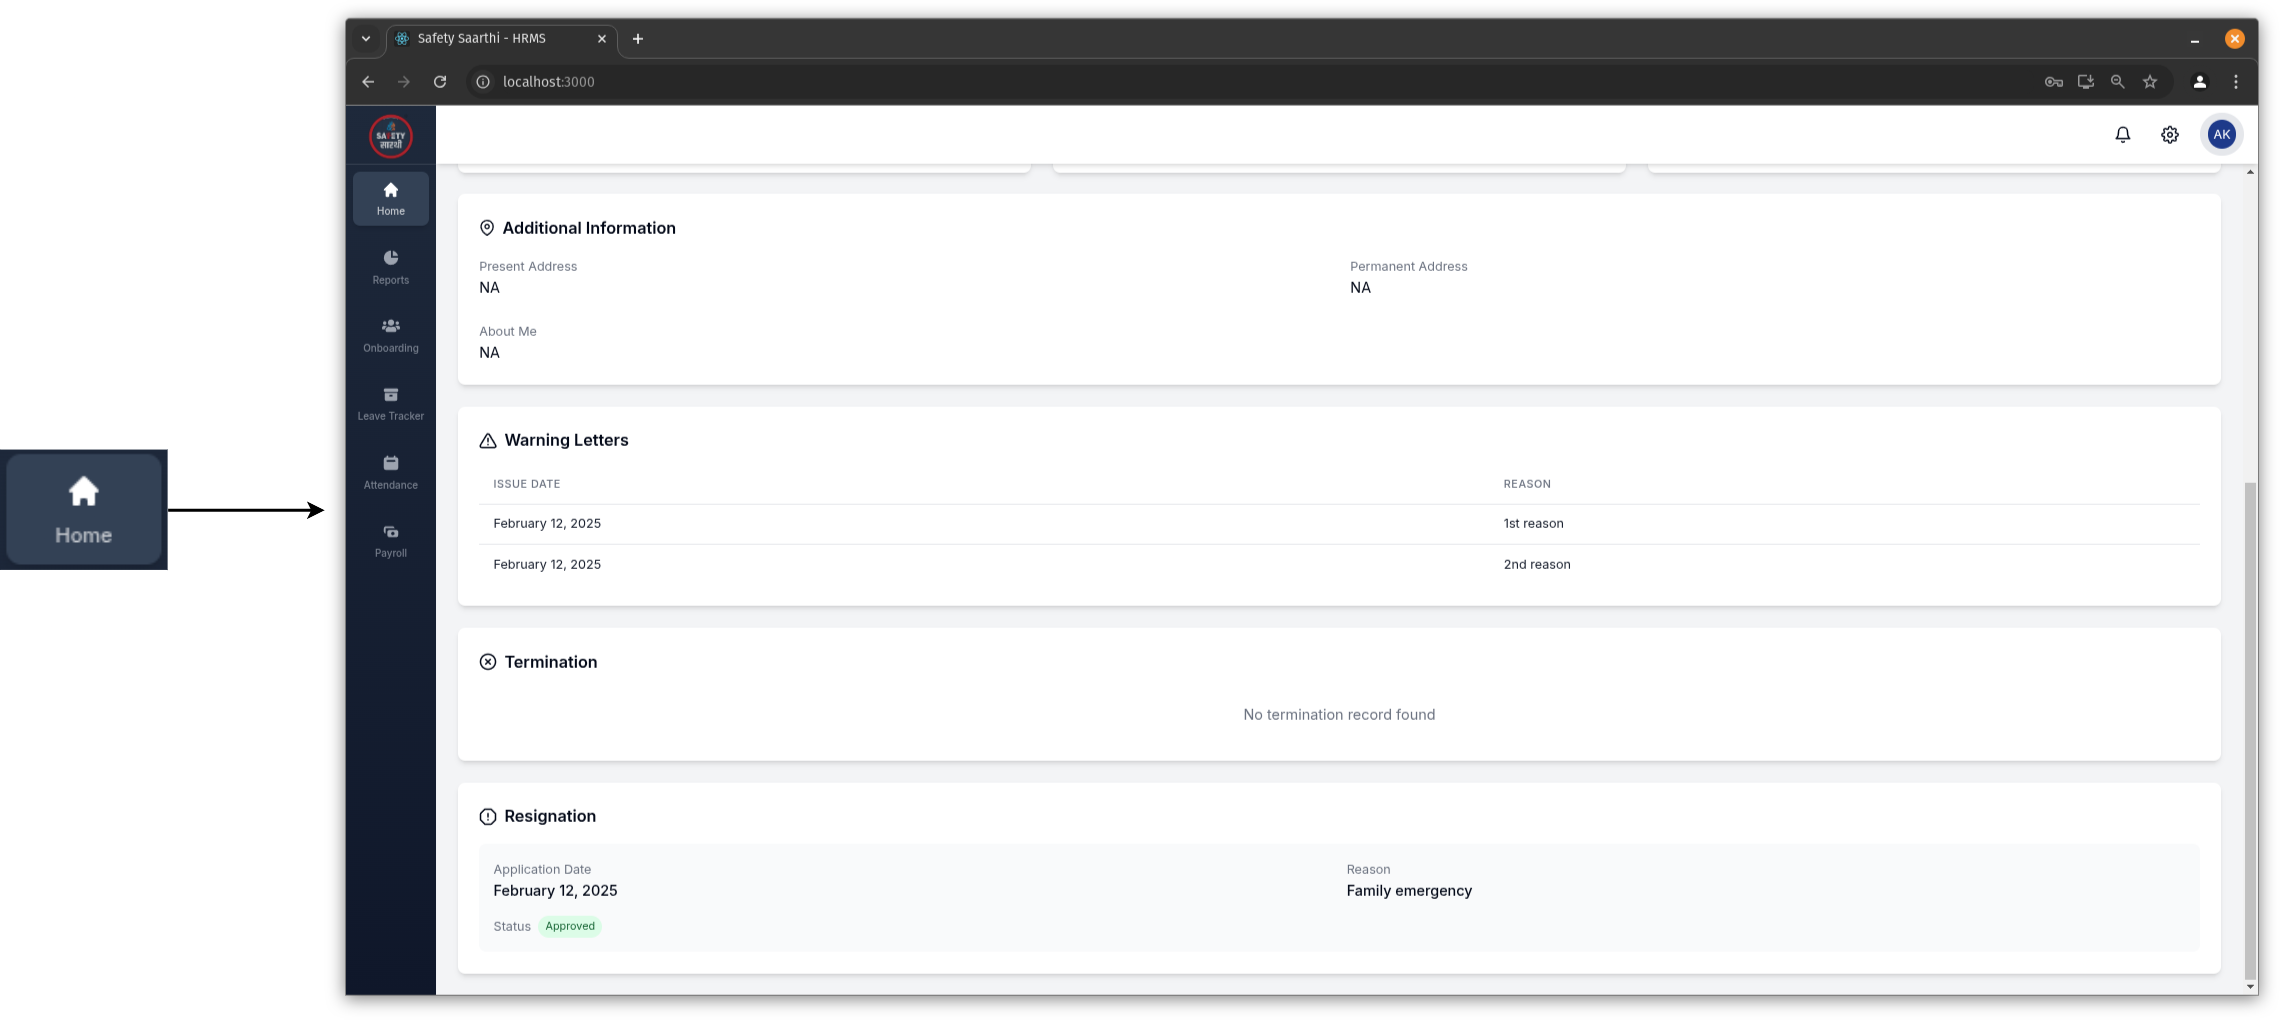
Go to 'Home' tab on the sidebar. Visit the 'Profile' tab to view resignation status.
-
After notice period ends (HR)

Go to 'Onboarding' tab on the sidebar. Click on 'Past Employees' to view employees whose notice period has ended.
Attendance
Settings
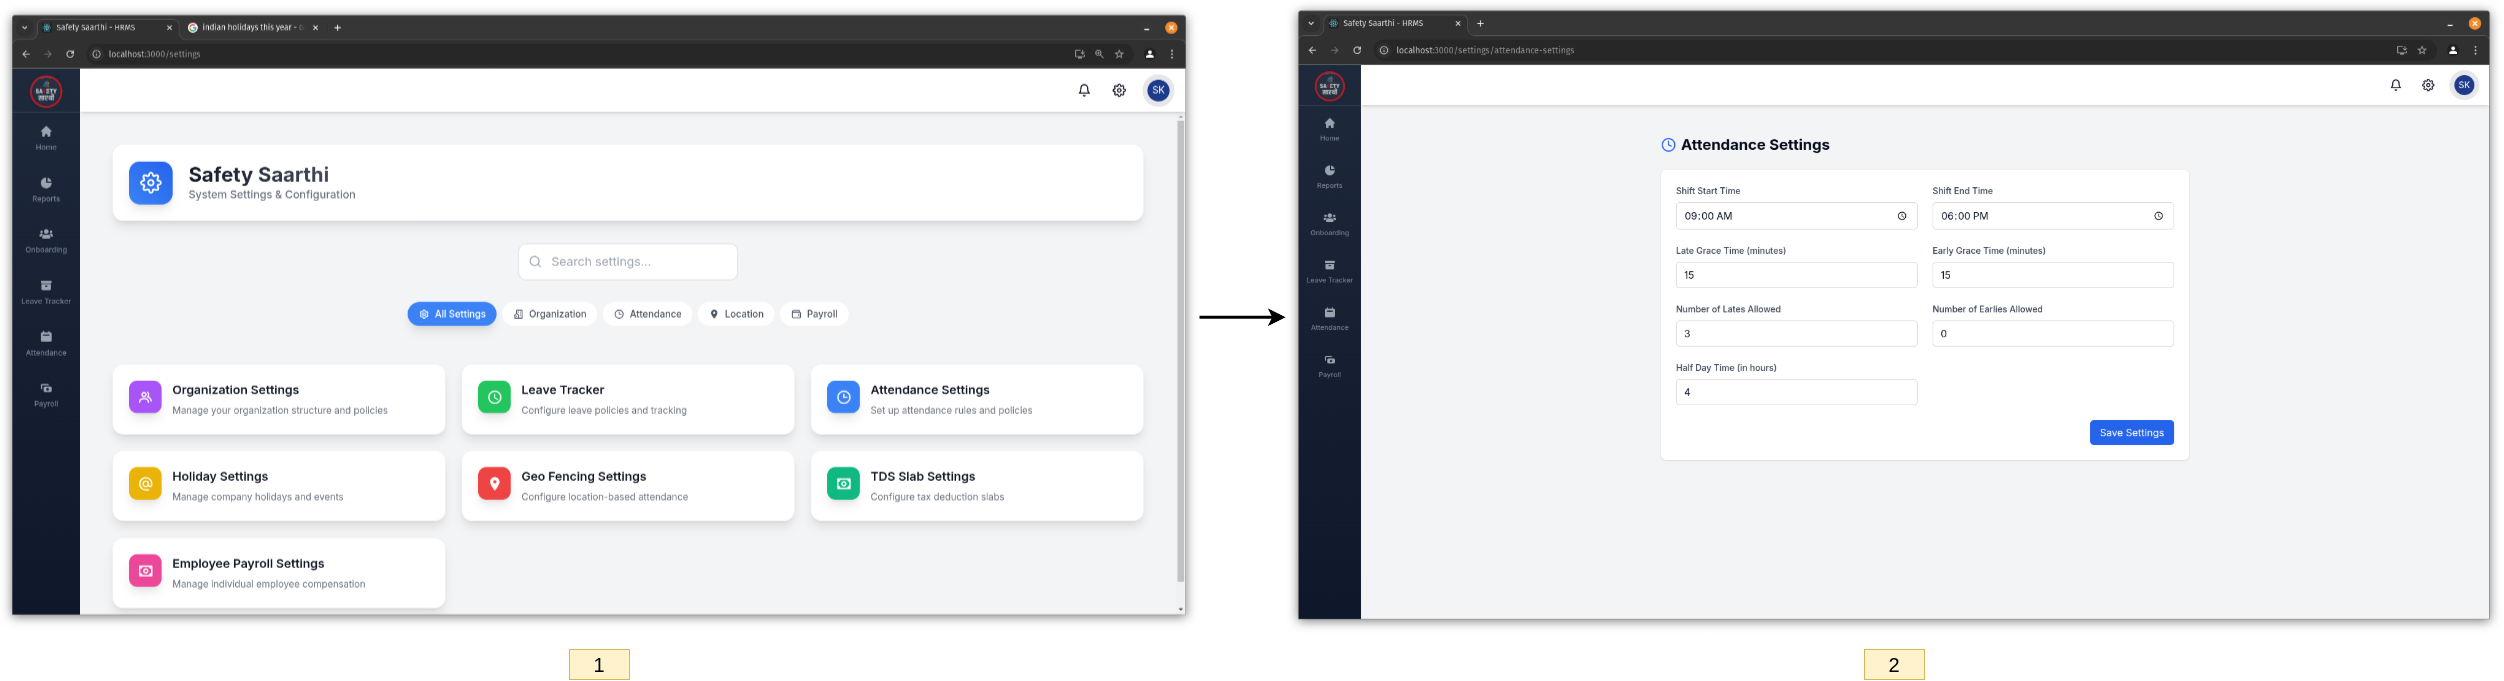
- Visit HRMS Website and open the settings page.
- Click on 'Attendance Settings' and fill in the required details. Save the changes.
Geo Fencing
-
Settings

- Open the settings page and click on 'Geo-Fencing Settings'.
- Use the functionalities to:
- Draw different shapes (circle, rectangle, or custom polygon) for fences.
- Zoom in / out in map.
- Clear or edit existing fences.
- Save the fence configuration.
-
Enable Geo-Fencing for Employees
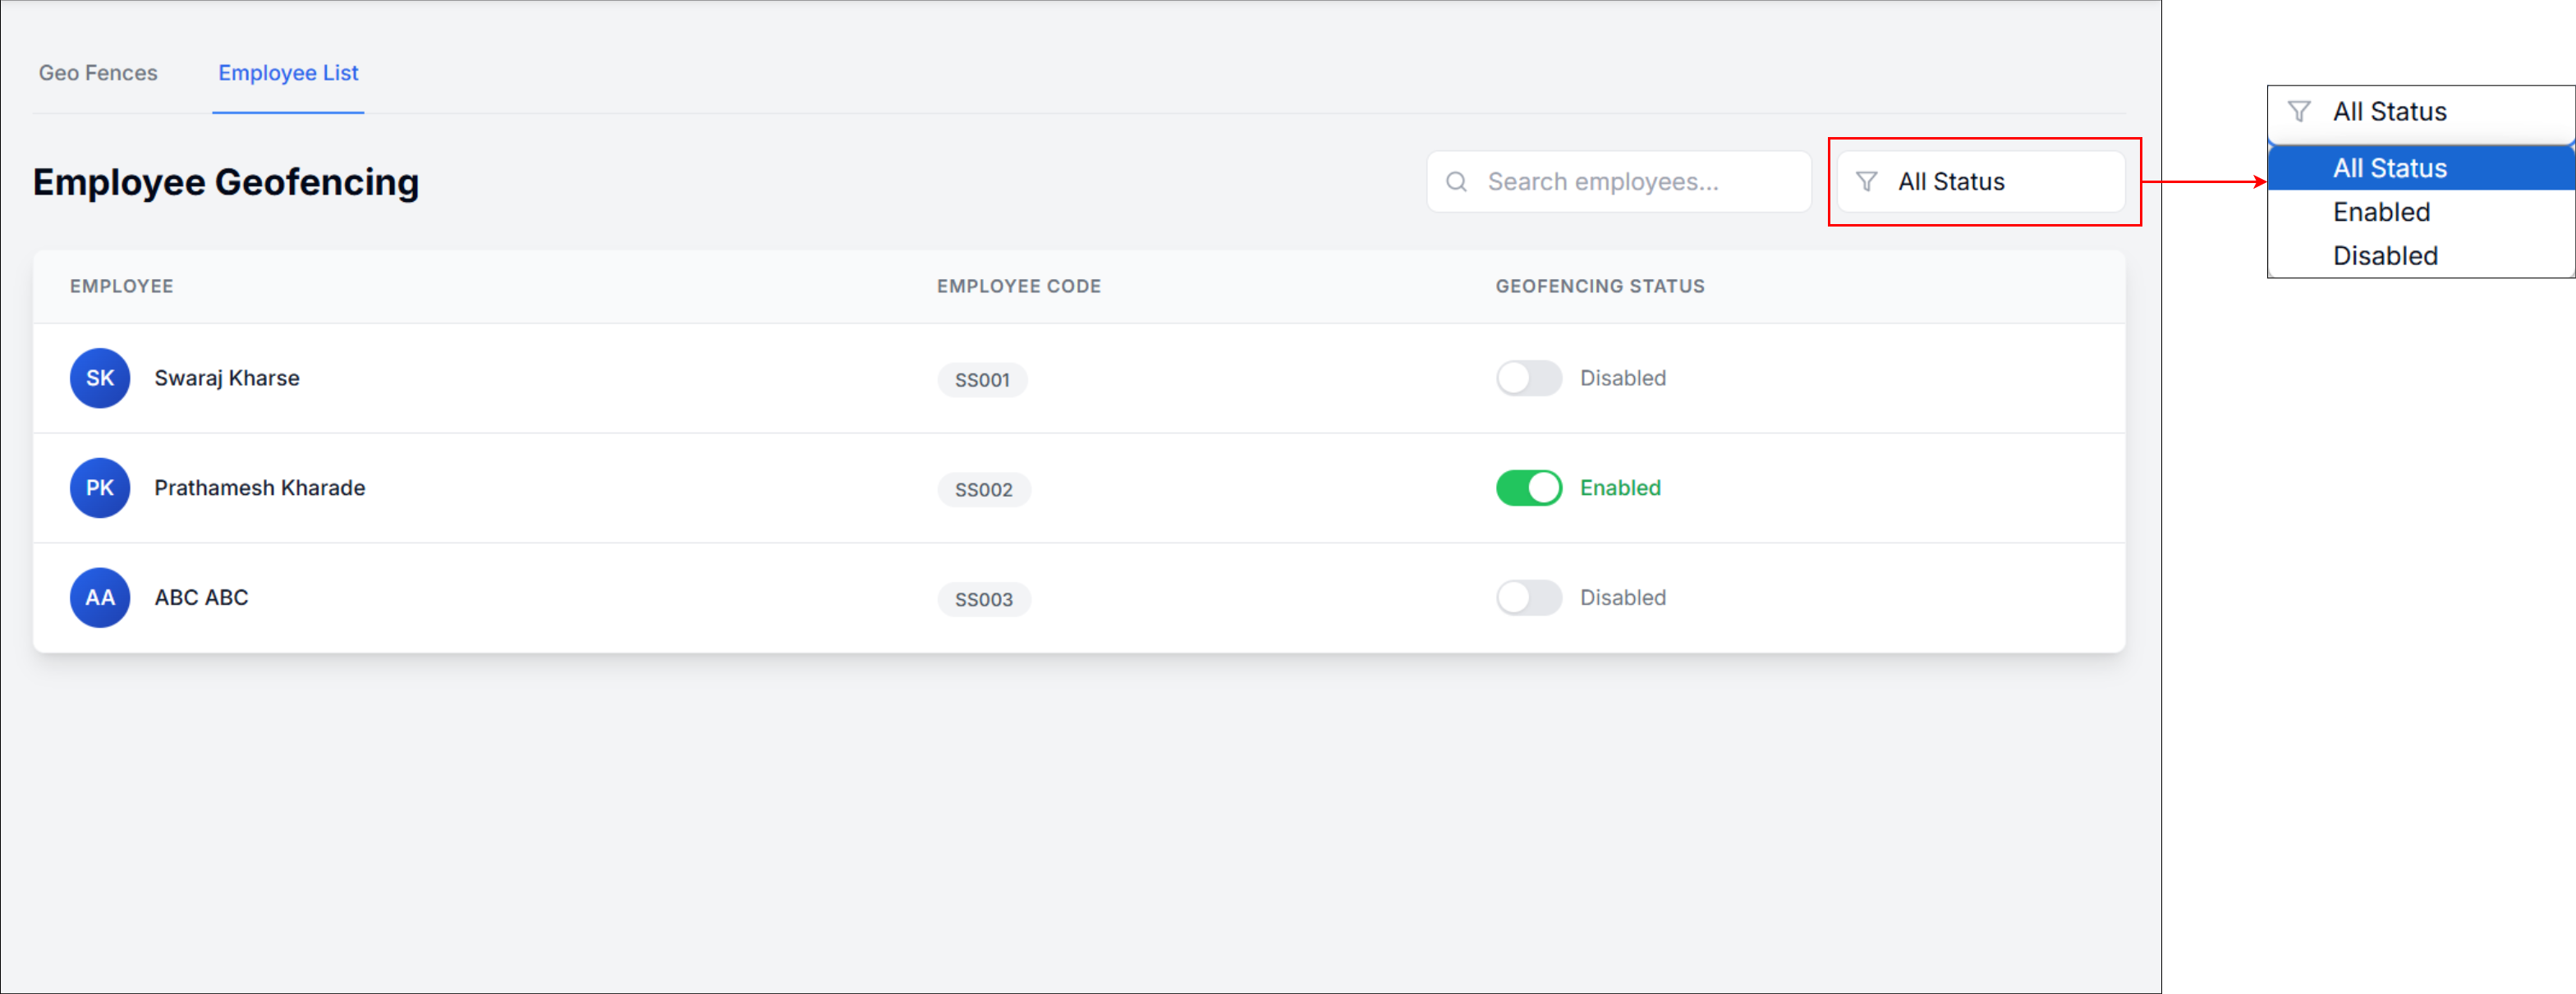
- Go to the 'Employee List'.
- Mark employees as enabled and disabled for geo-fencing.
Holidays
-
Settings
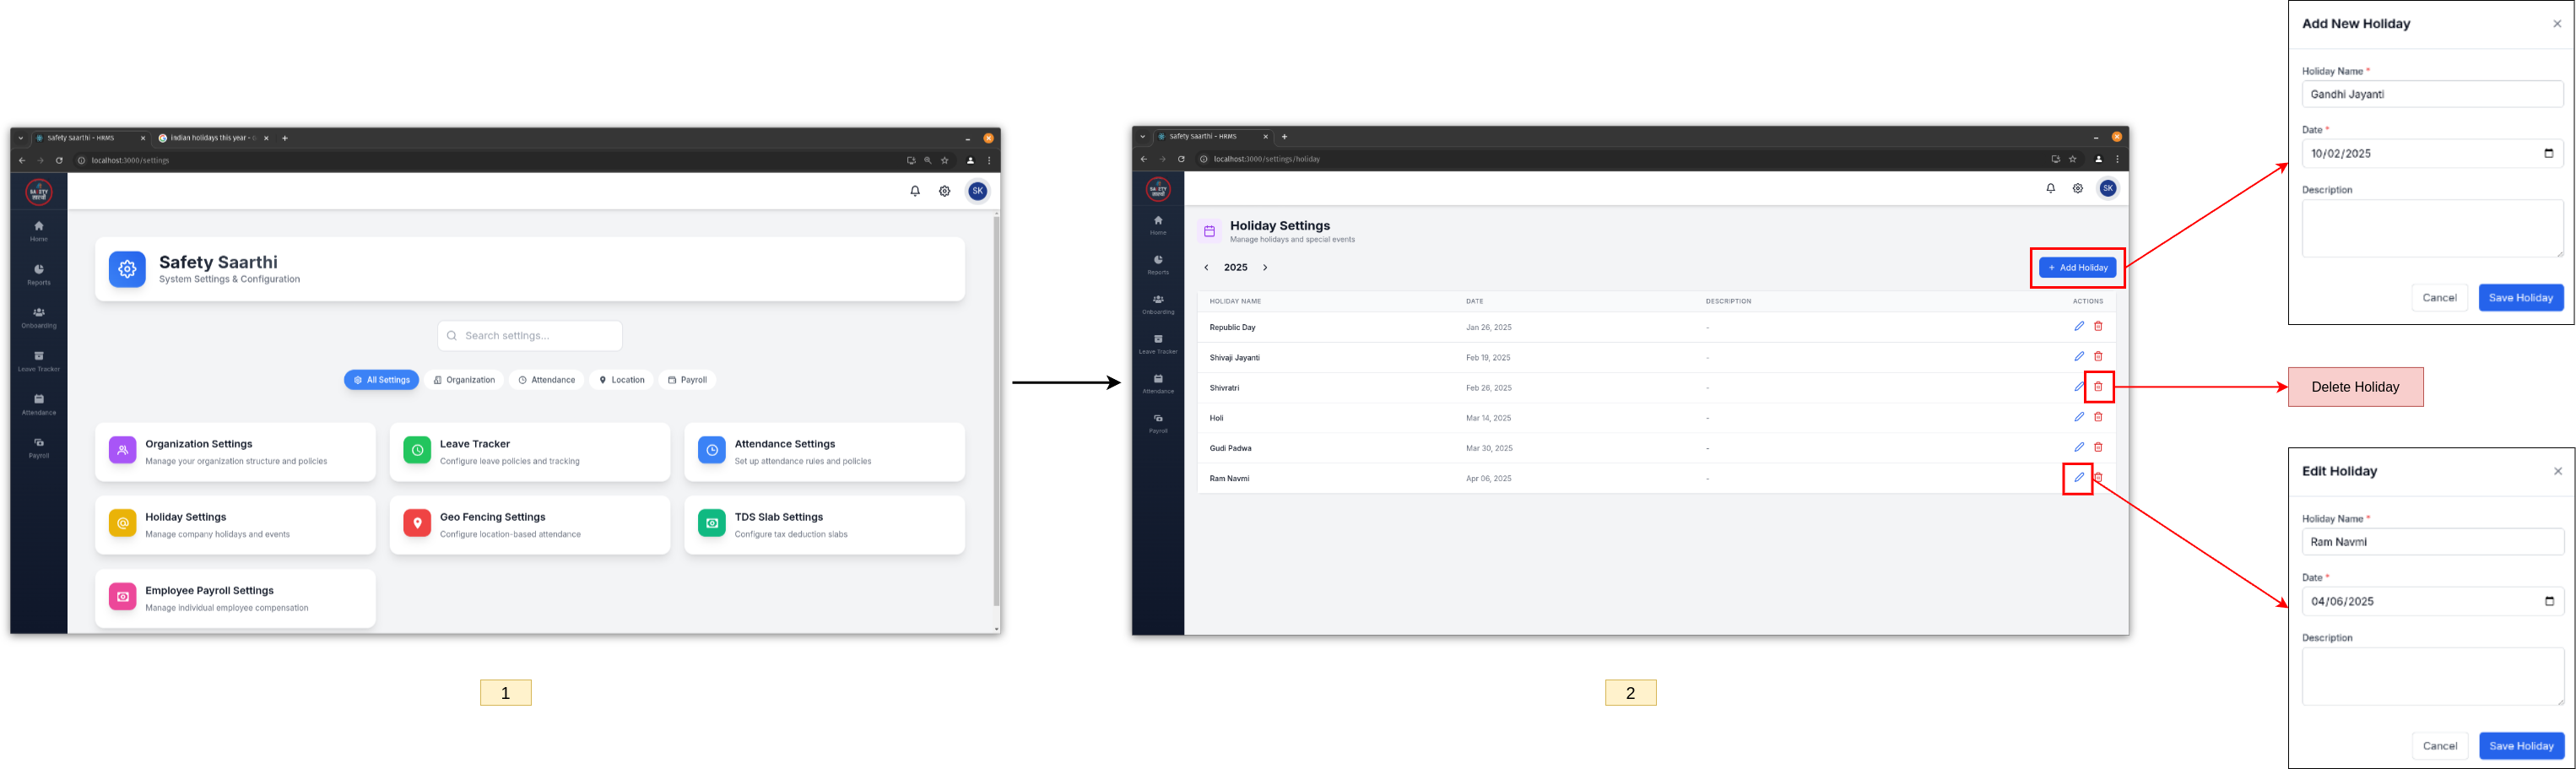
- Open the settings page and click on 'Holiday Settings'.
- Use the functionalities to:
- Add, edit, or delete holidays.
- View holidays from previous years.
-
View List of Holidays
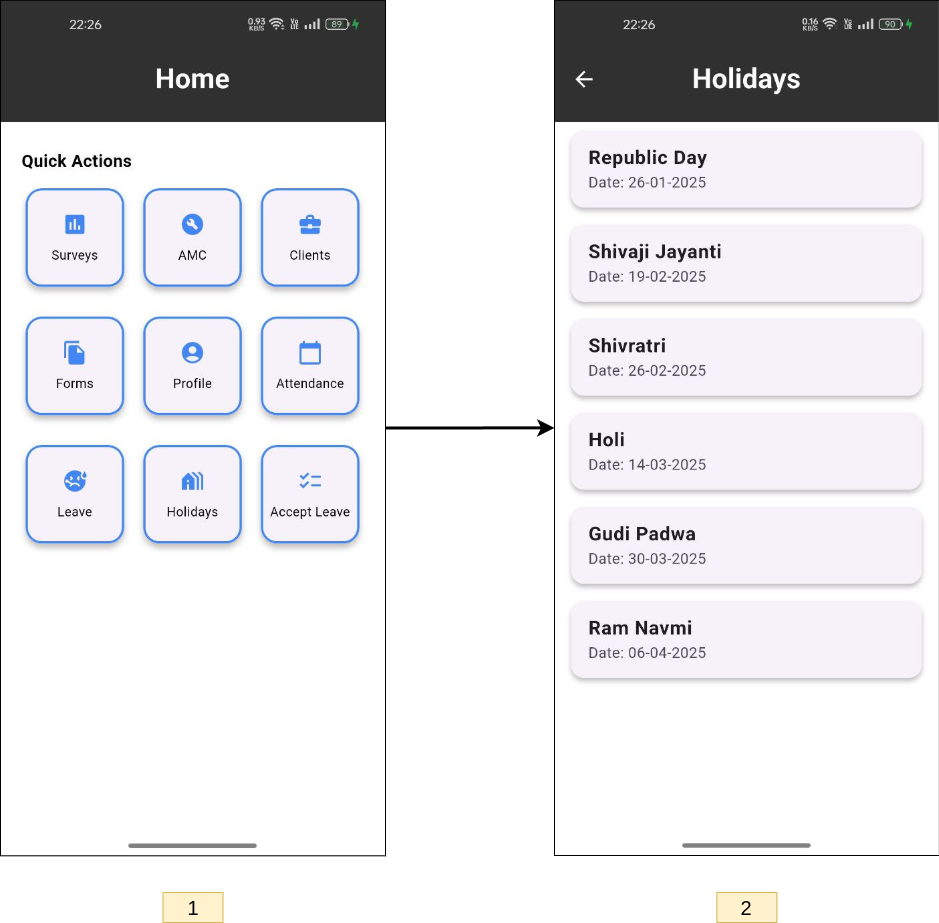
- From the home page, click on the 'Holidays' button.
- View the list of all holidays provided by your organization.
Mark Attendance
-
Mobile
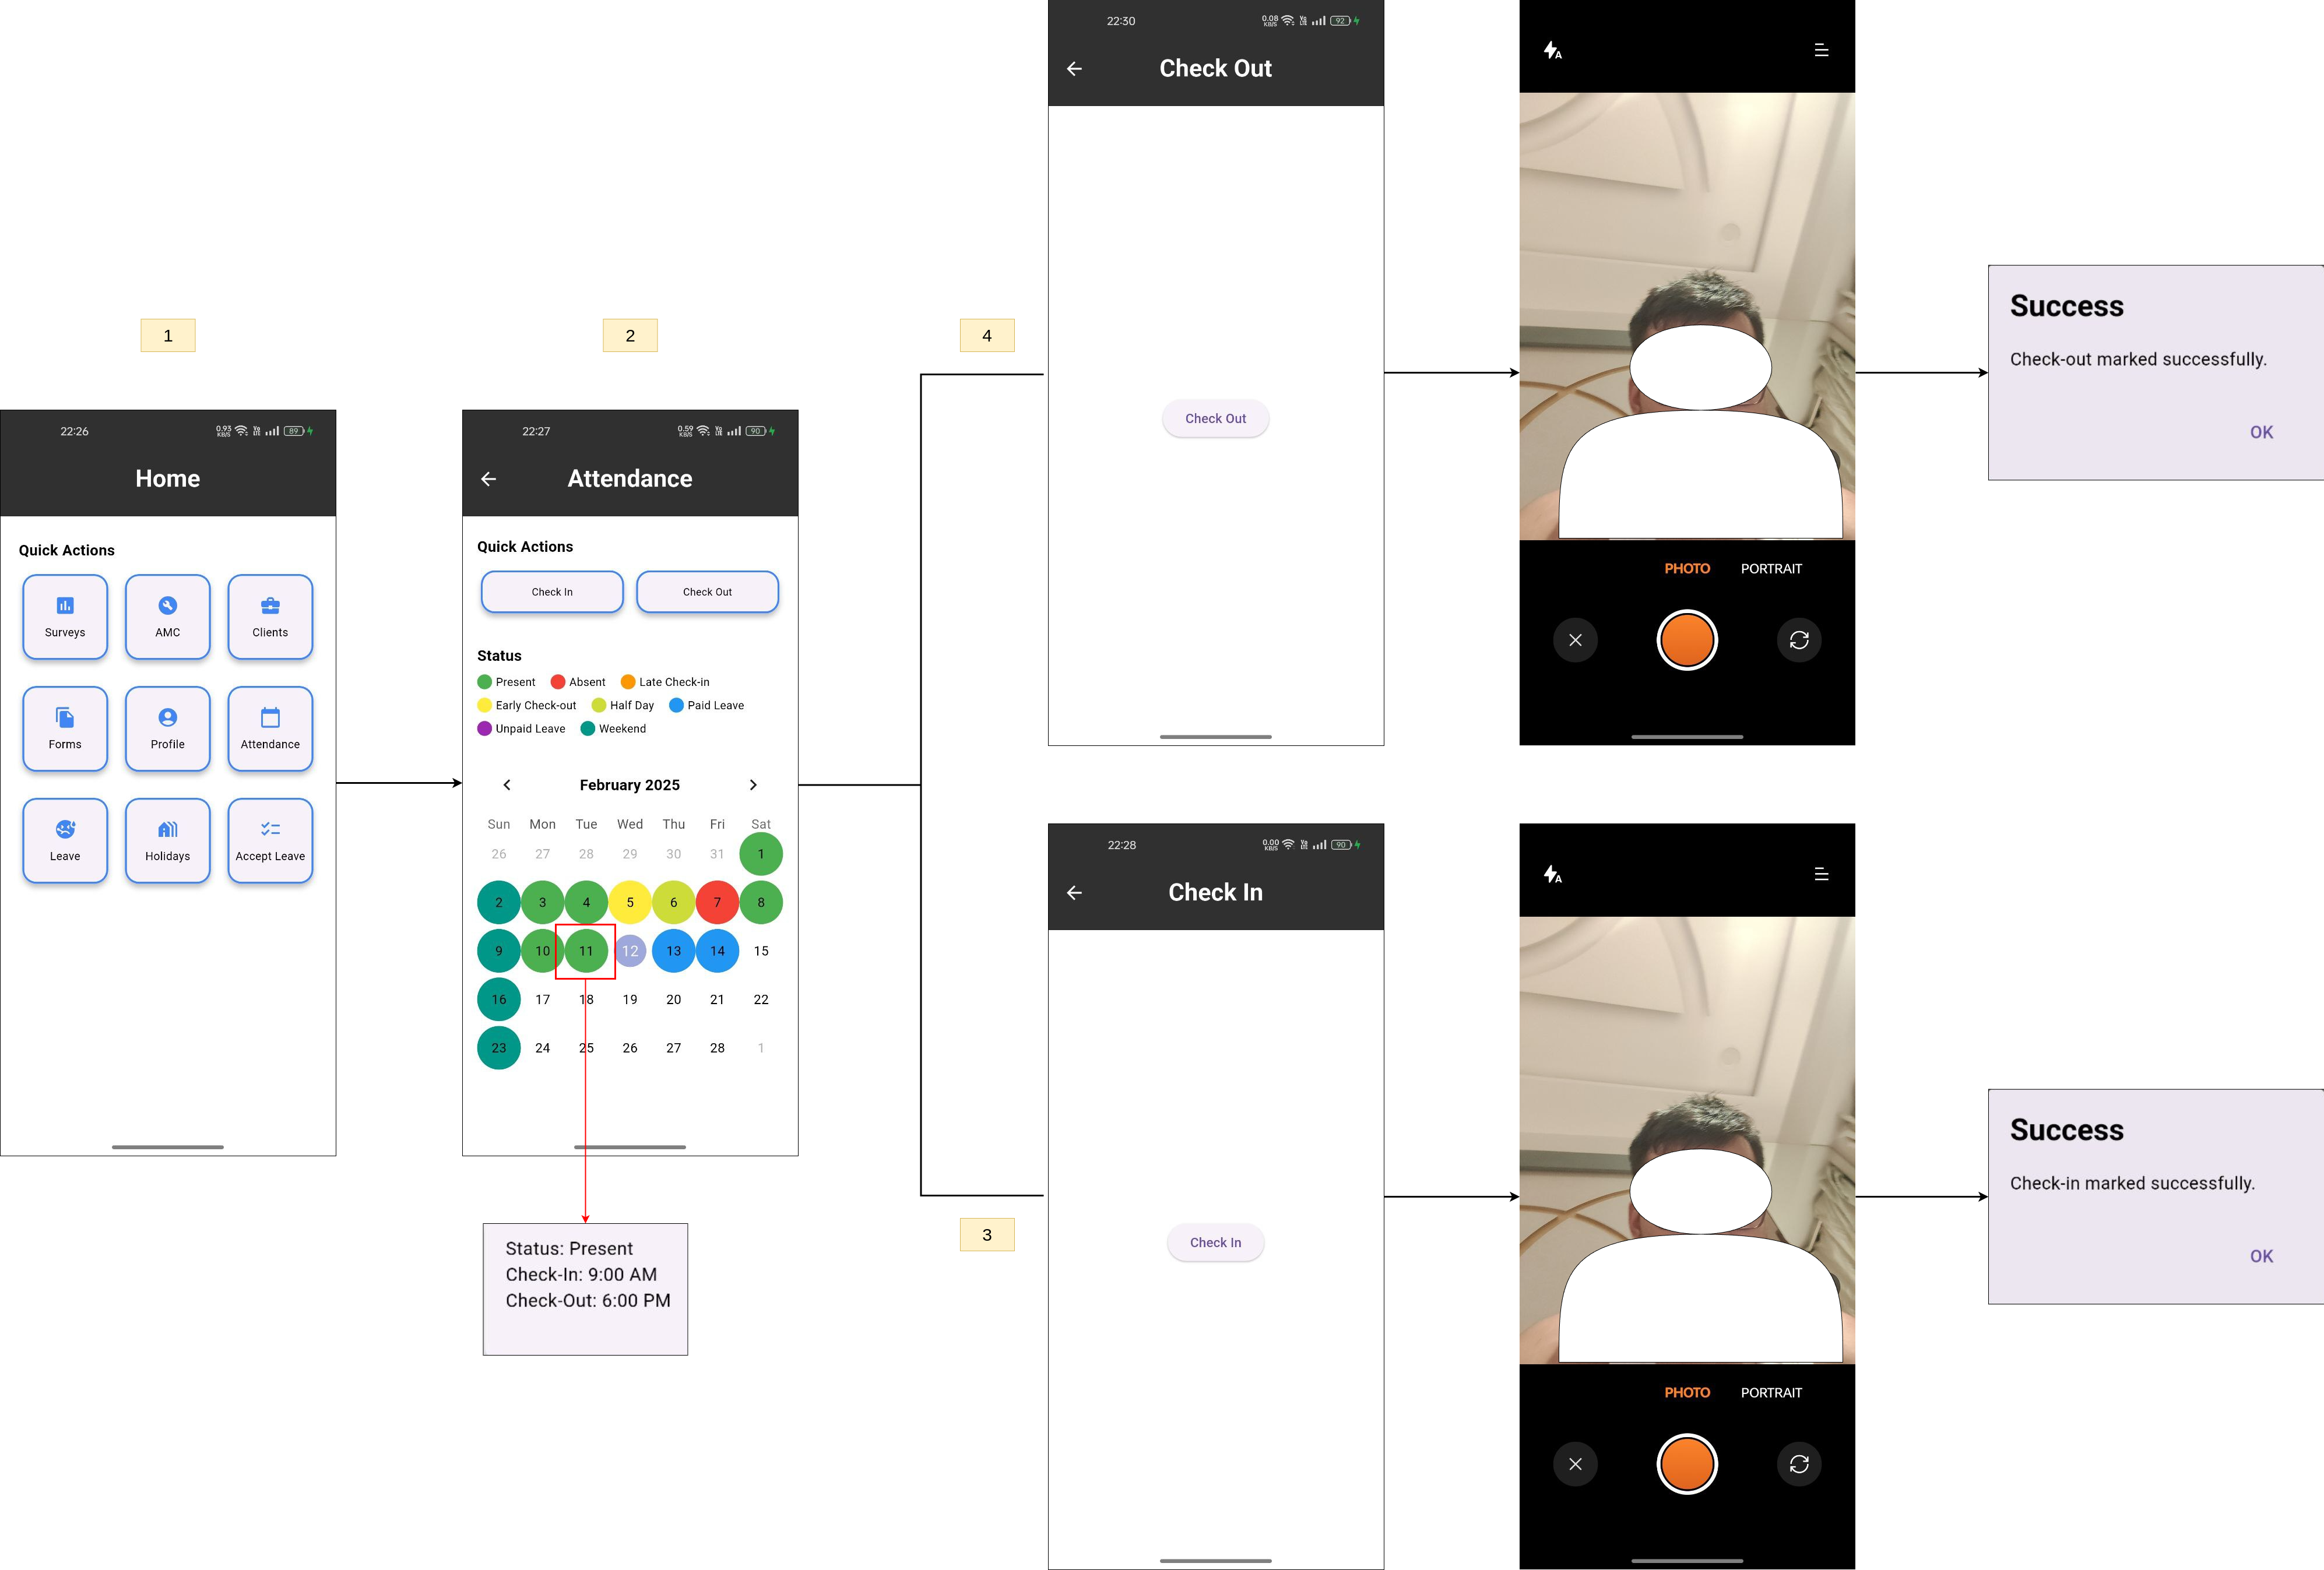
- From the home page, click on the 'Attendance' button.
- View the calendar showing attendance for the current month. Use the filter to view attendance for other months. Each day is color-coded to represent different attendance statuses.
- Click on a specific day to view the status, check-in, and check-out times.
- Use the 'Check In' and 'Check Out' buttons to mark attendance. A camera will open to capture your photo, which is used to verify your identity.
-
HRMS Website
Go to the 'Onboarding' tab on the sidebar and select an employee. Ensure the employee has a profile picture with a visible face.
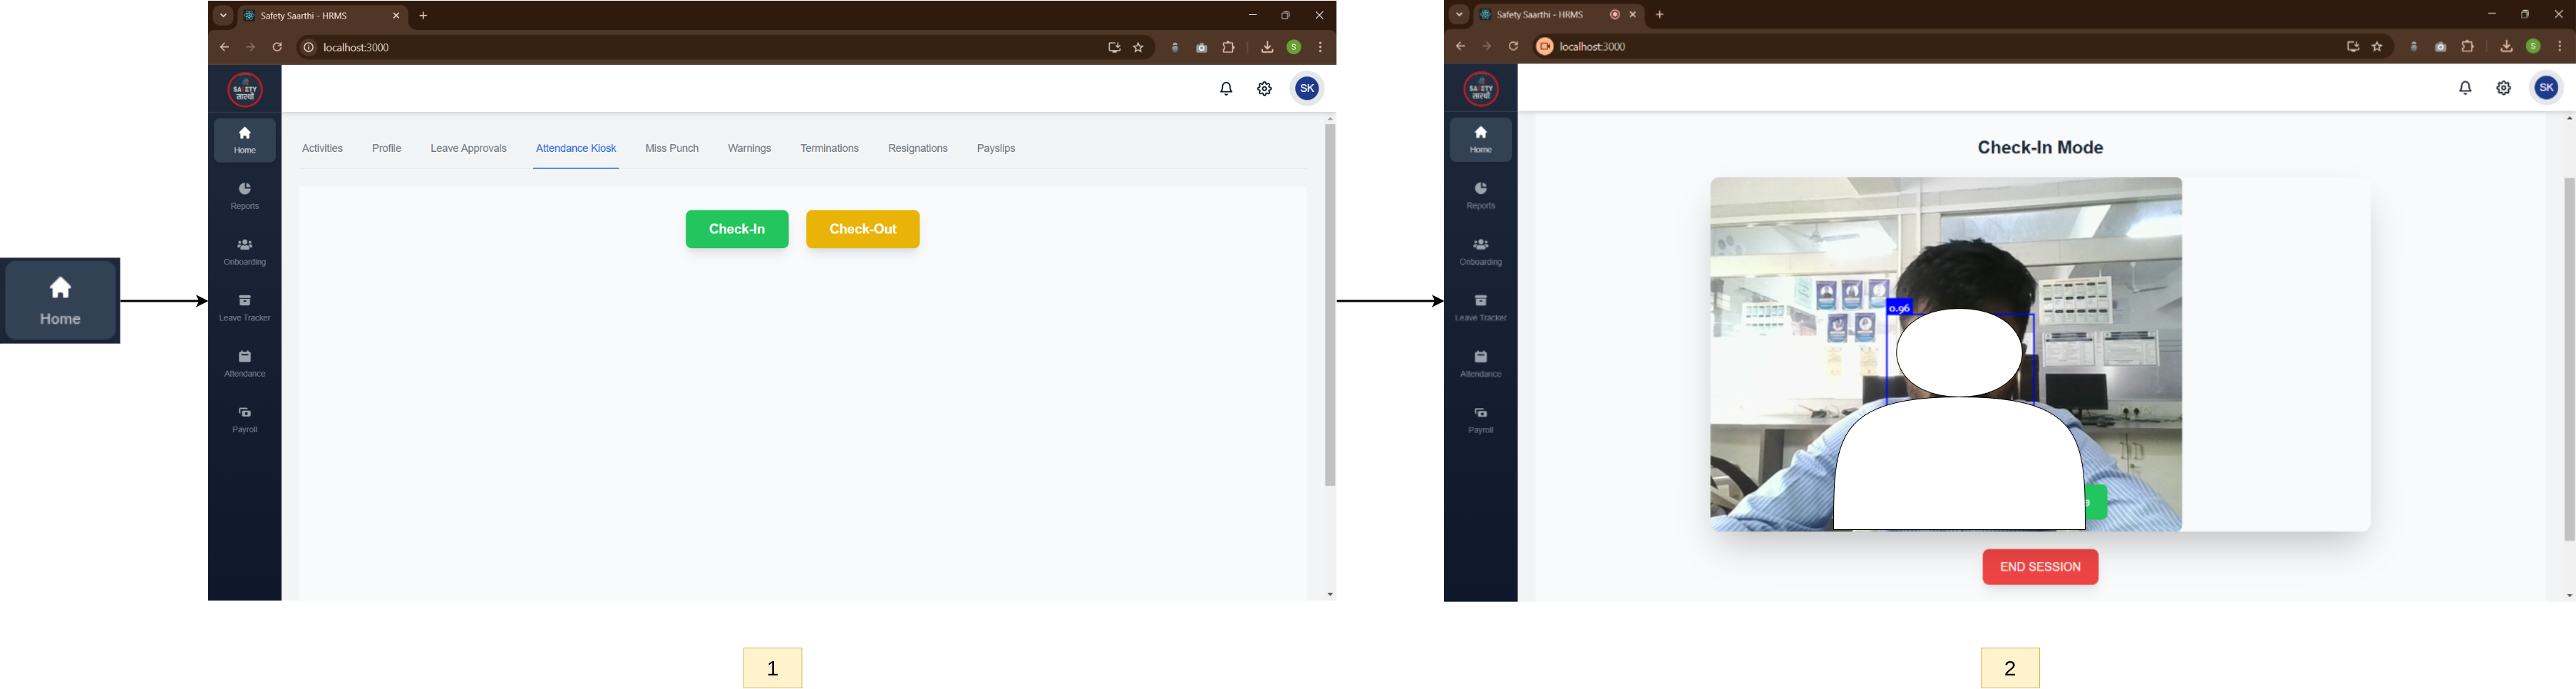
- Go to the 'Home' tab and click on 'Attendance Kiosk'.
- Use the 'Check In' and 'Check Out' buttons to mark attendance. The camera will capture your face and compare it with the profile photo to mark attendance.
This feature is designed for a dedicated PC with a camera, typically placed at the company entrance.
Miss Punch
-
Apply for miss punch (Employee)
-
Mobile
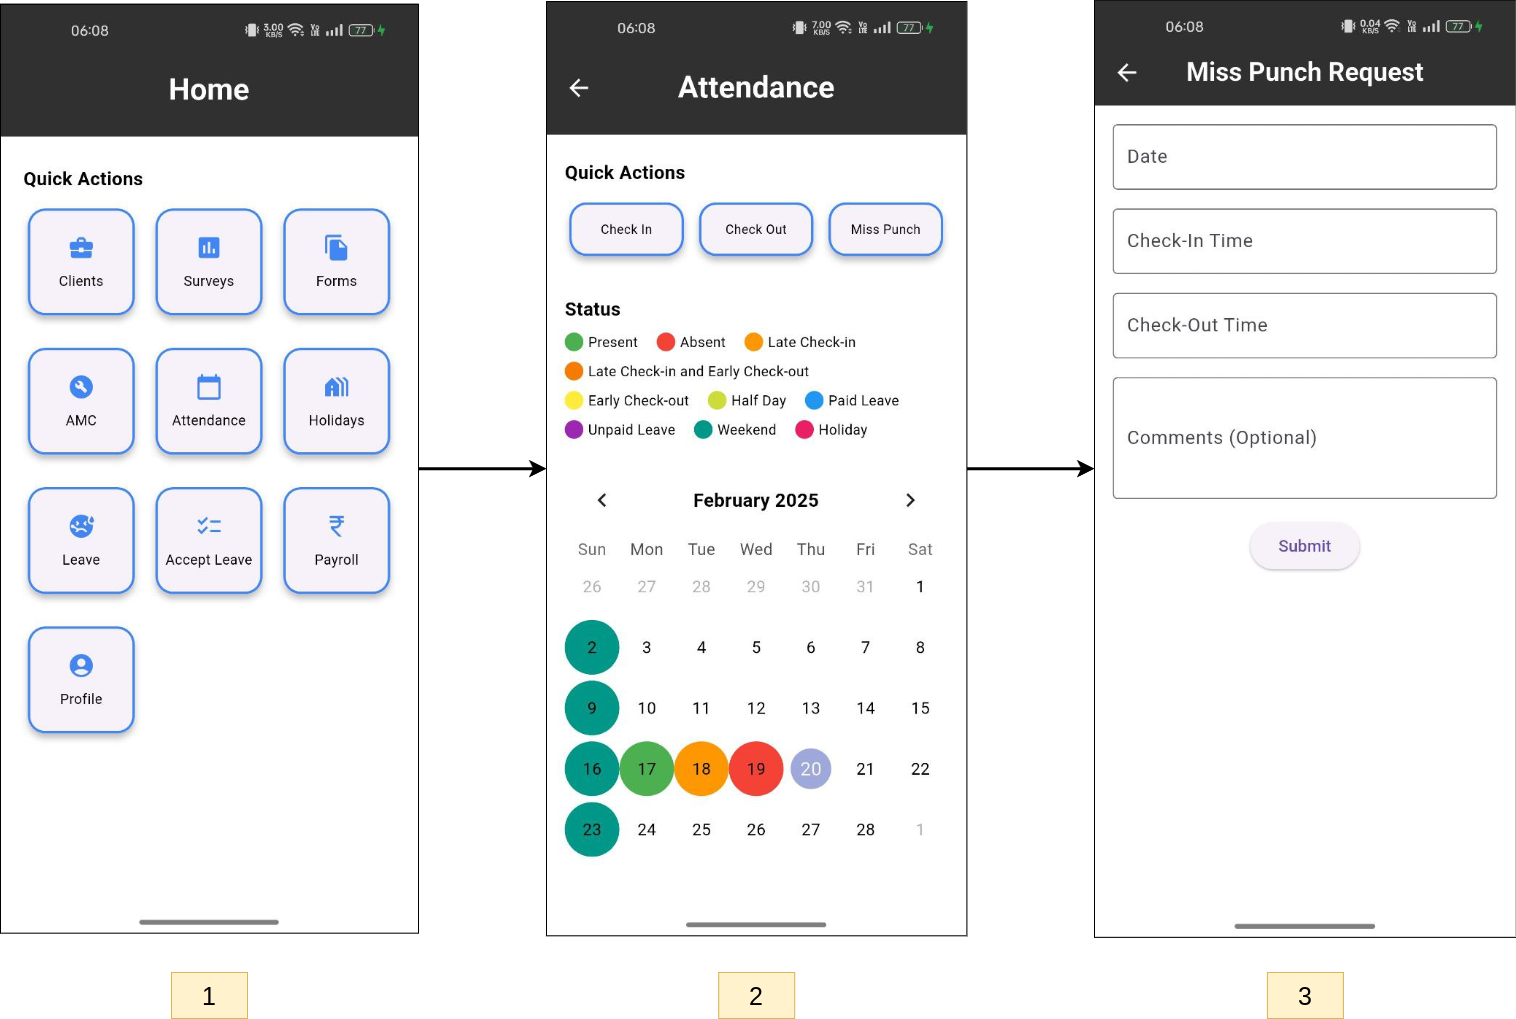
- From the home page, click on the 'Attendance' button.
- Click on the 'Miss Punch' button.
- Fill out the form to request a miss punch.
-
HRMS Website
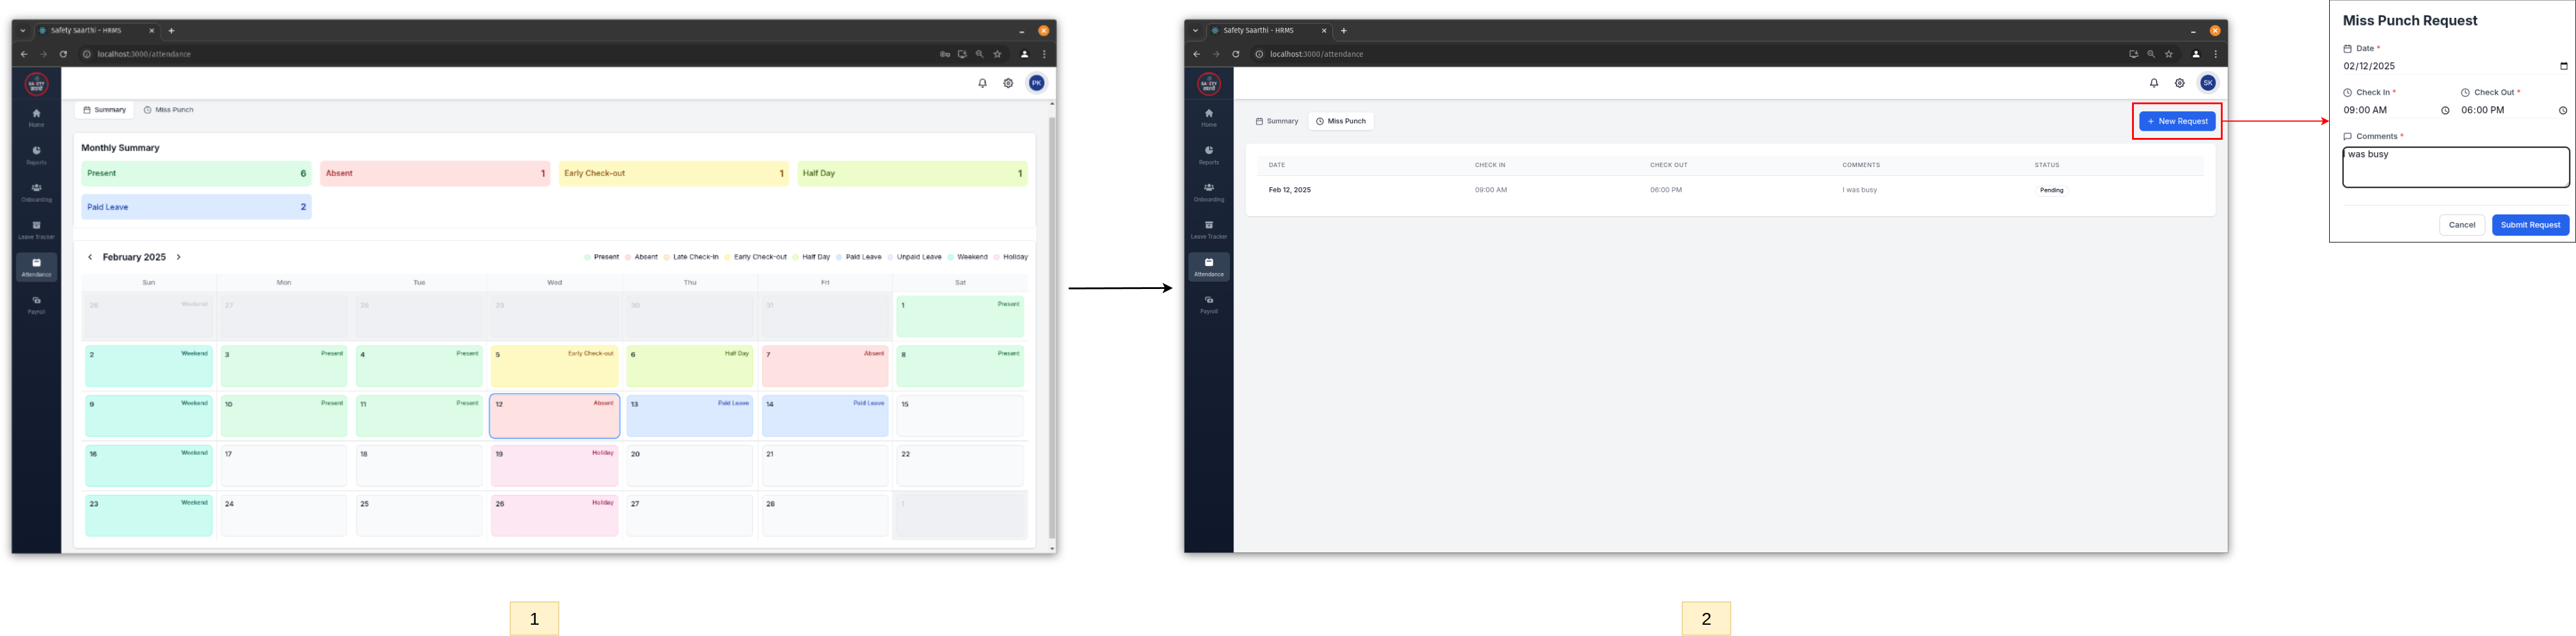
- Go to the 'Attendance' tab on the sidebar.
- View the calendar and click on 'Miss Punch'.
- Click on the
'New Request' button to apply for a miss punch.
-
Mobile
-
Review the miss punch request (HR)
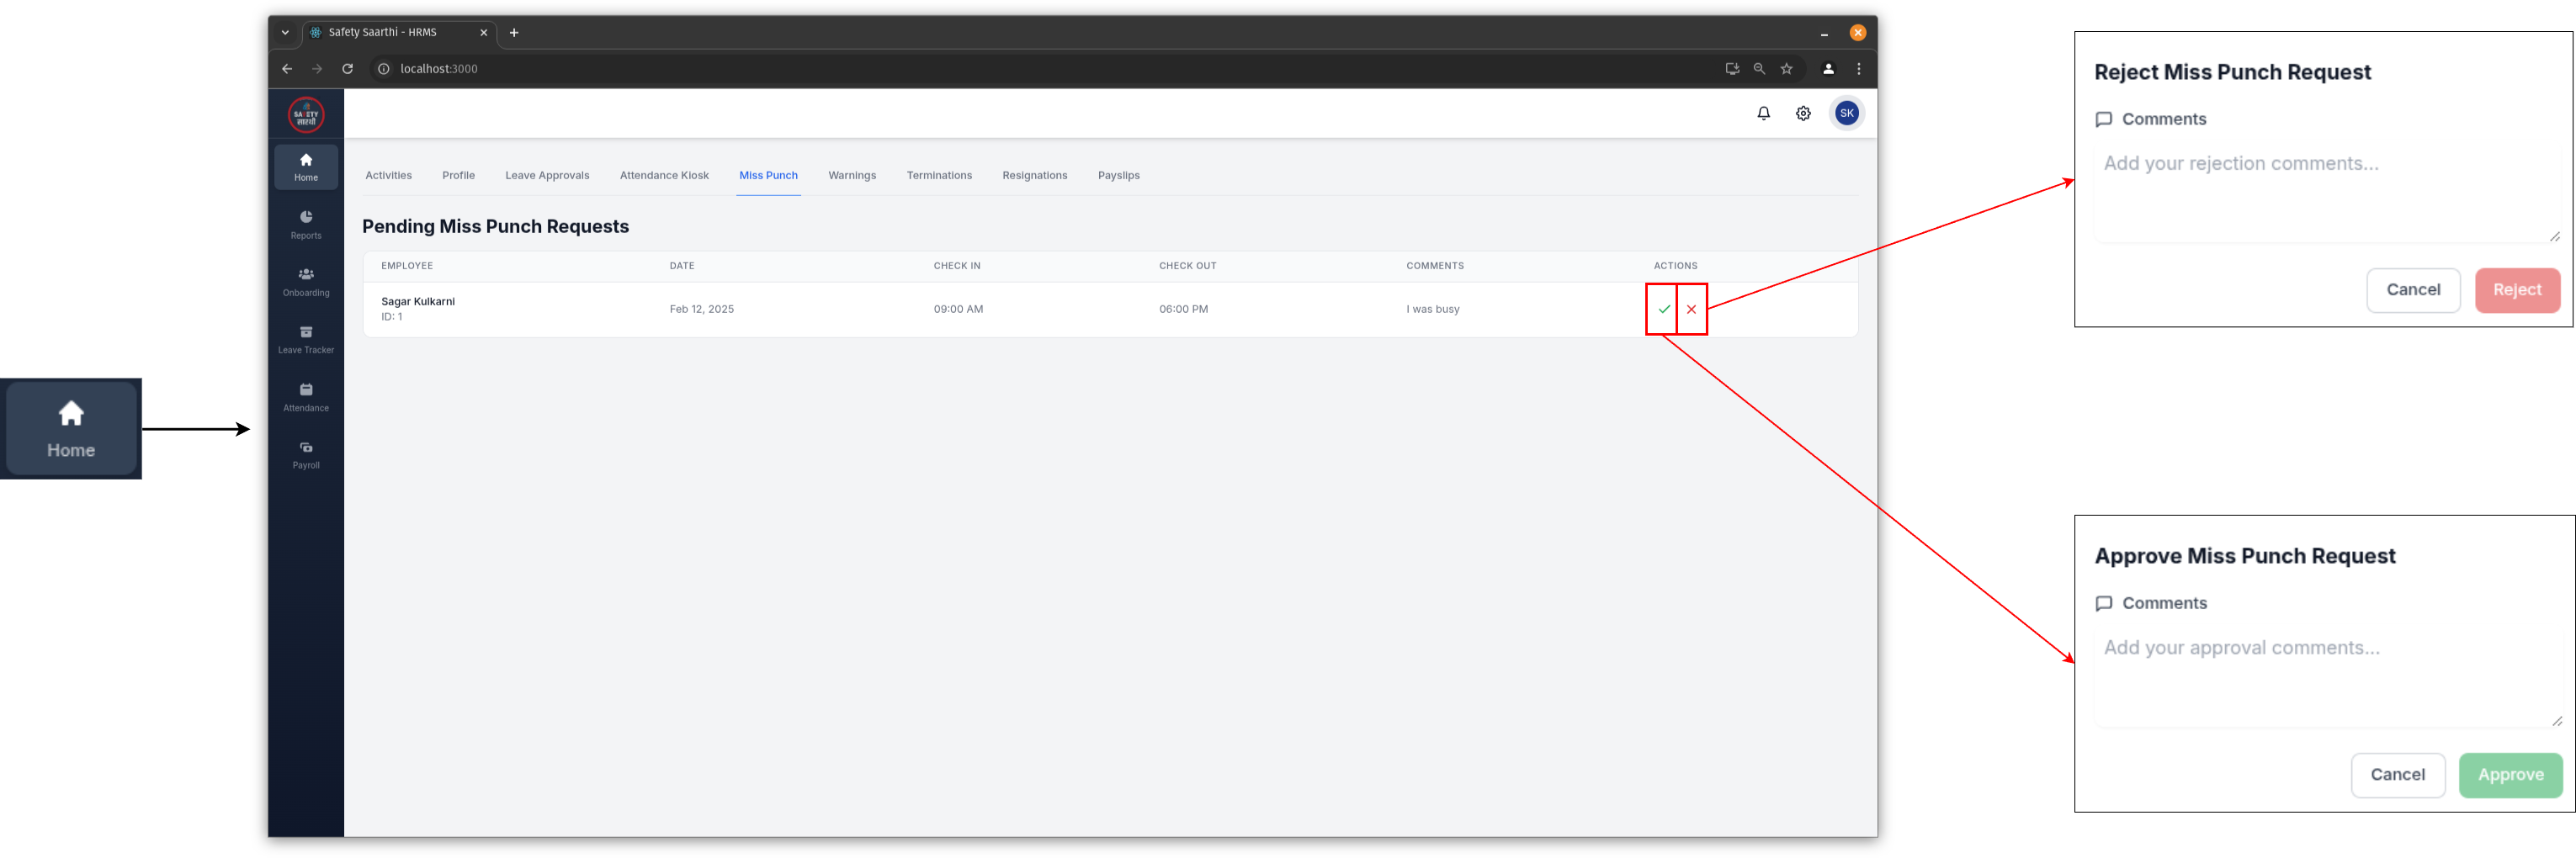
- Go to the 'Home' tab on the sidebar and click on 'Miss Punch'.
- View the list of pending miss punch requests and accept or reject them.
-
View miss punch requests for individual employee (HR)
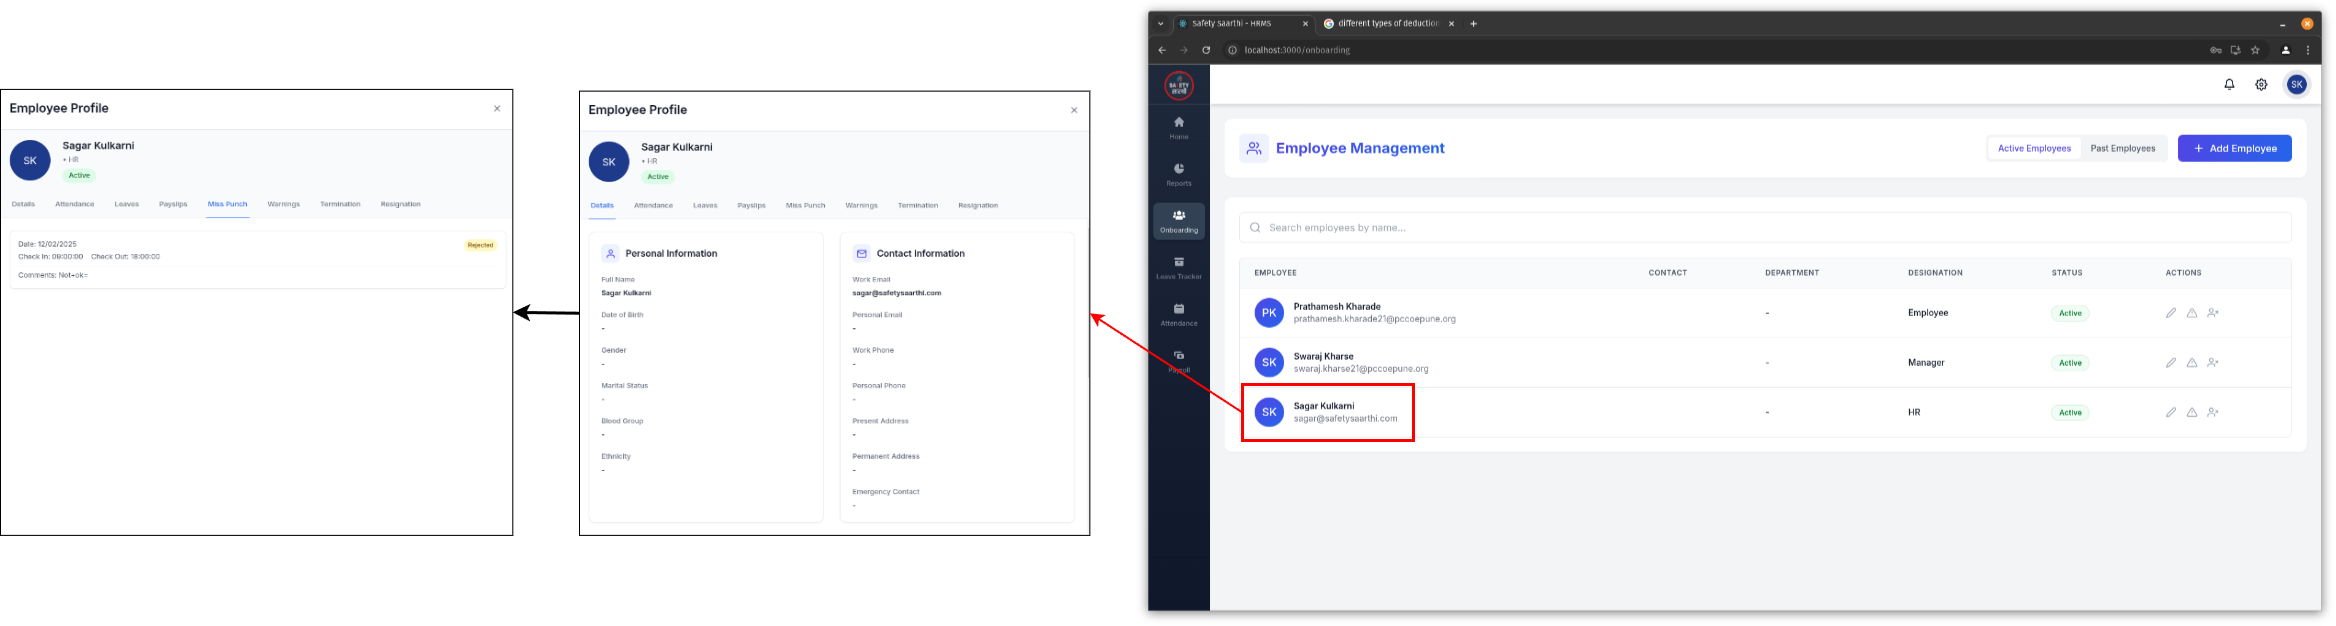
- Go to the 'Onboarding' tab on the sidebar.
- Select the employee and go to 'Miss Punch' to view their requests.
Change attendance (HR)
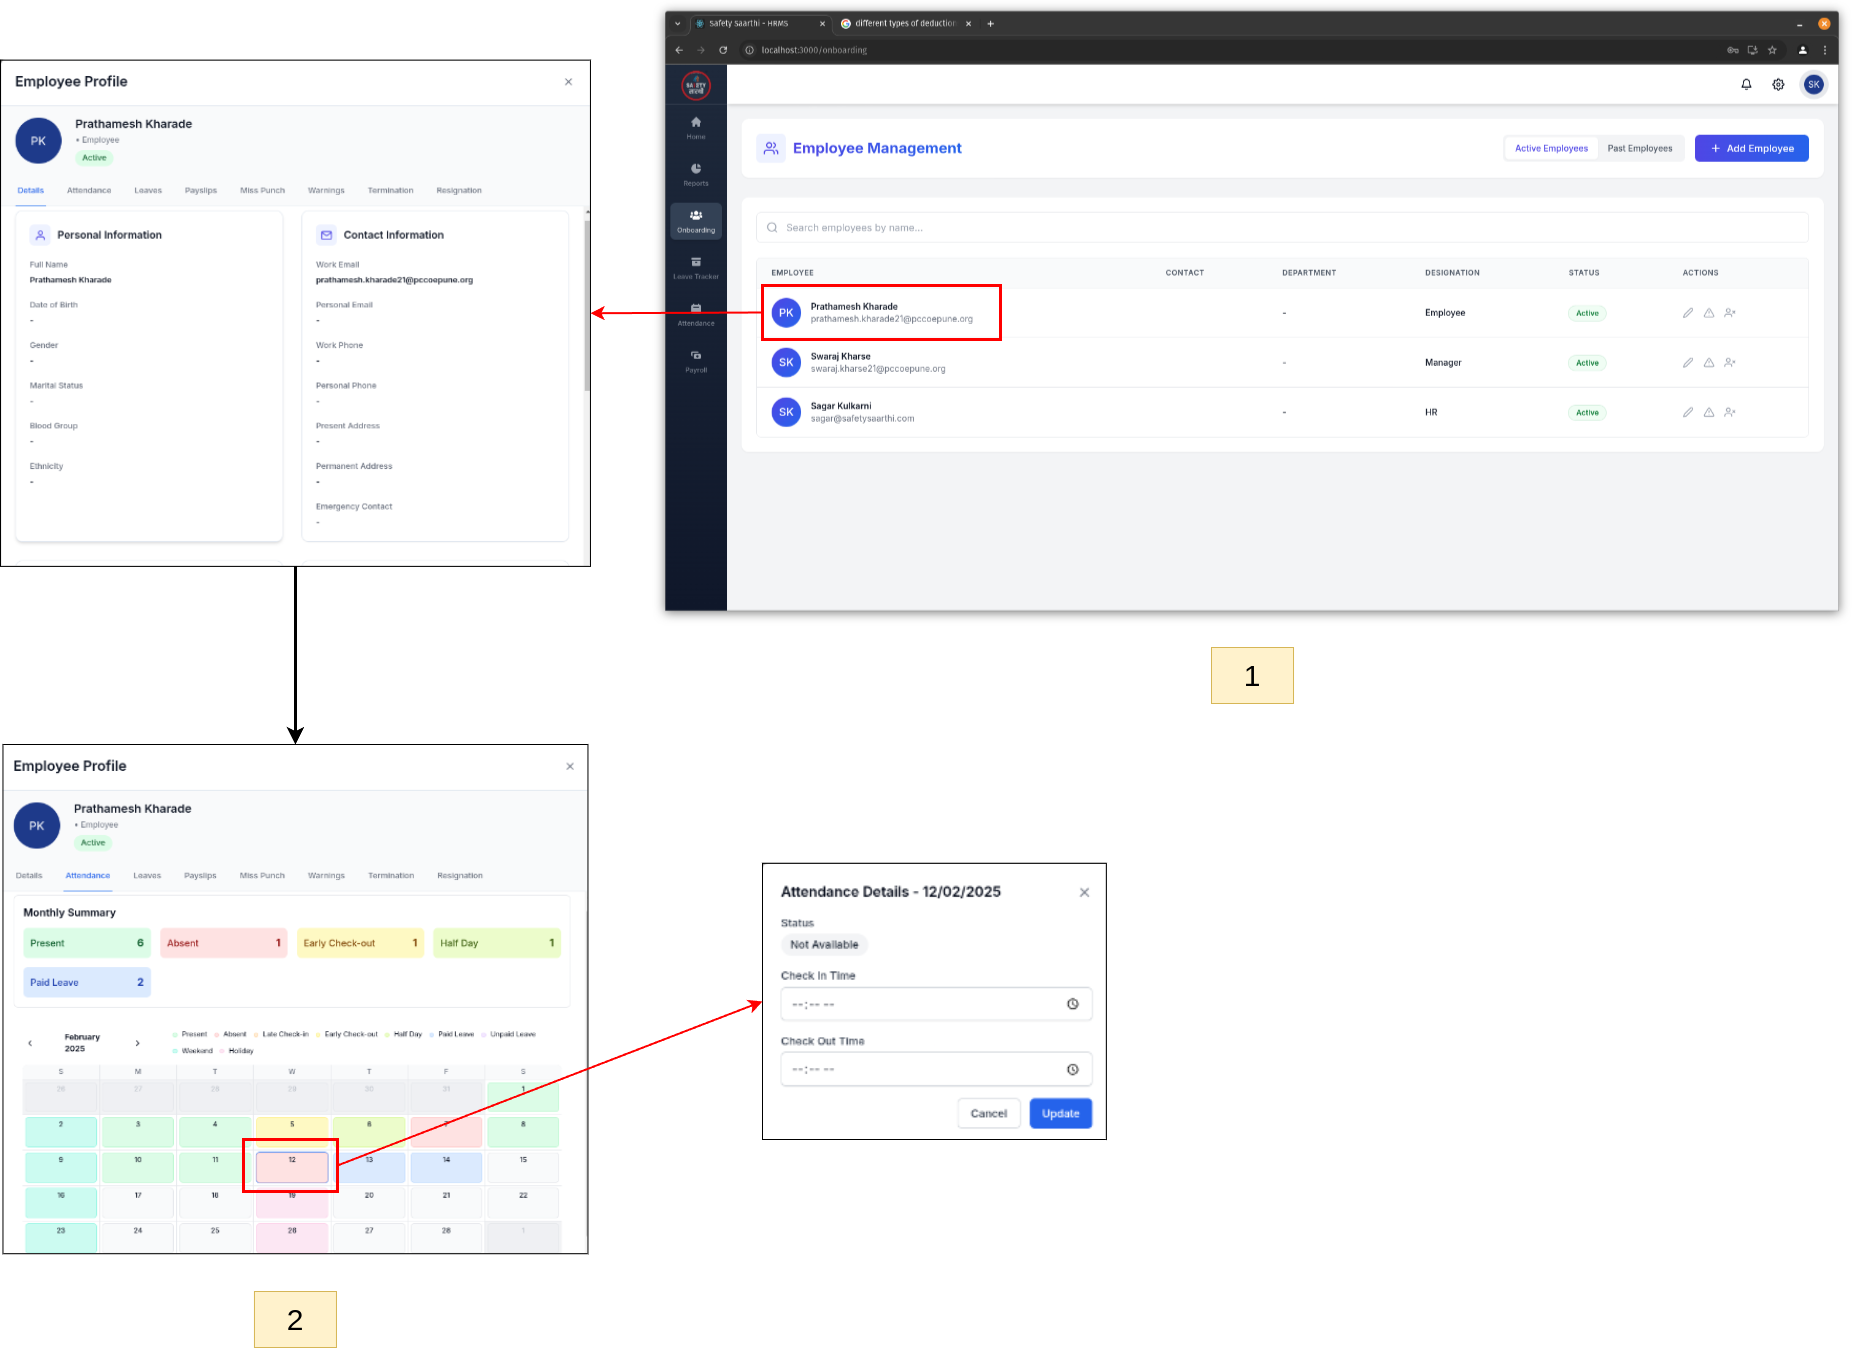
- Go to the 'Onboarding' tab on the sidebar and select an employee.
- Go to 'Attendance' to view their monthly attendance. Use the calendar to navigate between months.
- Click on a specific day to change the attendance status for that day.
Reports
-
Attendance Report
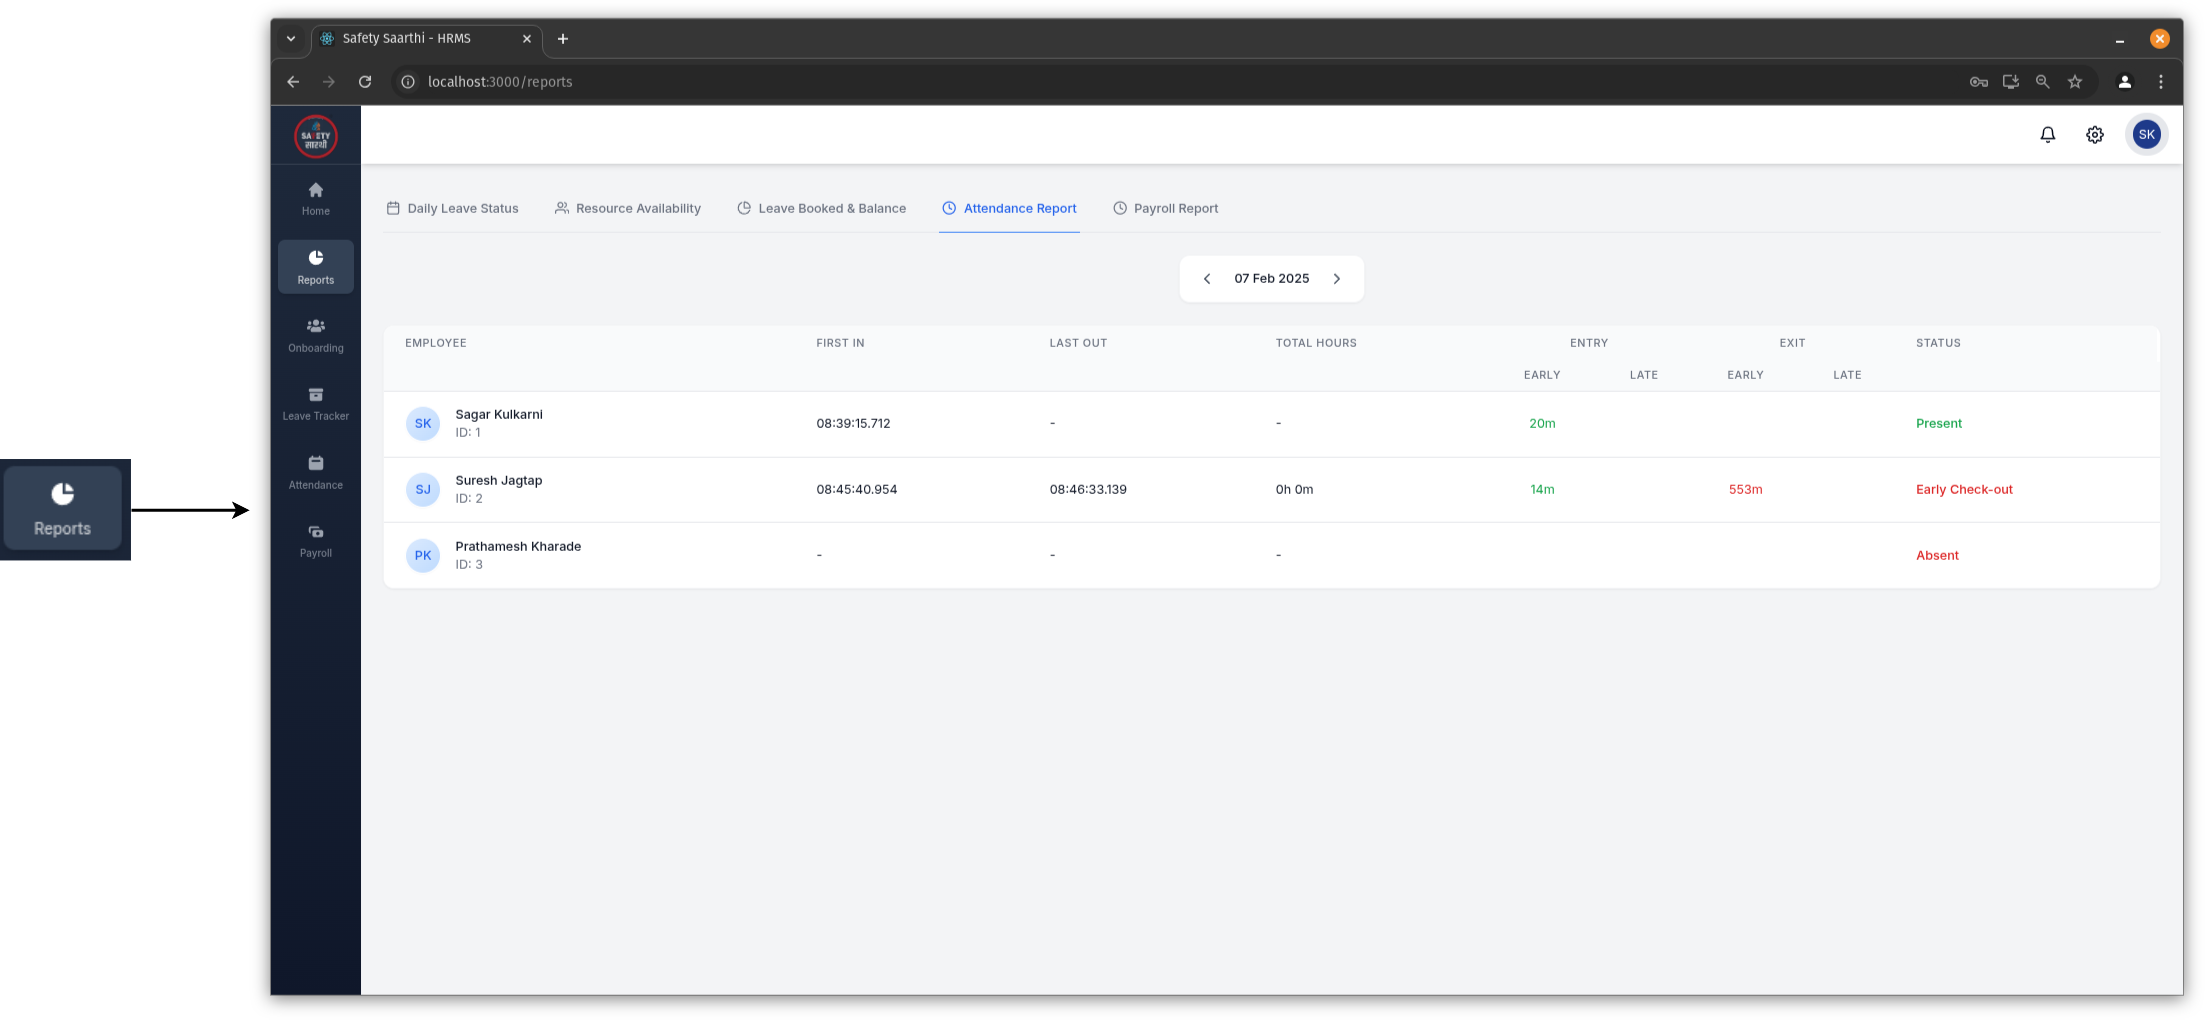
Go to the 'Reports' tab on the sidebar and click on 'Attendance Report'. View the attendance status of all employees for a specific day. Use the filter to change the date.
-
Resource Availability
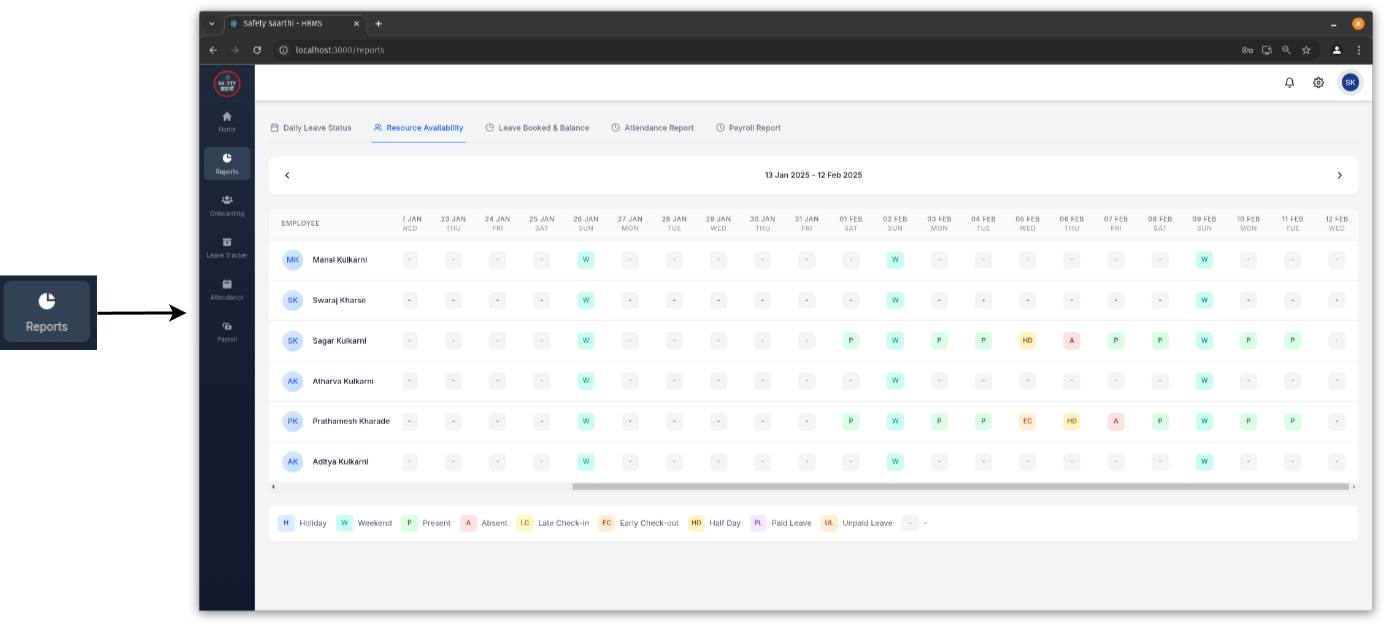
Go to the 'Reports' tab on the sidebar and click on 'Resource Availability'. View the attendance status of all employees for a specific month. Use the filter to change the month.
Leave
Settings
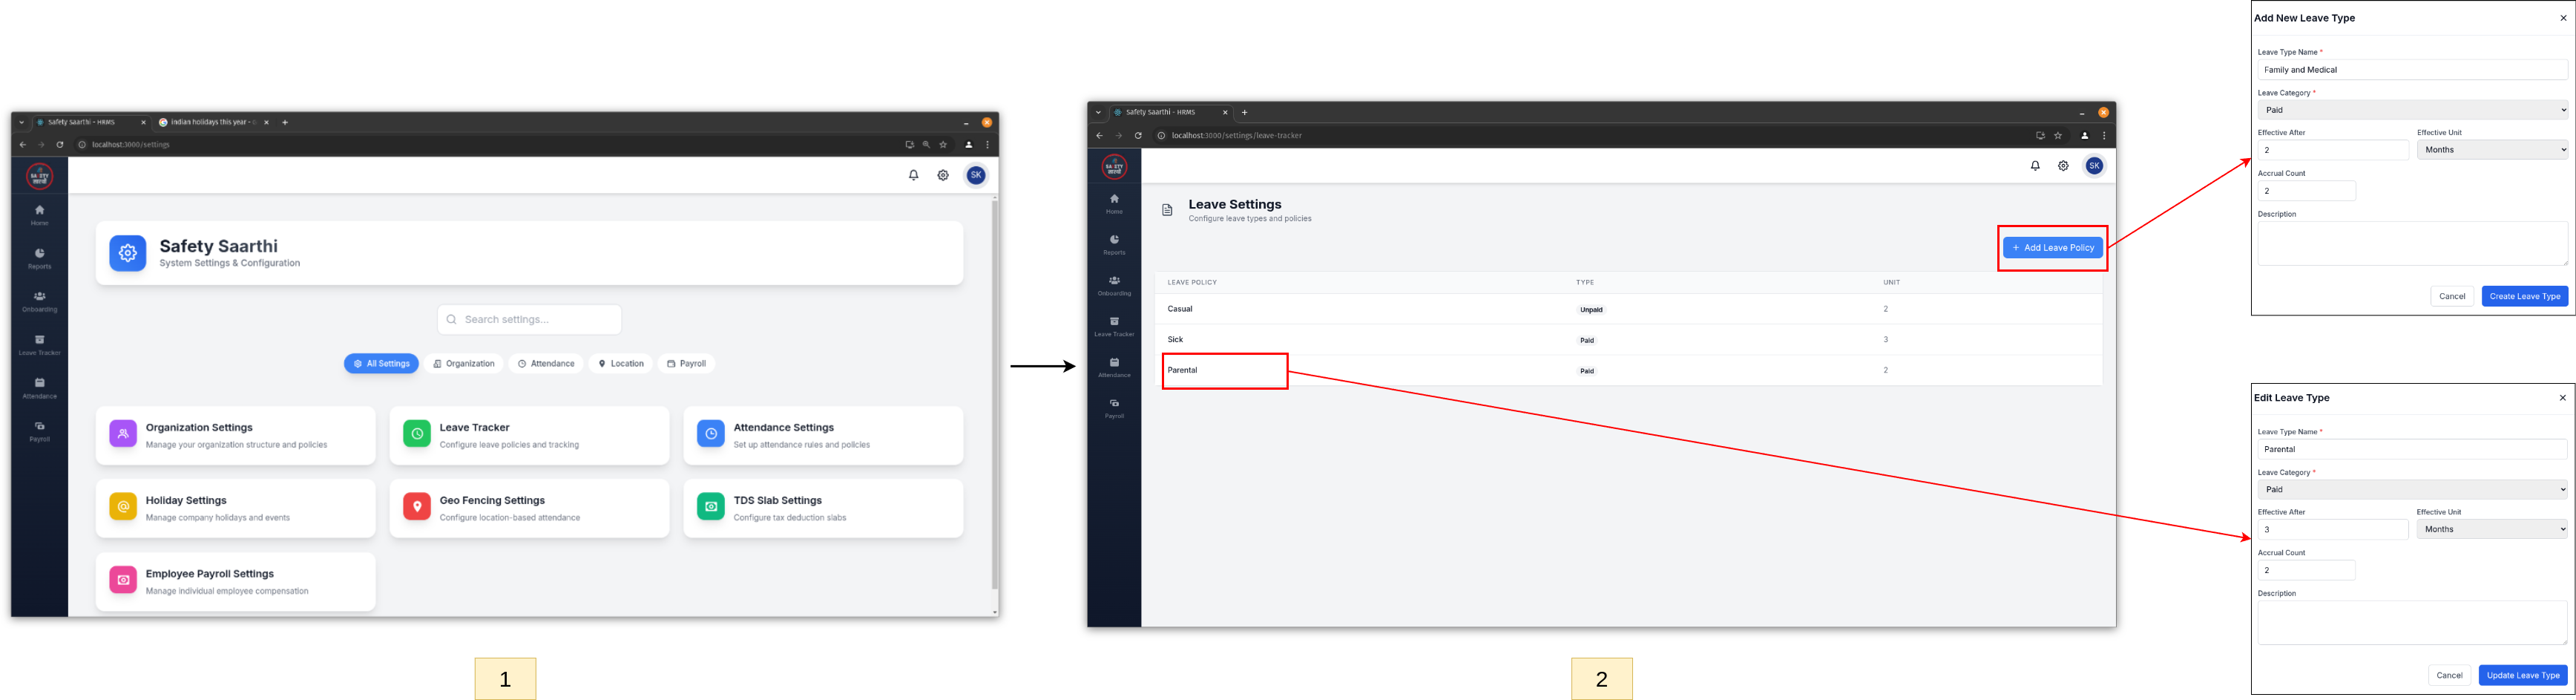
- Visit HRMS Website and open the settings page.
- Click on 'Leave Settings' to add or edit different leave types.
Leave Request
-
Apply for leave (Employee)
-
Mobile

- From the home page, click on the 'Leave' button.
- View your leave balances (accrual count and balance left for each leave type).
- Click on the 'Apply Leave' button and fill out the form.
-
HRMS Website
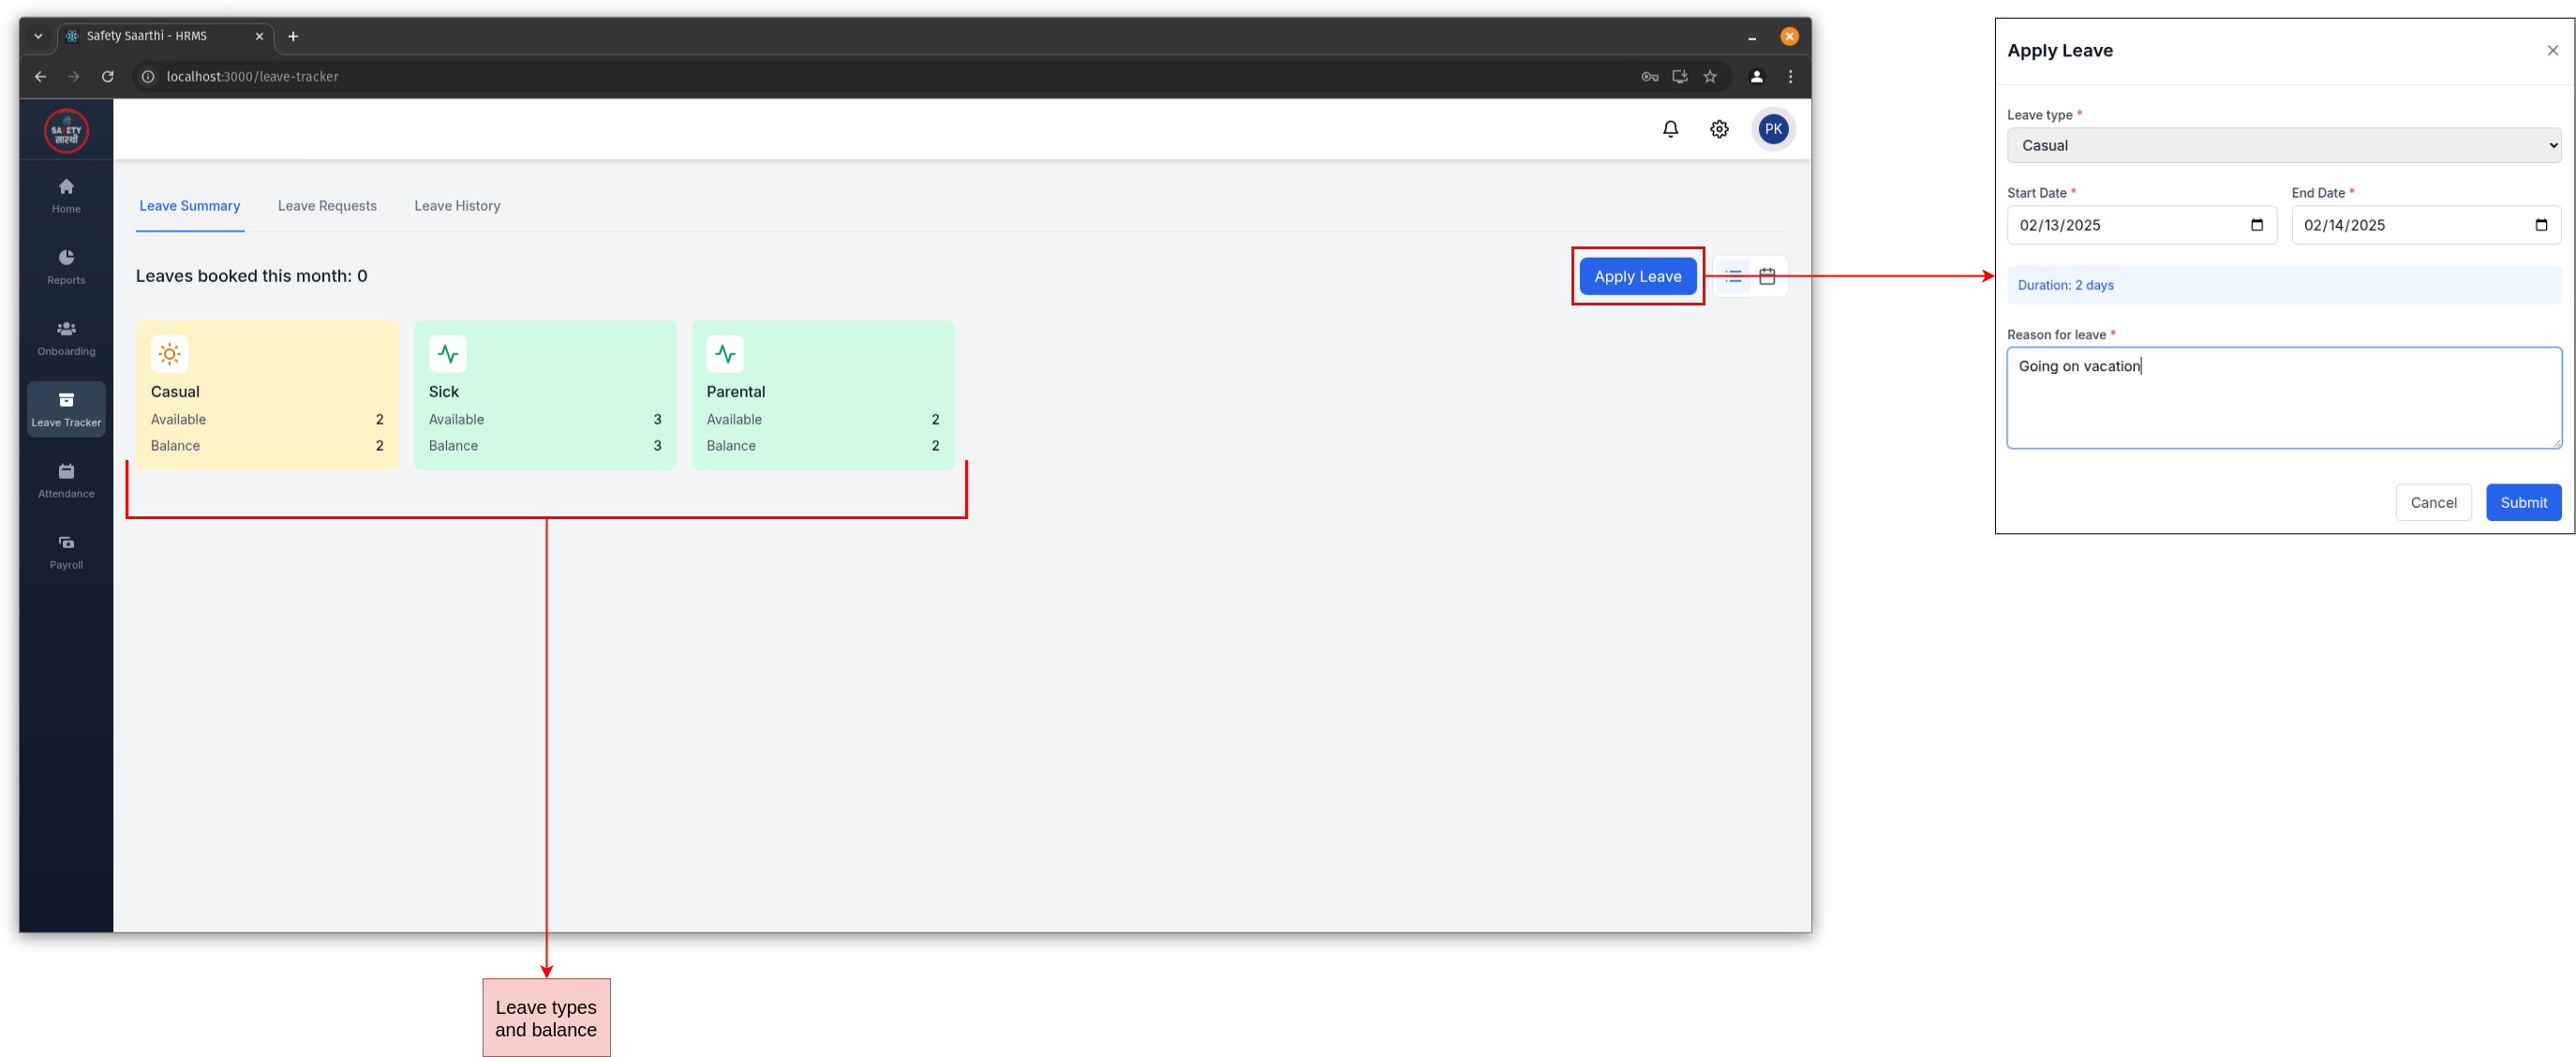
- Go to the 'Leave Tracker' tab on the sidebar.
- View your leave balances and click on the 'Apply Leave' button.
-
Mobile
-
Review leave request (Manager)
-
Mobile
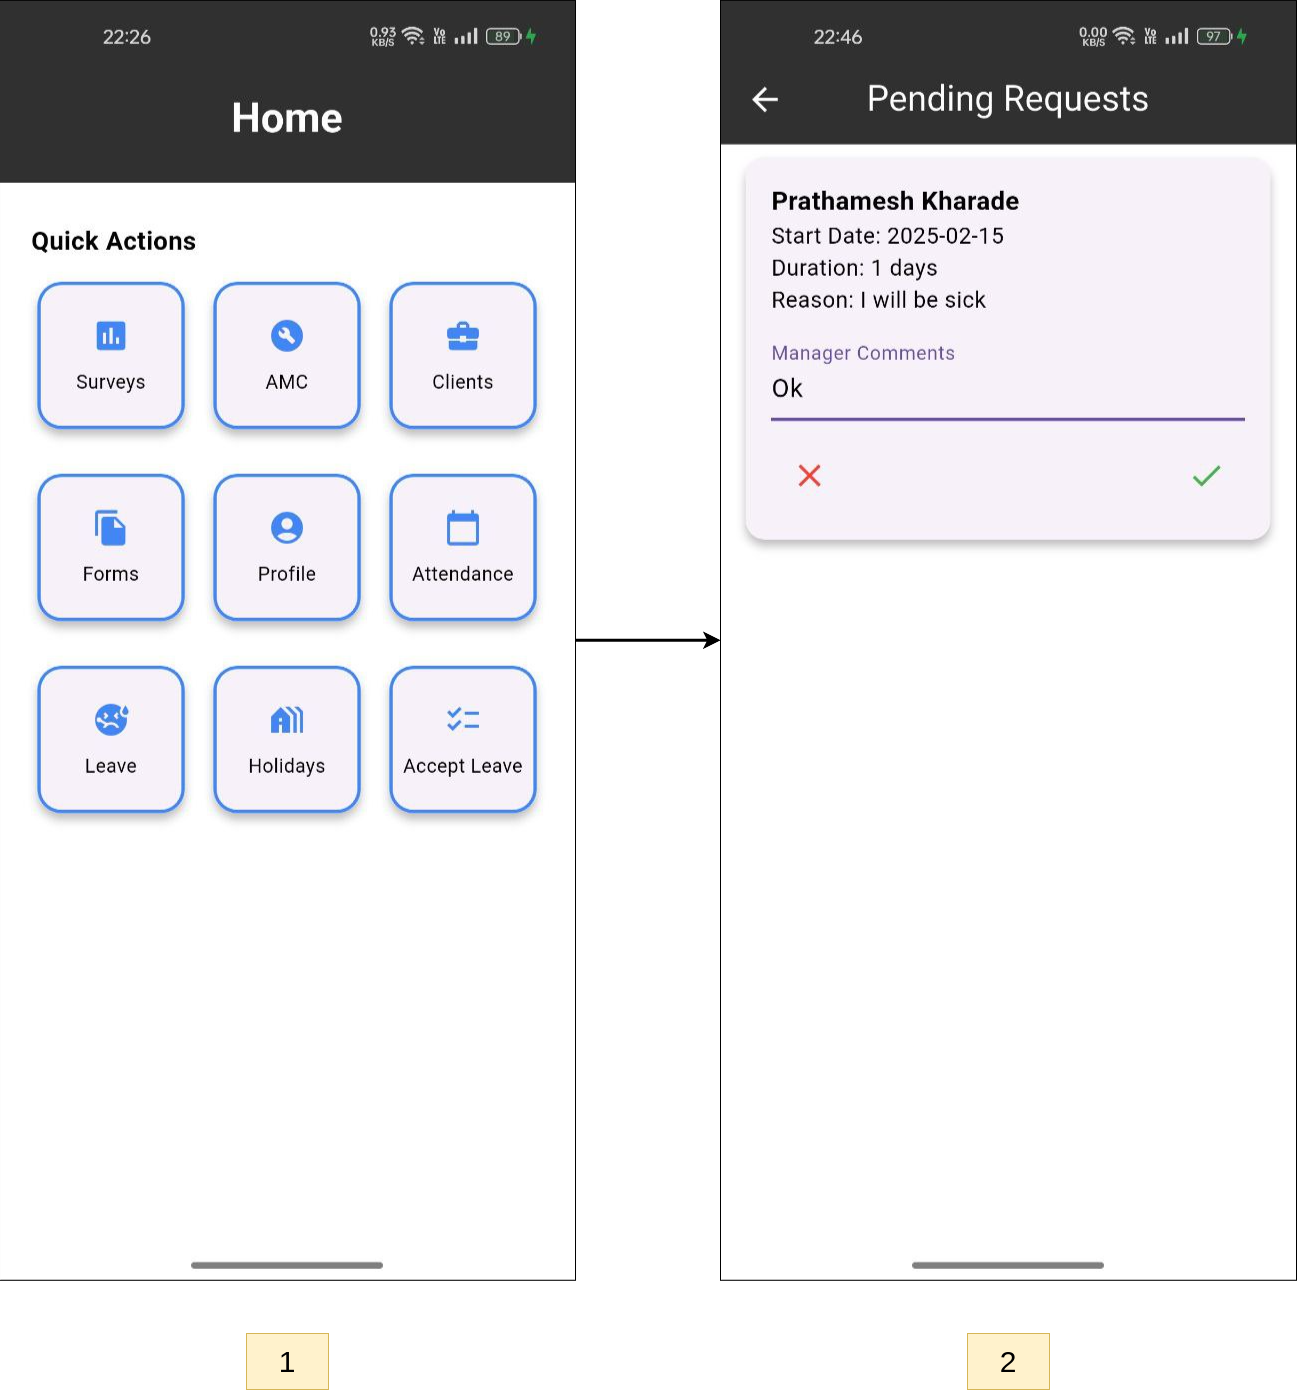
- From the home page, click on the 'Accept Leave' button.
- View the list of leave requests and accept or reject them.
-
HRMS Website

- Go to the 'Home' tab on the sidebar and and click on 'Leave Approvals'.
- View the list of leave requests and accept or reject them.
-
Mobile
-
Review leave request (HR)

- Go to the 'Home' tab on the sidebar and and click on 'Leave Approvals'.
- View the list of leave requests and accept or reject them.
-
View leave requests for individual employee (HR)
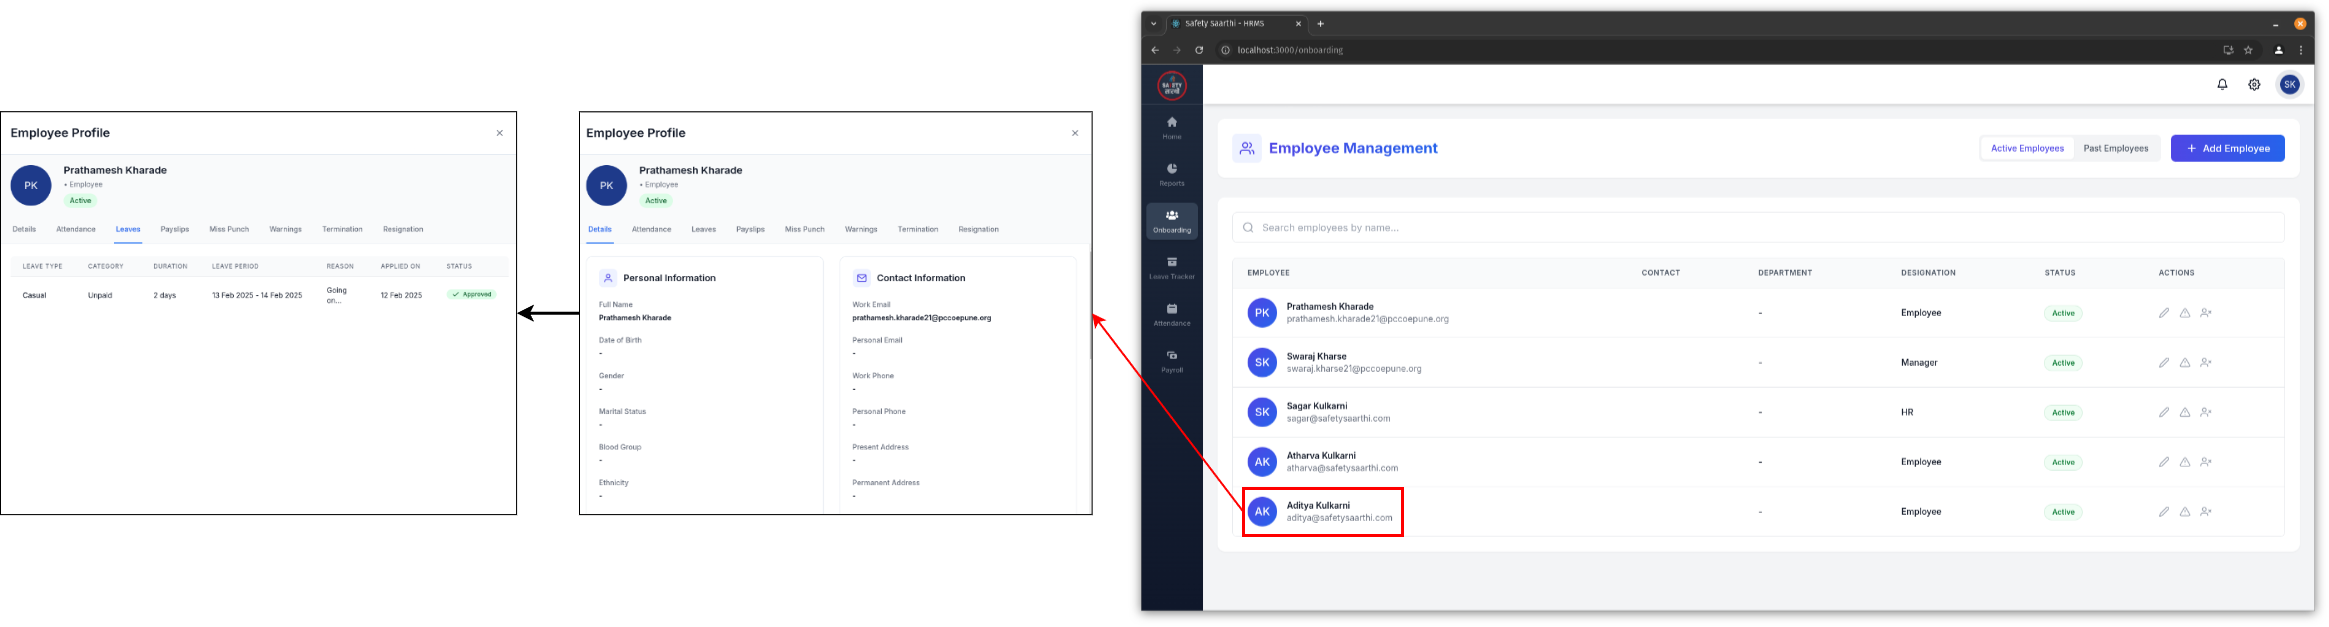
- Go to the 'Onboarding' tab.
- Select the employee and go to 'Leaves' to view their leave requests.
-
View leave status of individual employee (Employee)
-
Mobile
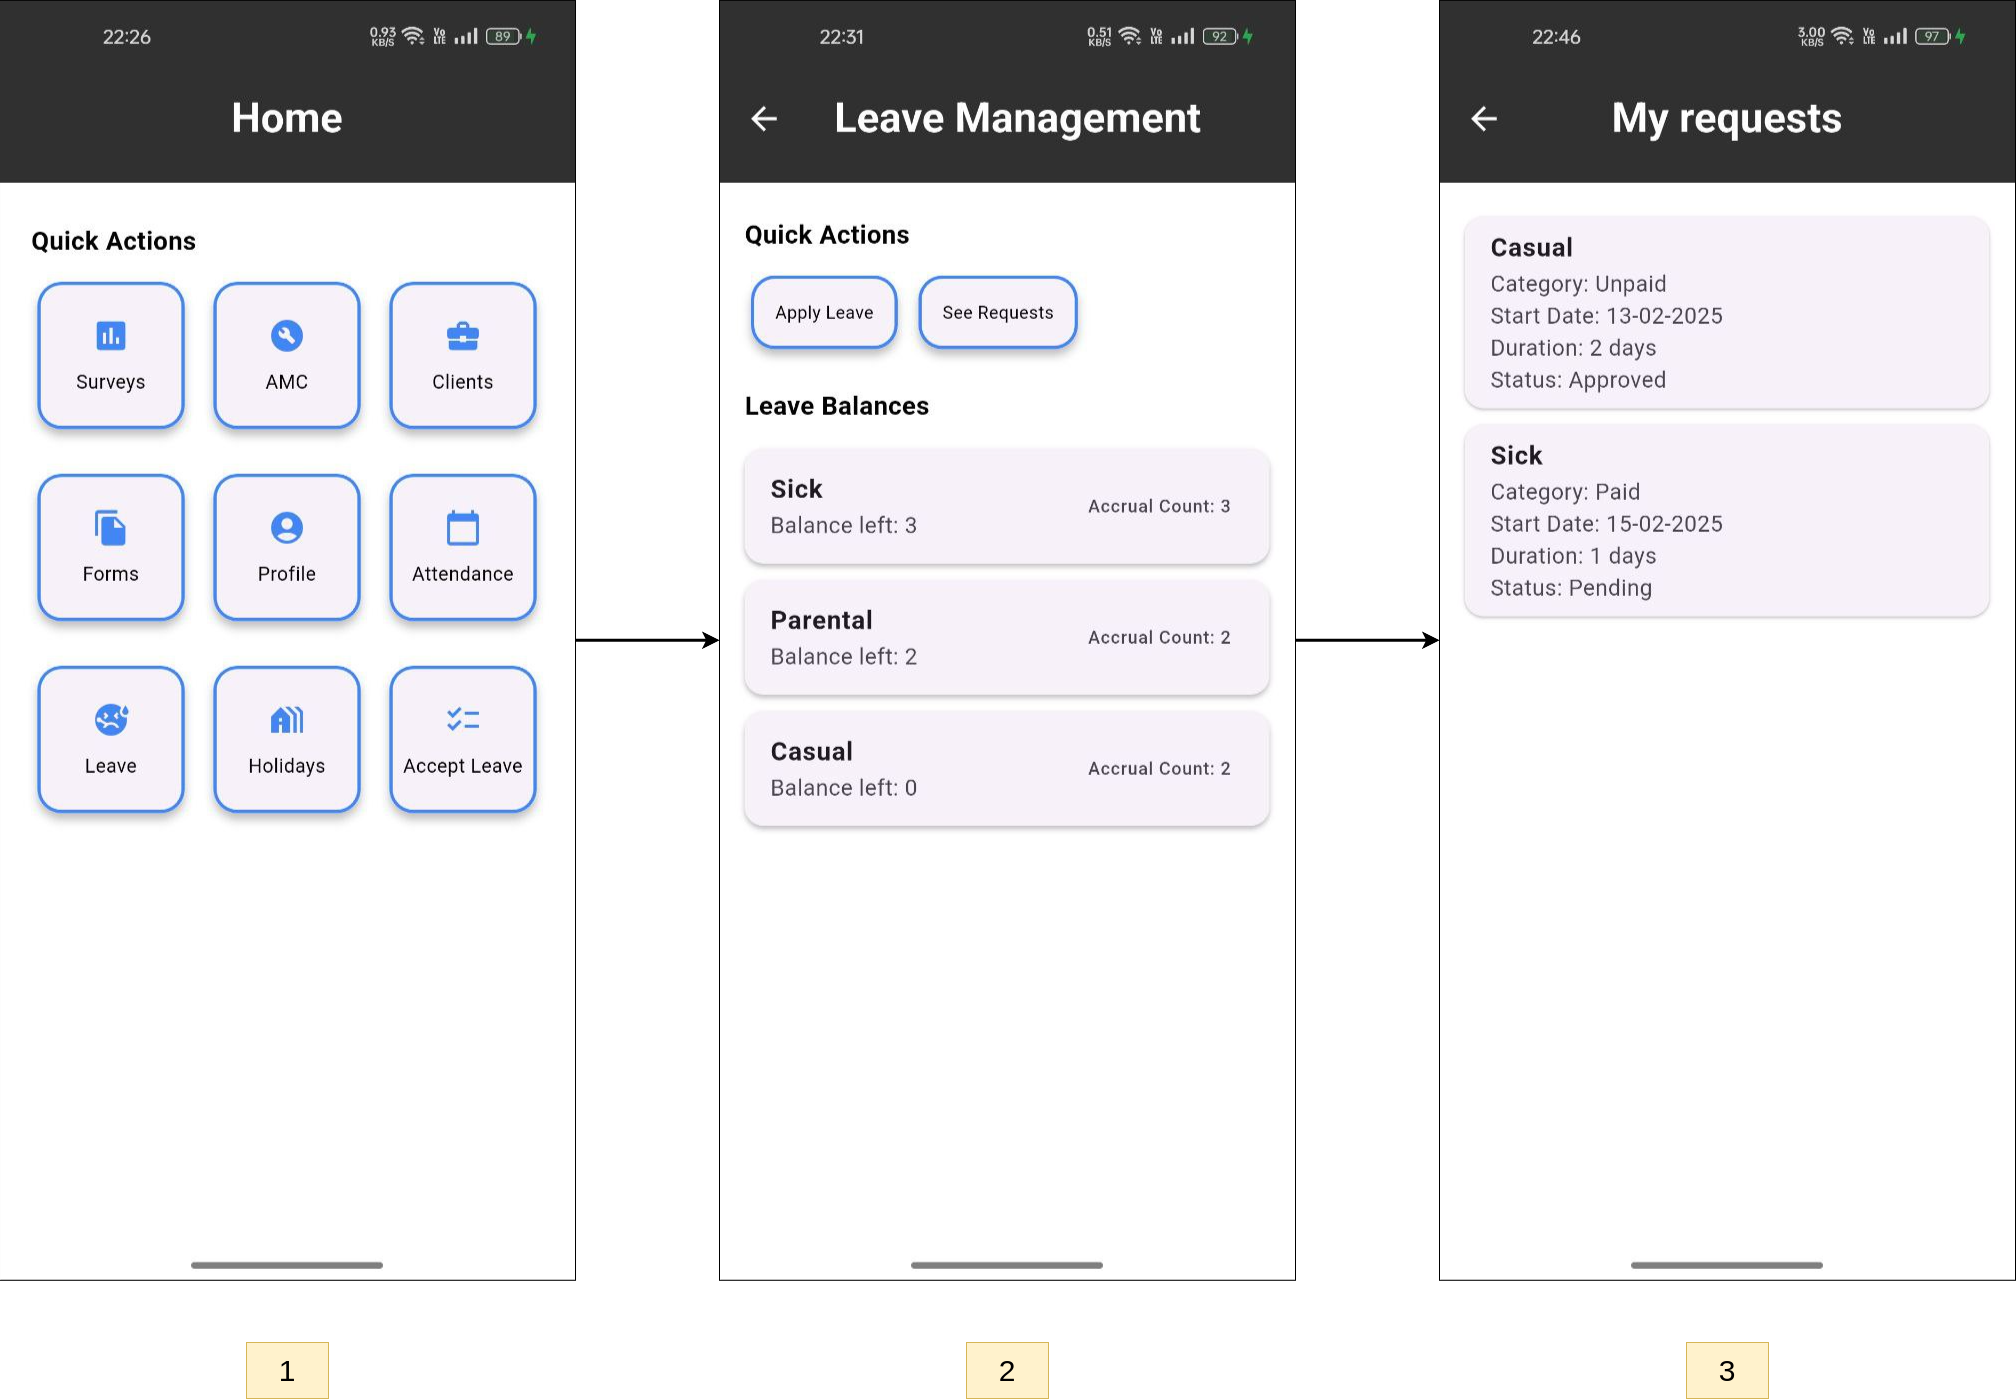
- From the home page, click on the 'Leave' button.
- View your leave balances and click on the 'See Requests' button.
- View the list of your leave requests.
-
HRMS Website
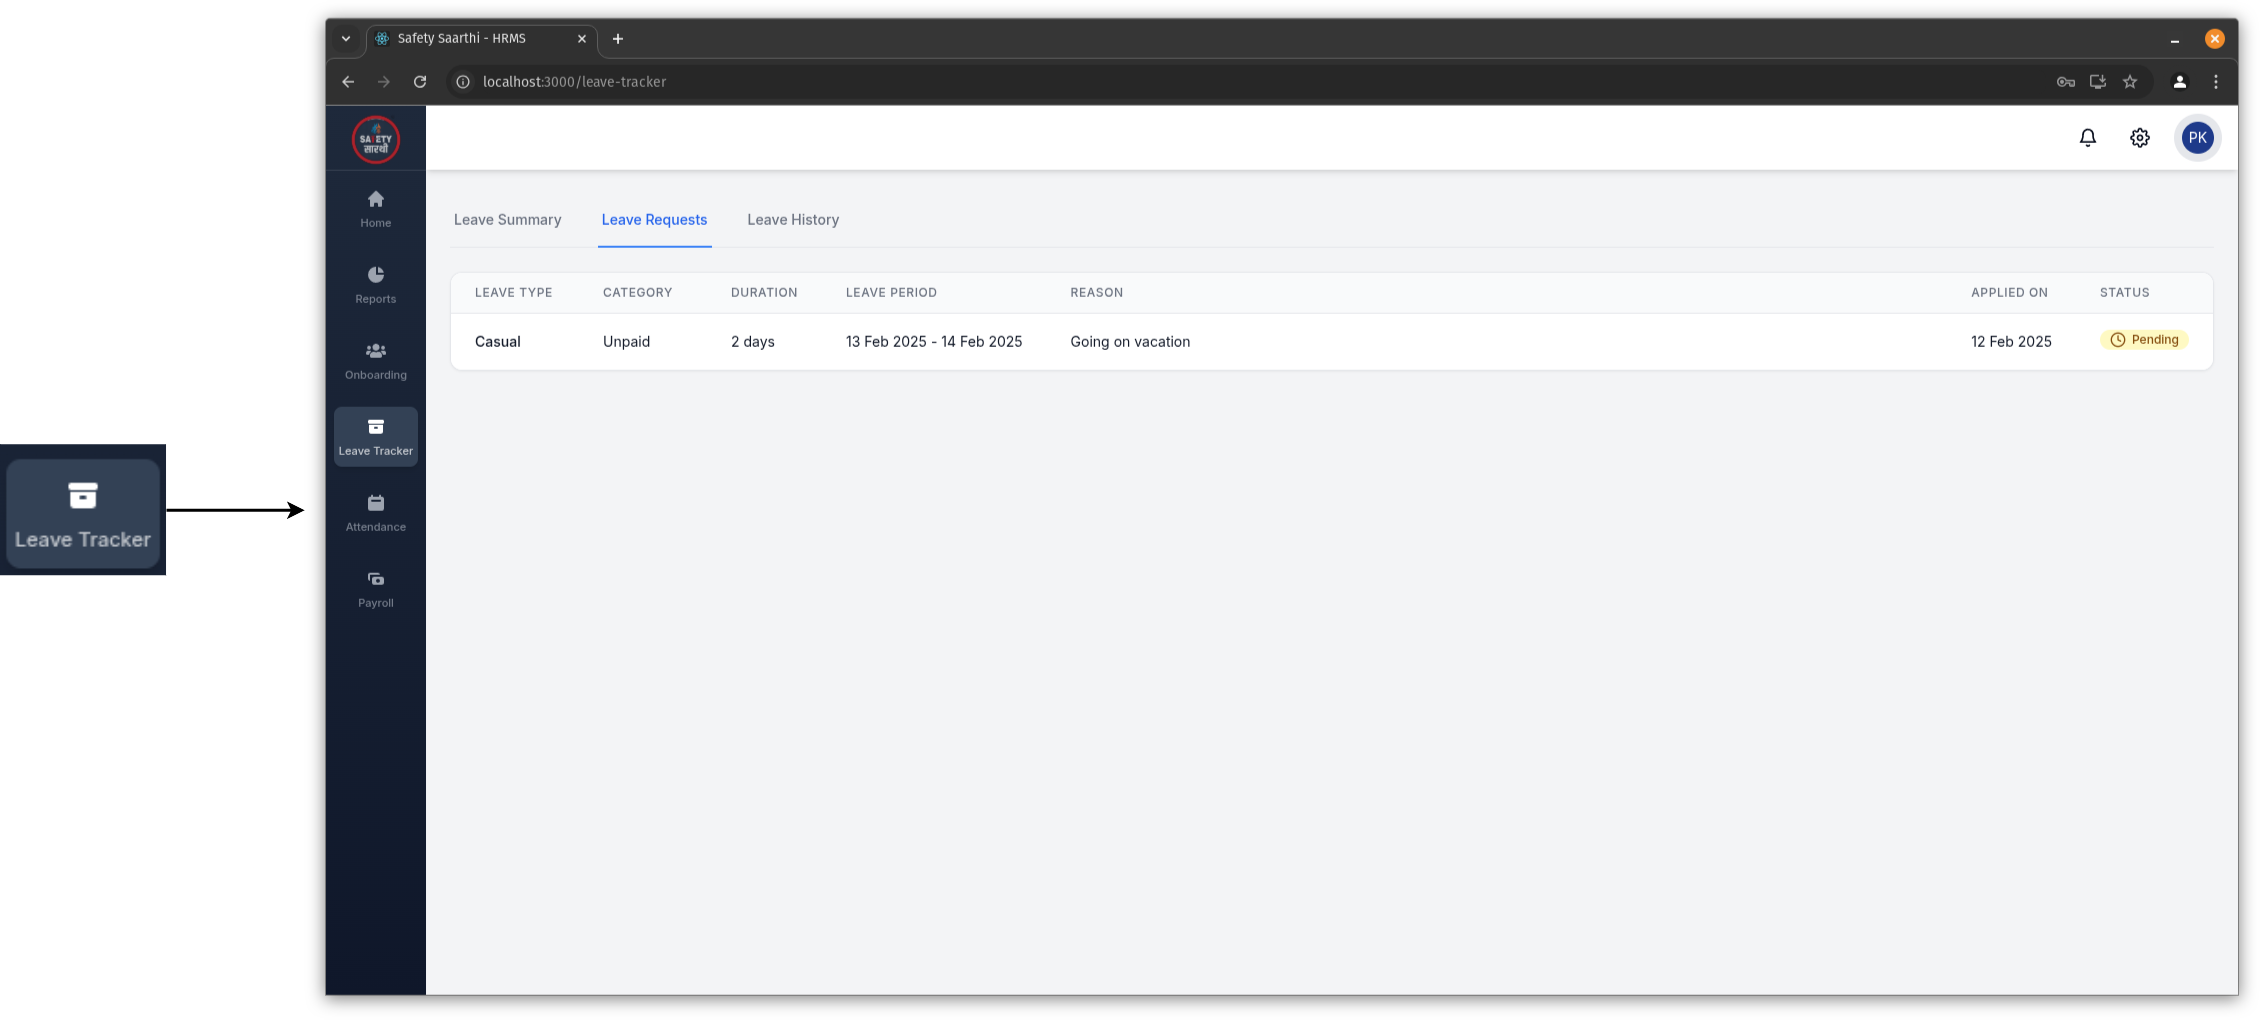
- Go to the 'Leave Tracker' tab on the sidebar.
- Click on 'Leave Requests' to view your leave requests.
-
Mobile
Reports
-
Daily Leave Status
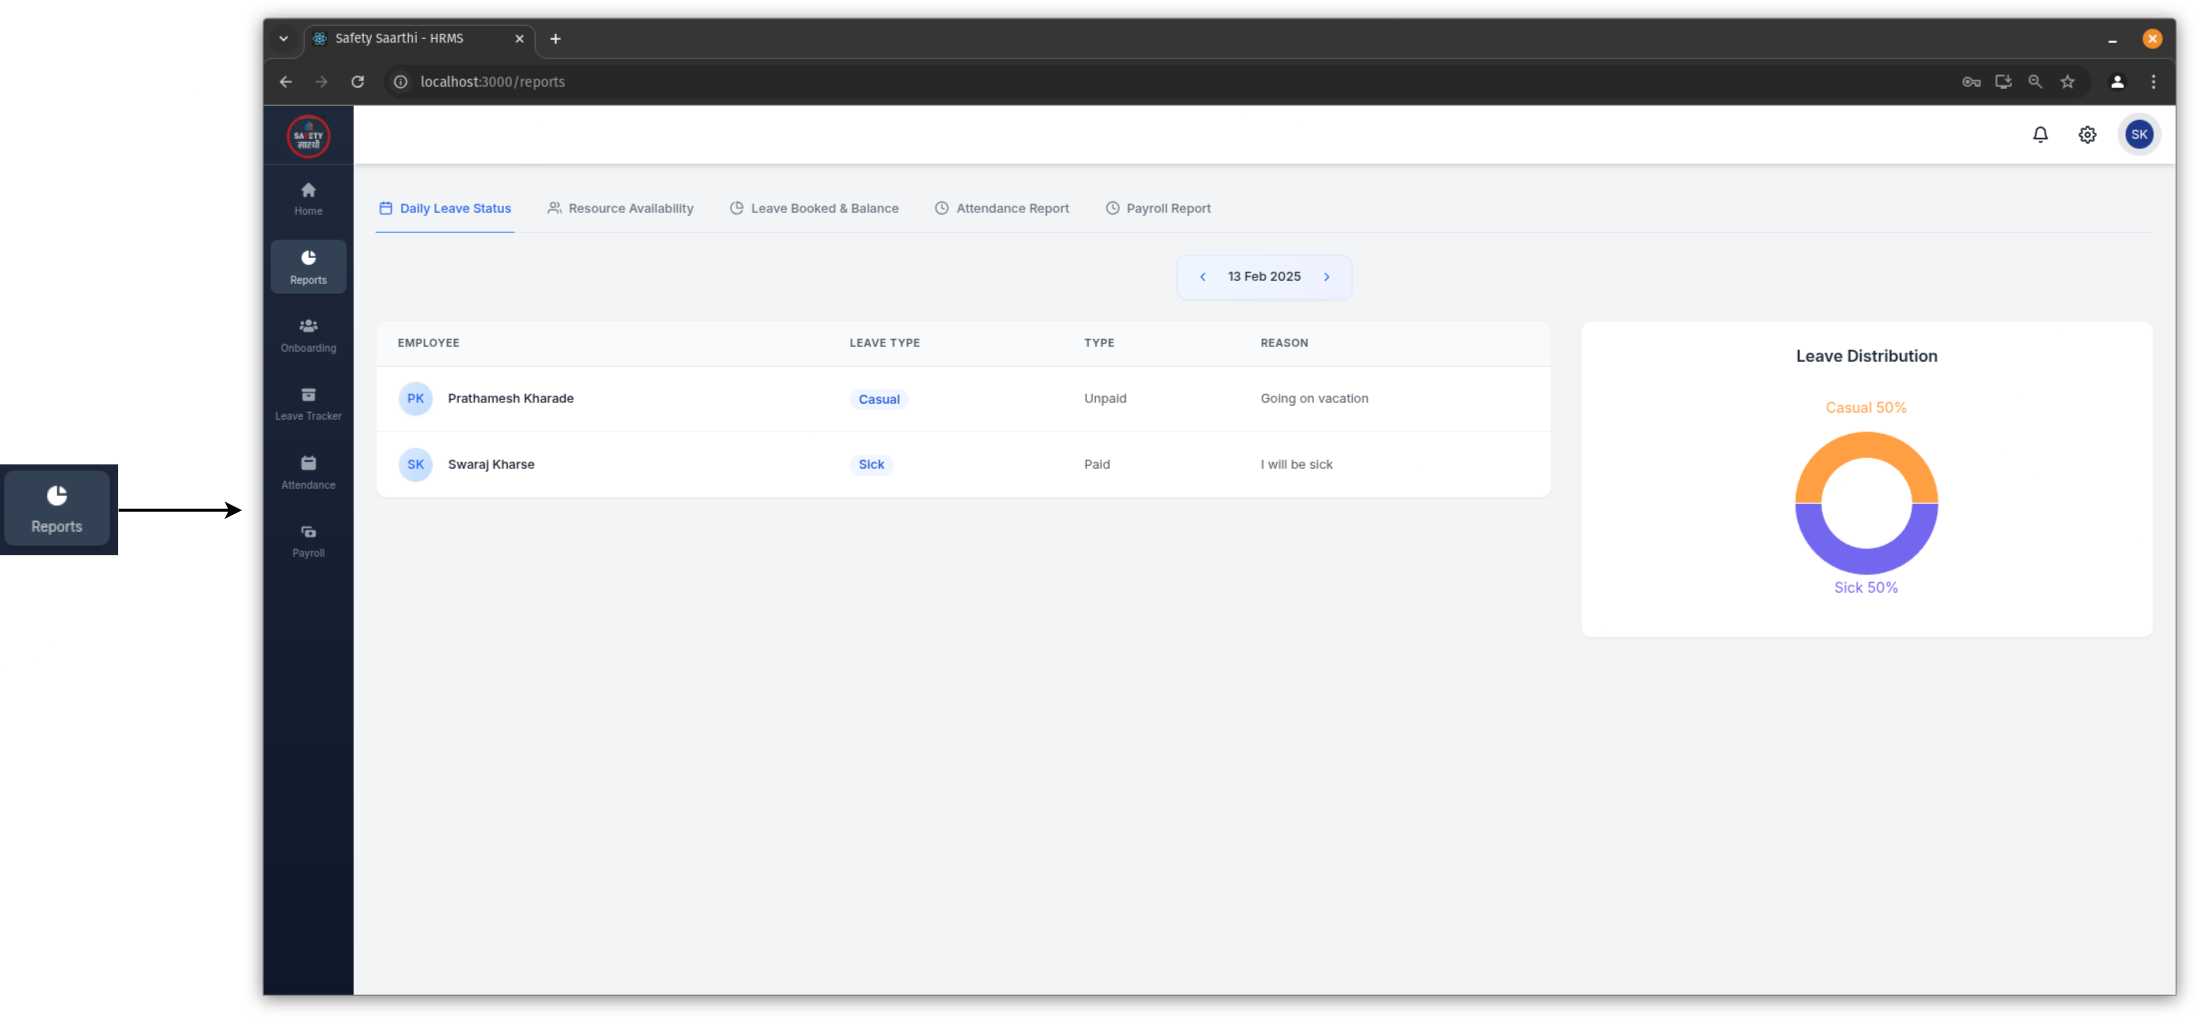
Go to the 'Reports' tab on the sidebar and click on 'Daily Leave Status'. View the leave status of all employees for a specific day. Use the filter to change the date.
-
Leave Booked And Balanced
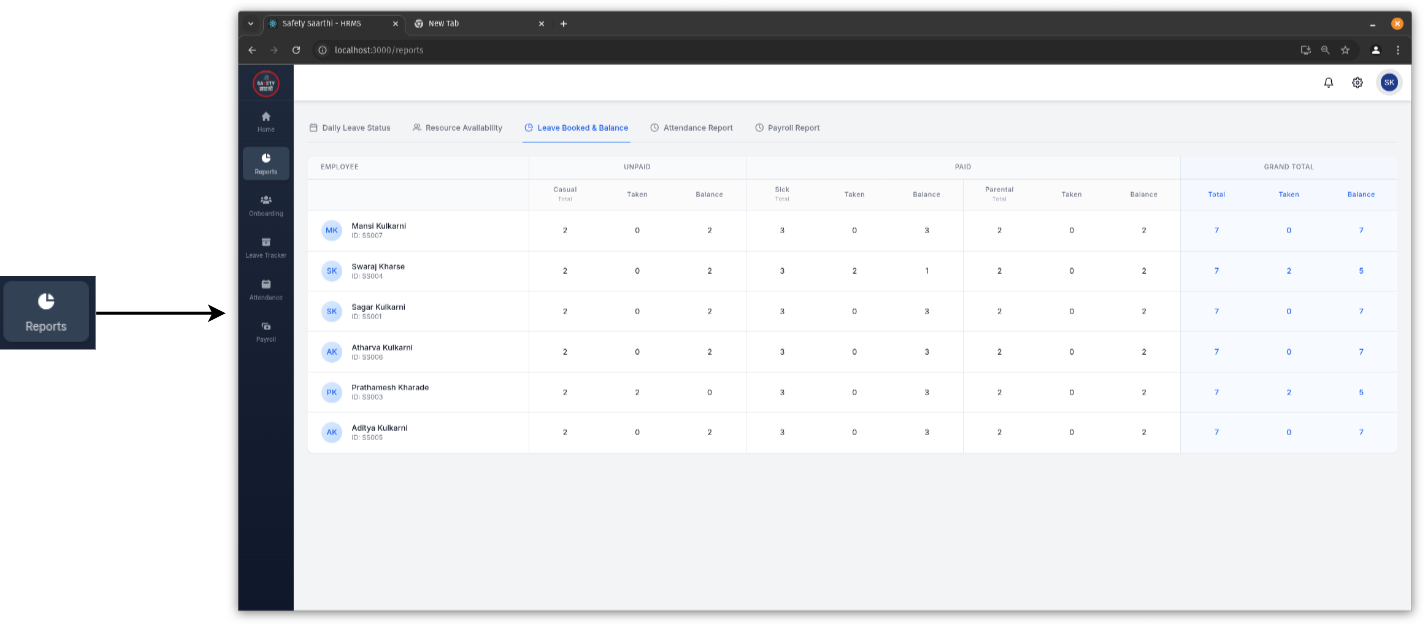
Go to the 'Reports' tab on the sidebar and click on 'Leave Booked And Balanced'. View the leave balance of all employees for all leave types.
Payroll
Settings
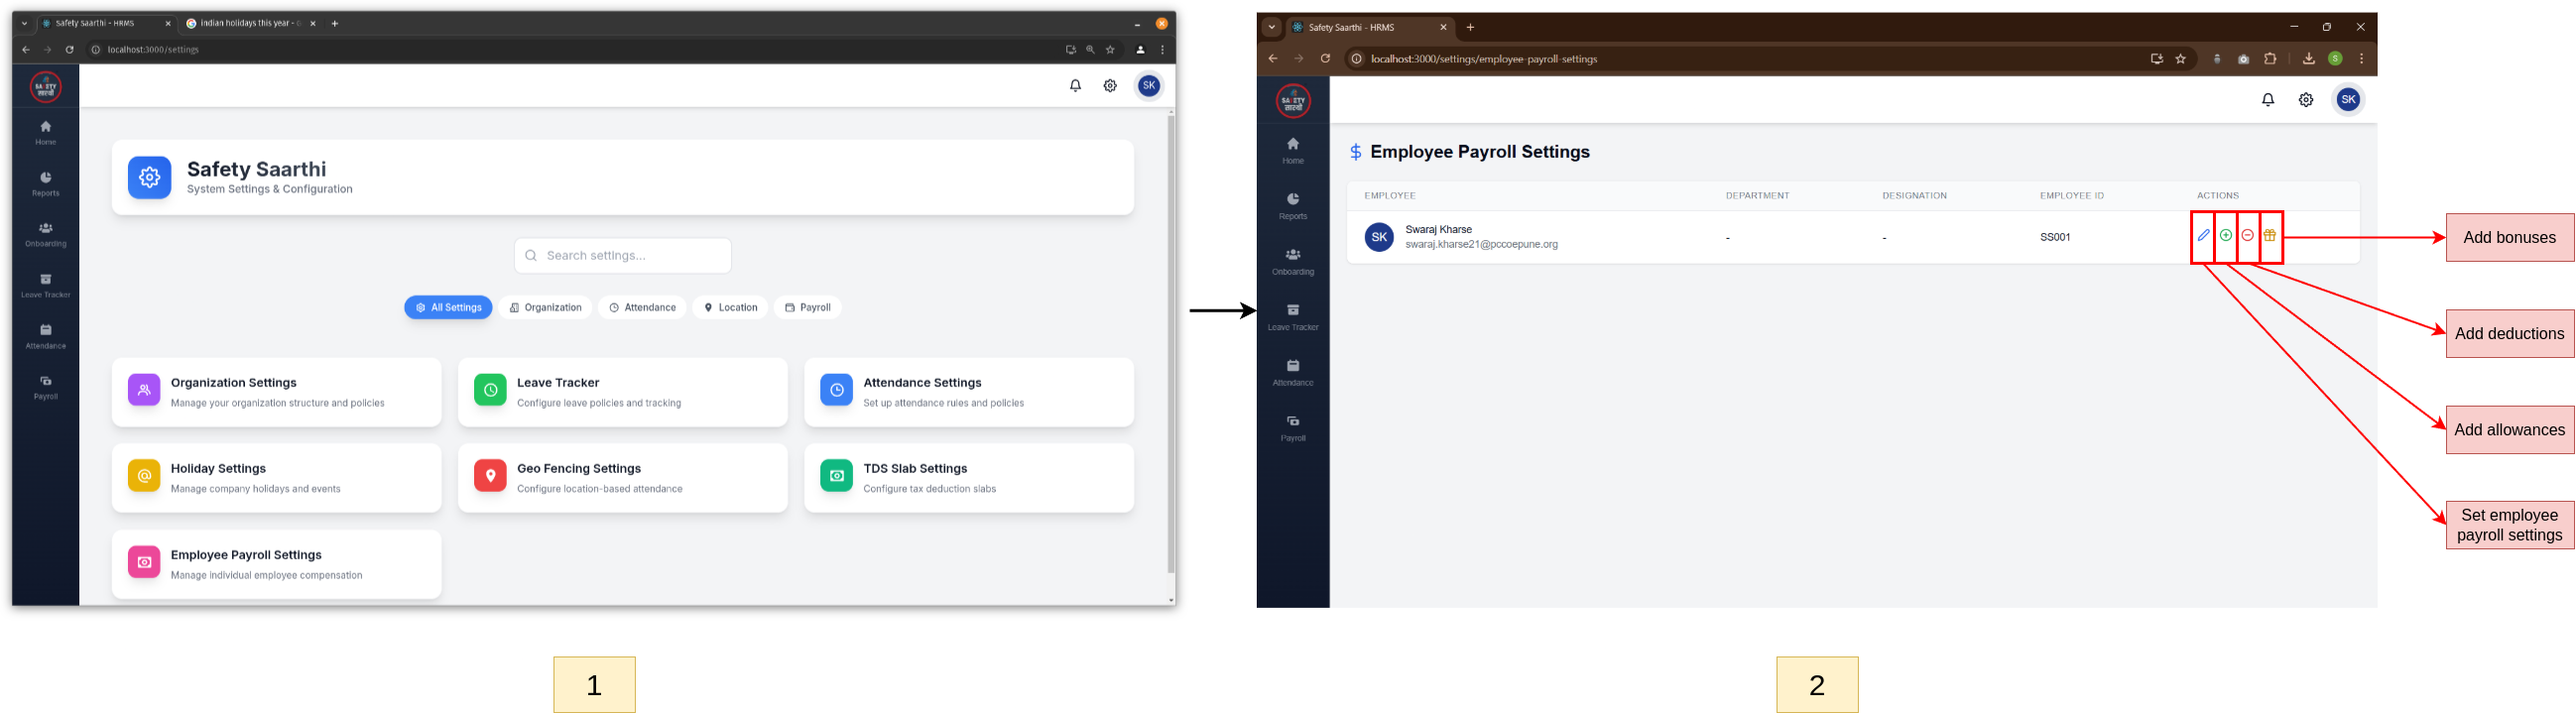
- Visit HRMS Website and open the settings page.
- Click on 'Employee Payroll Settings' to manage payroll settings, allowances, bonuses, and deductions.
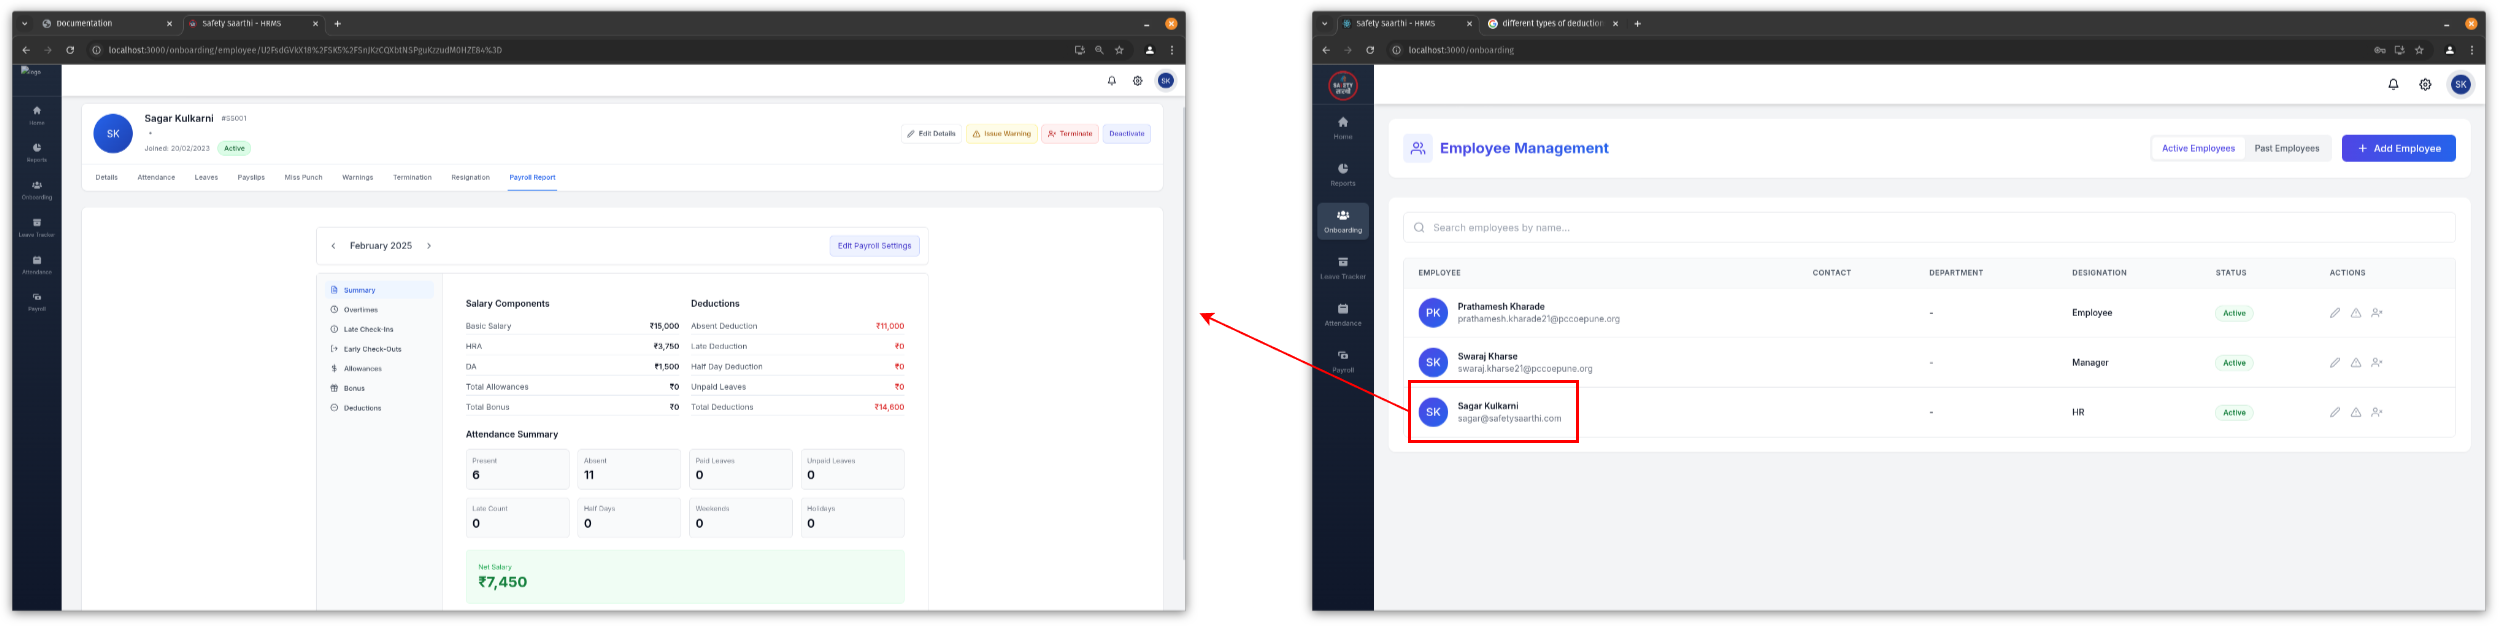
Go to the 'Onboarding' tab, select an employee, and click on 'Payroll Report'.
-
For each employee
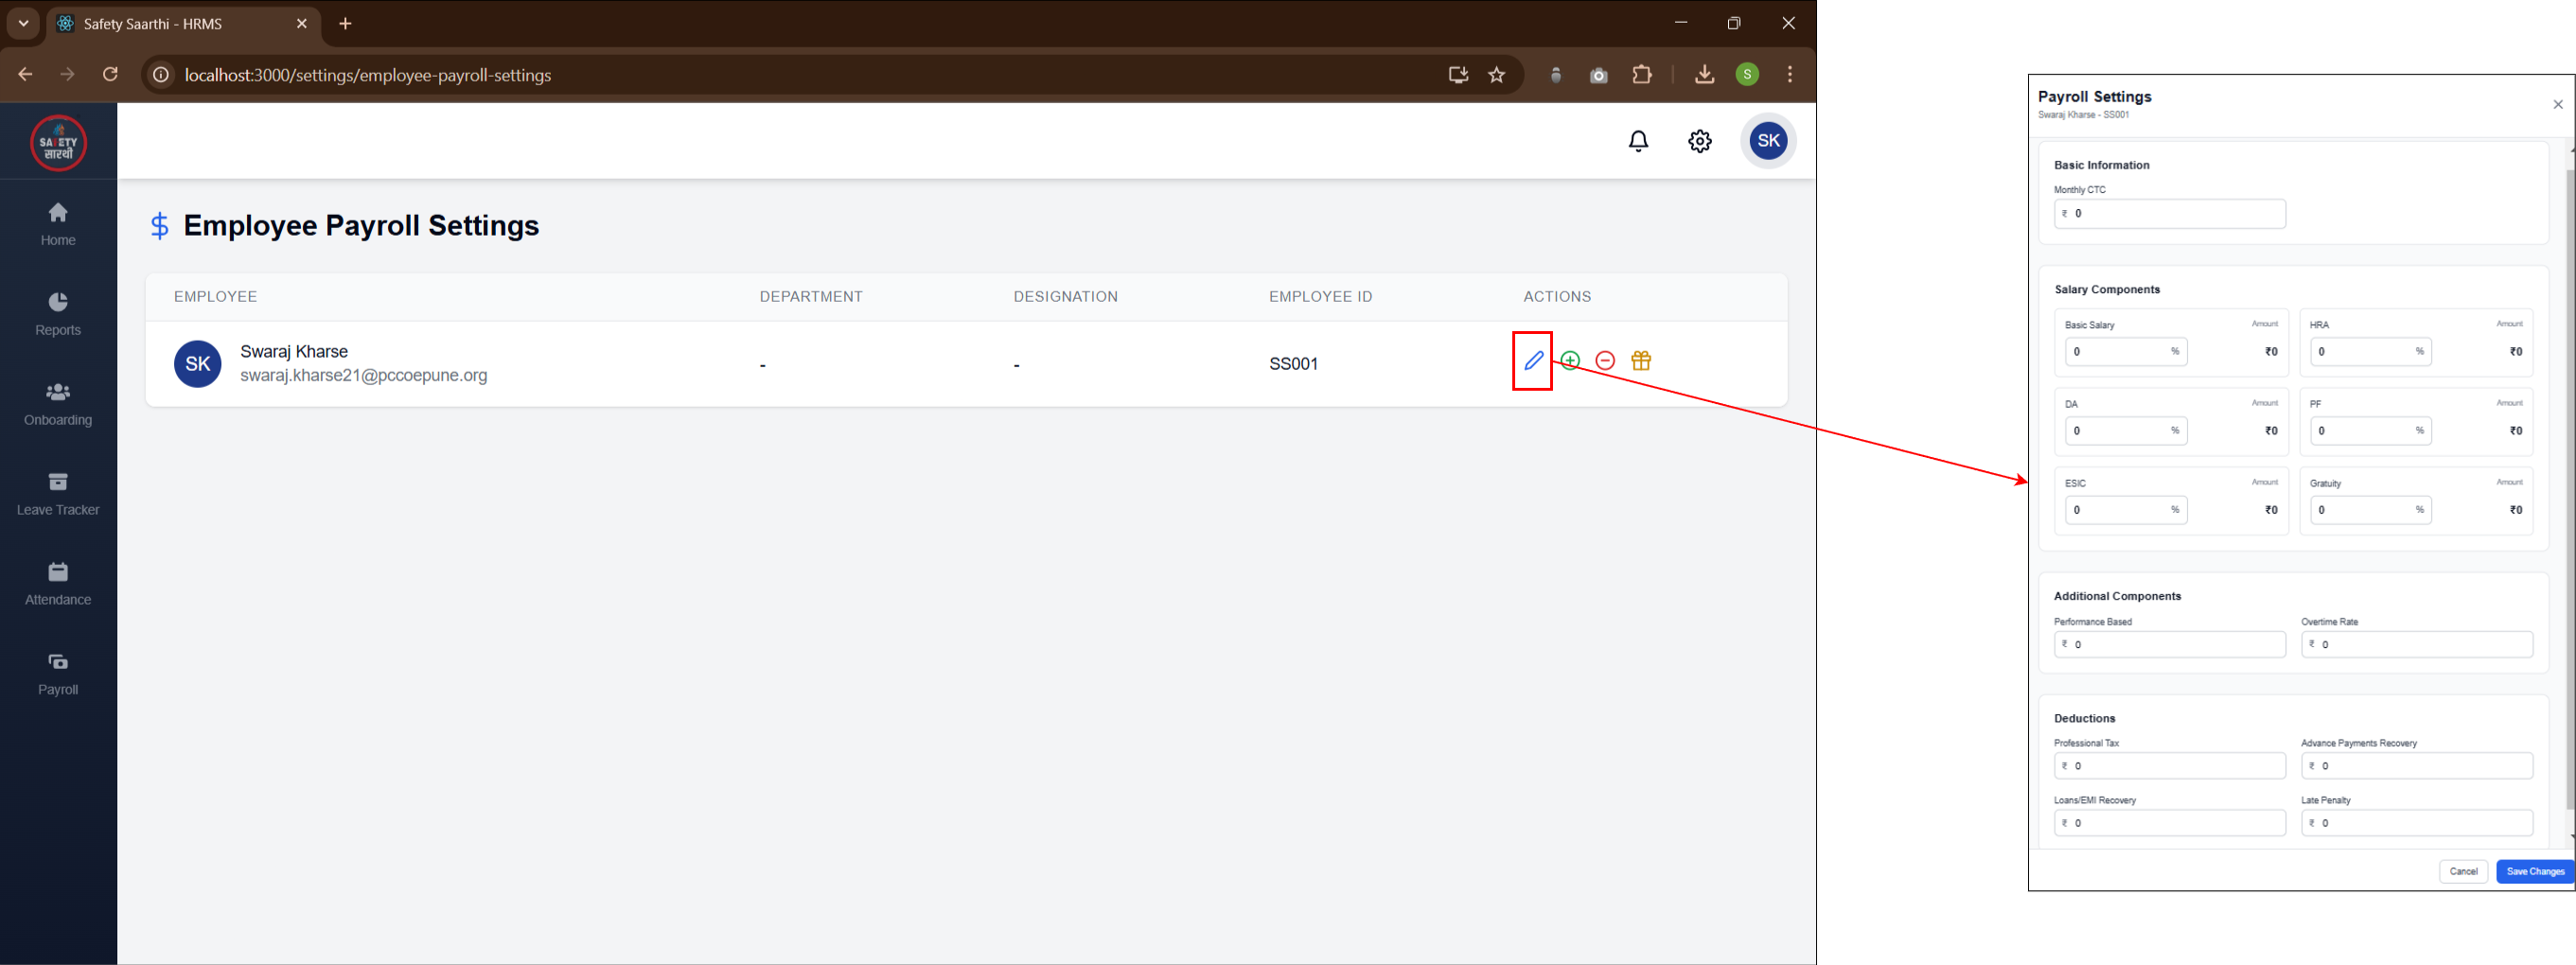
Fill out the form for employee payroll settings. You can keep the details fixed or edit them as required.
-
Allowance

Manage allowances for employees. Add, edit, or delete allowances as needed.
-
Deduction
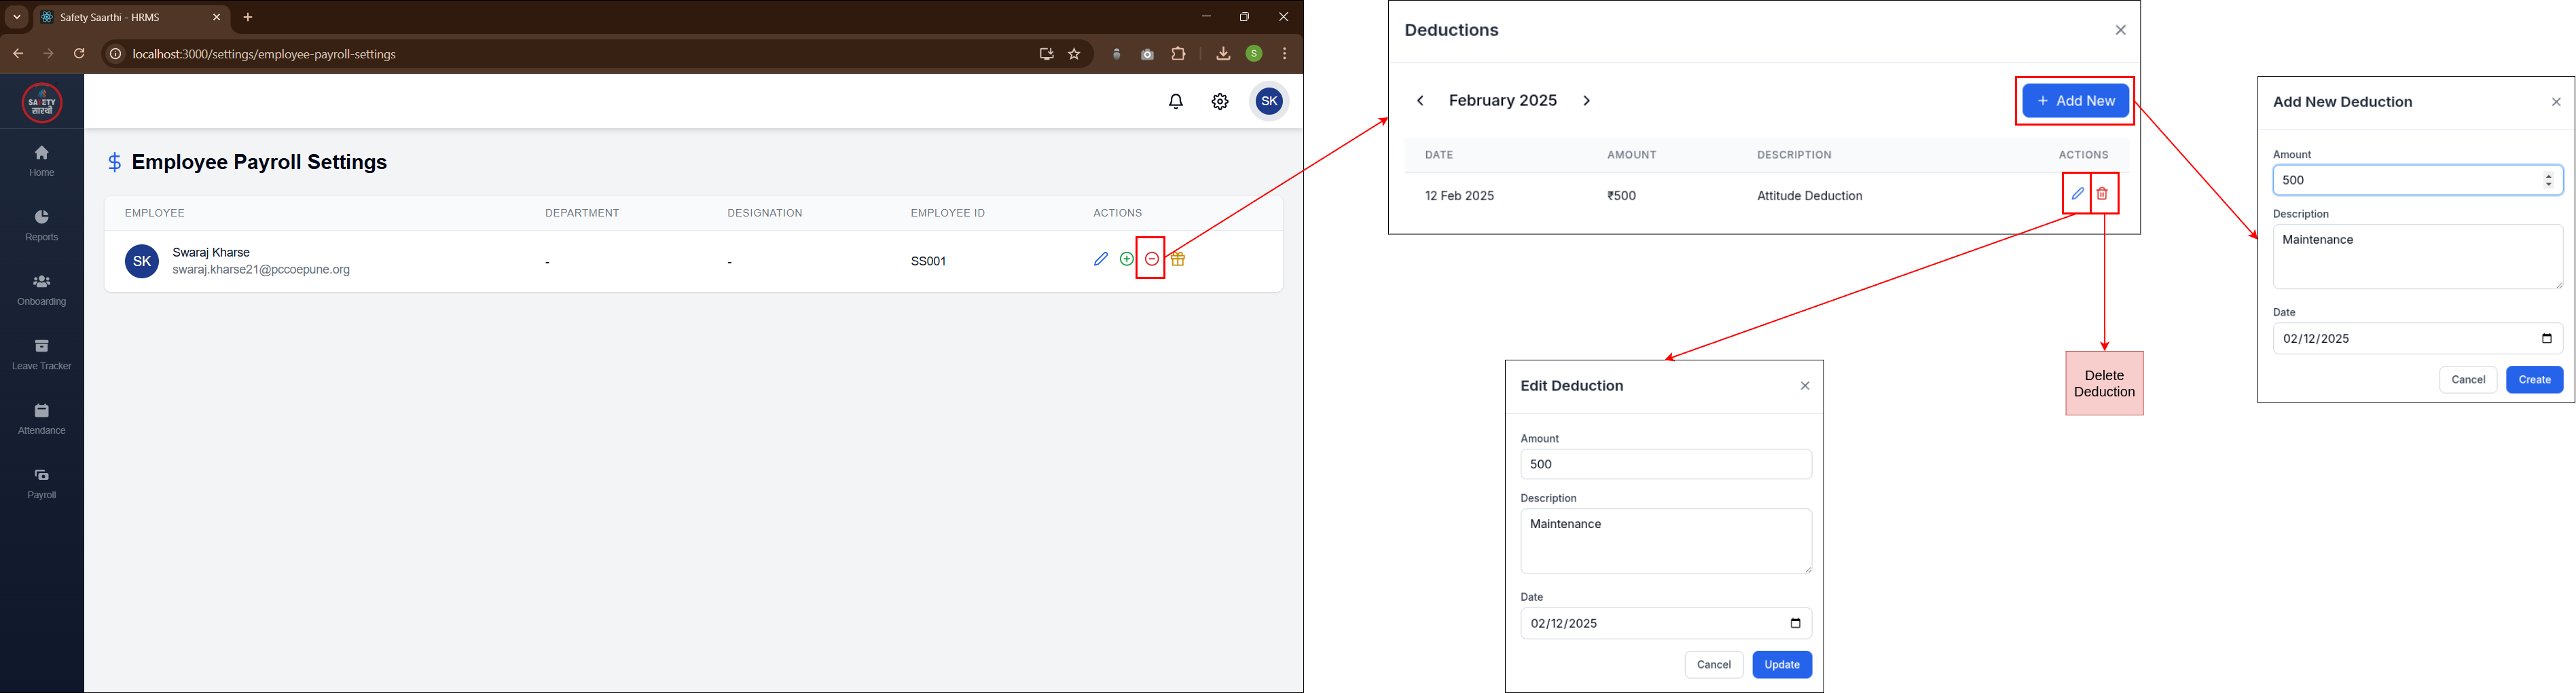
Manage deductions for employees. Add, edit, or delete deductions as needed.
-
Bonus

Manage bonuses for employees. Add, edit, or delete bonuses as needed.
-
Overtime
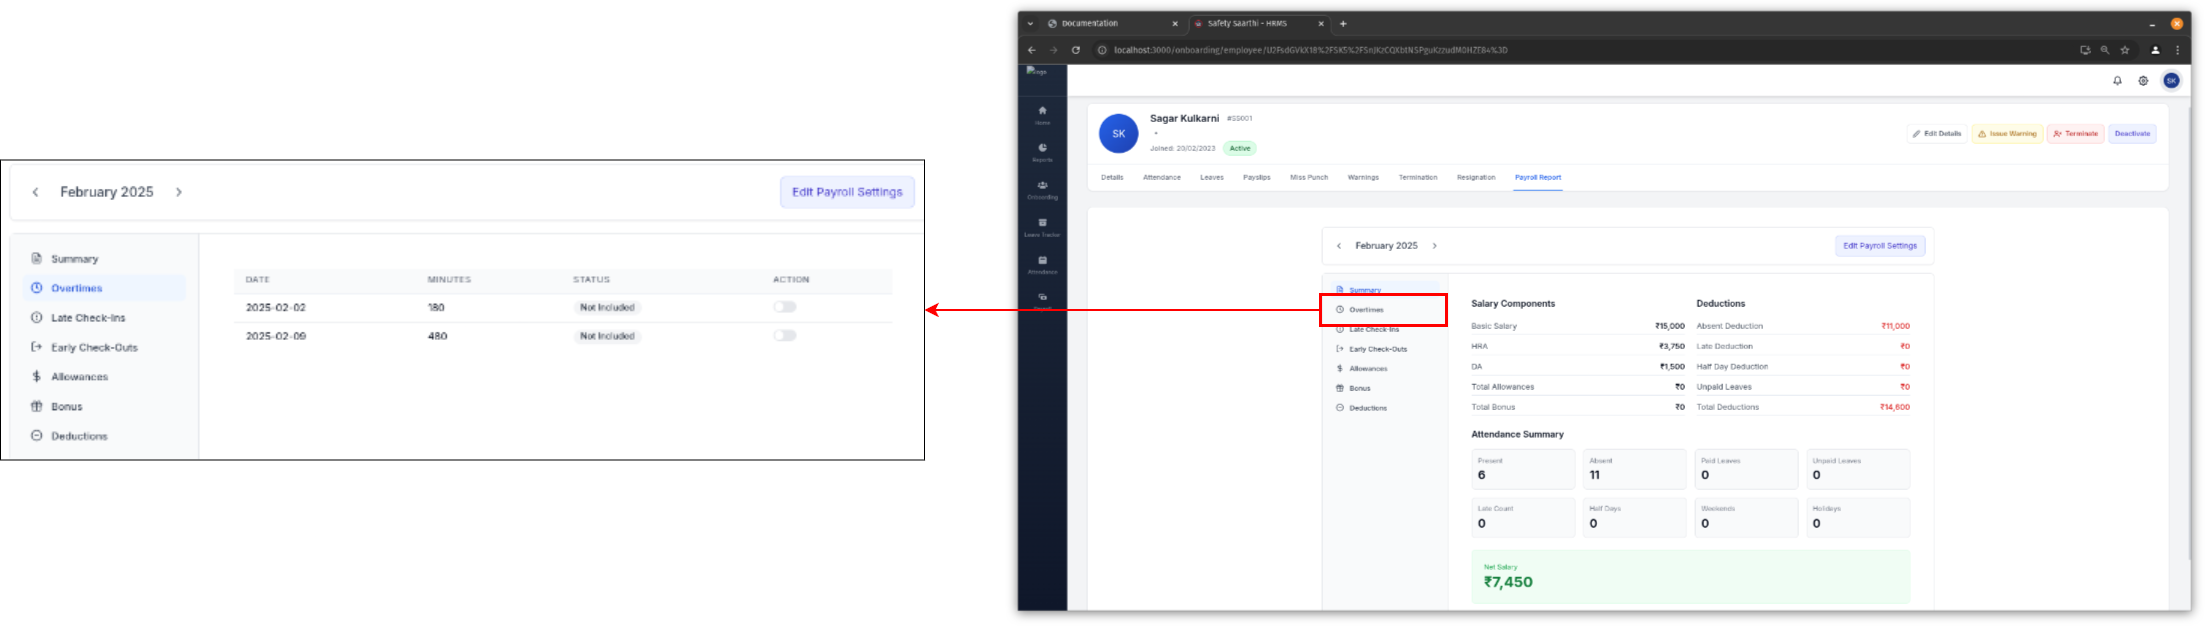
Enable or disable overtime inclusion in the payroll report. Adjust overtime minutes as needed.
-
Late
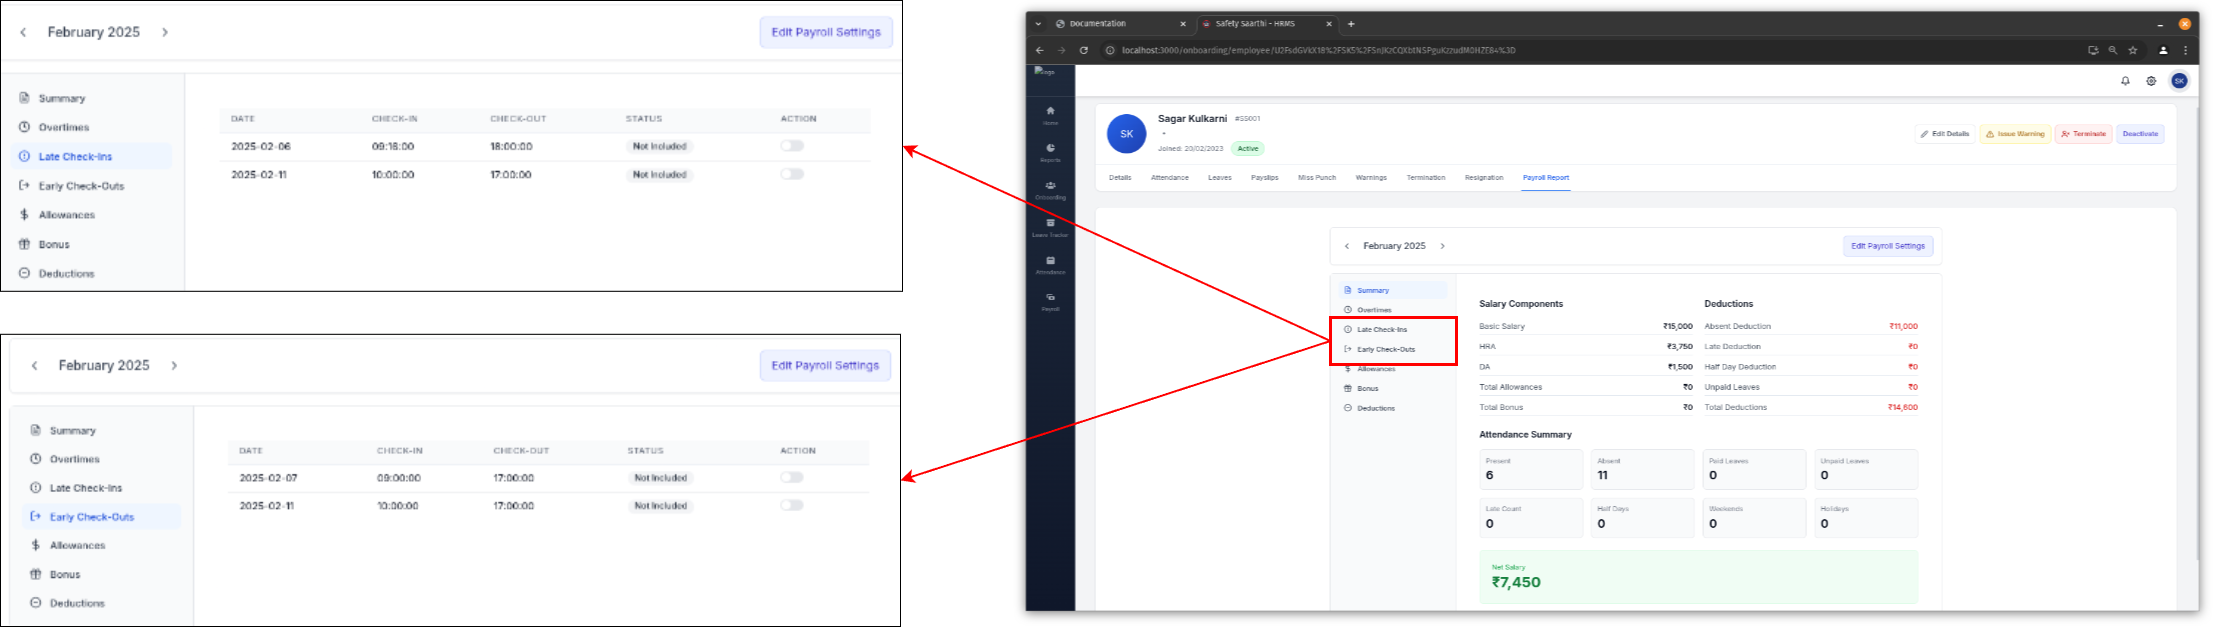
Enable or disable late entry inclusion in the payroll report.
TDS Slab
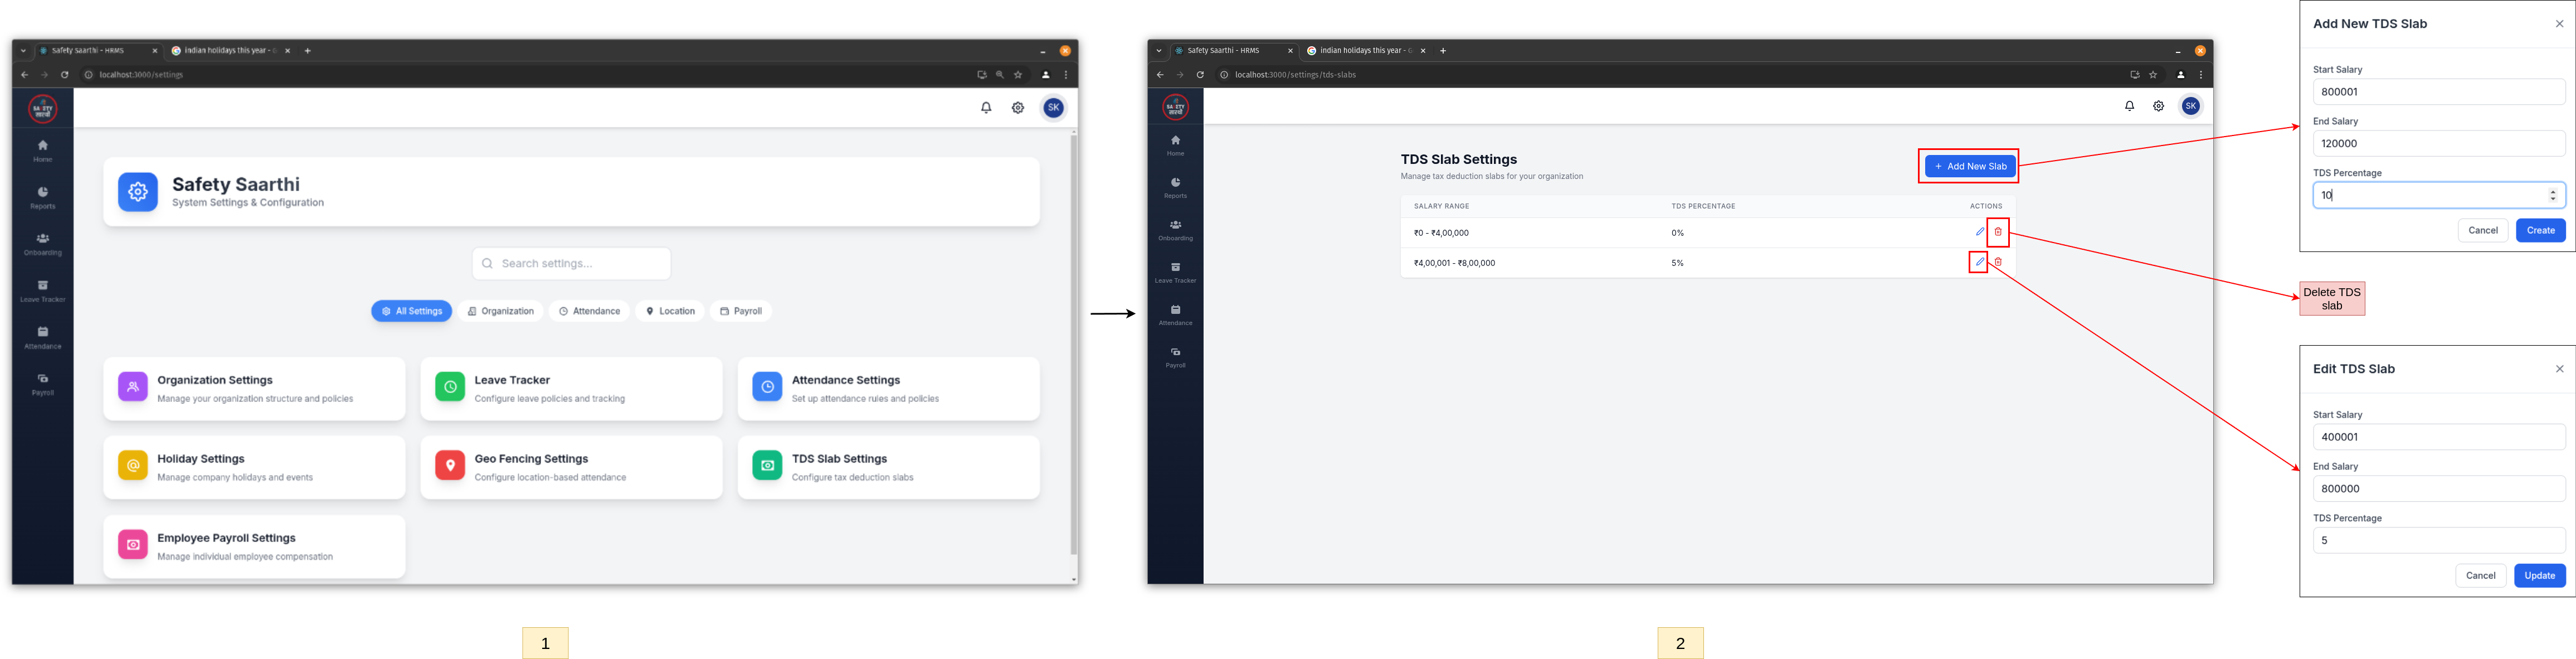
- Open the settings page and click on 'TDS Slab Settings'.
- Use the functionalities to add, edit, or delete TDS slabs.
Reports
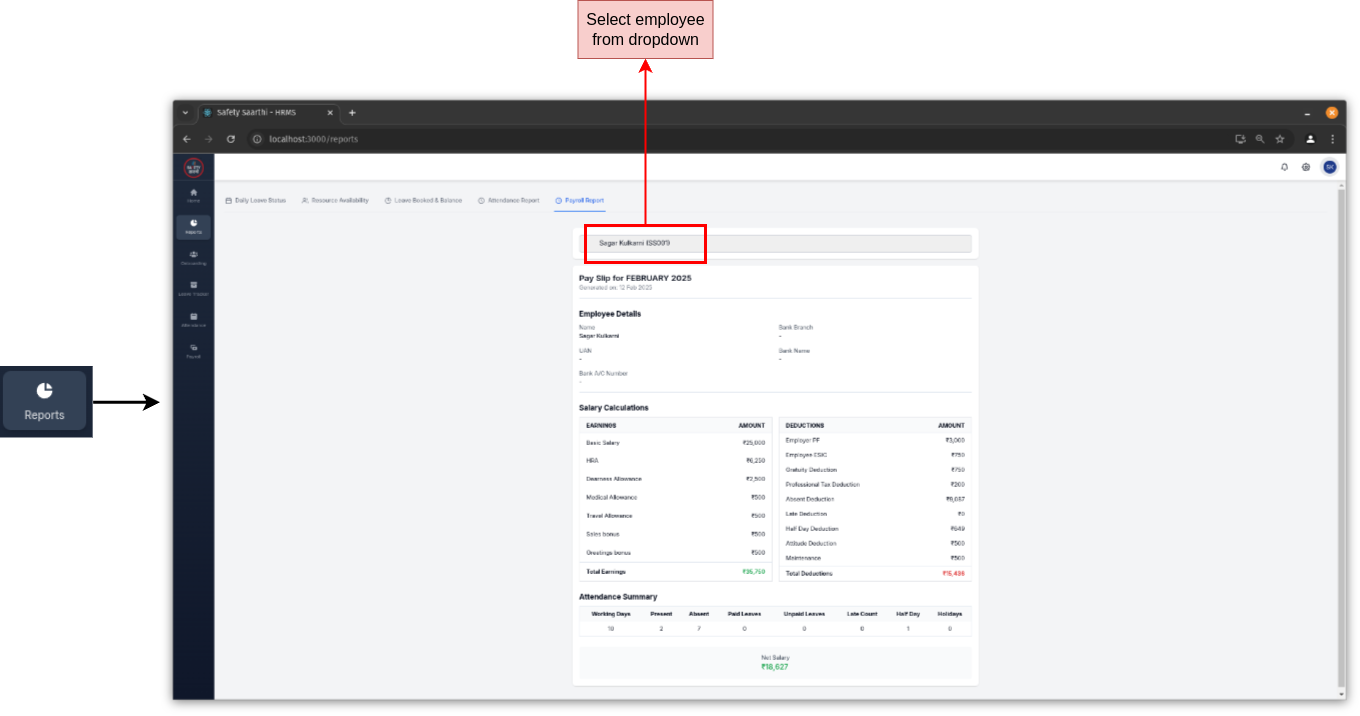
Go to the 'Reports' tab on the sidebar and click on 'Payroll Report'. Select an employee from the dropdown menu to view their payroll from the start of the month to the current date.
Alternatively, go to the 'Onboarding' tab, select an employee, and click on 'Payroll Report'.
Payslips
-
View payslips of individual employee (HR)
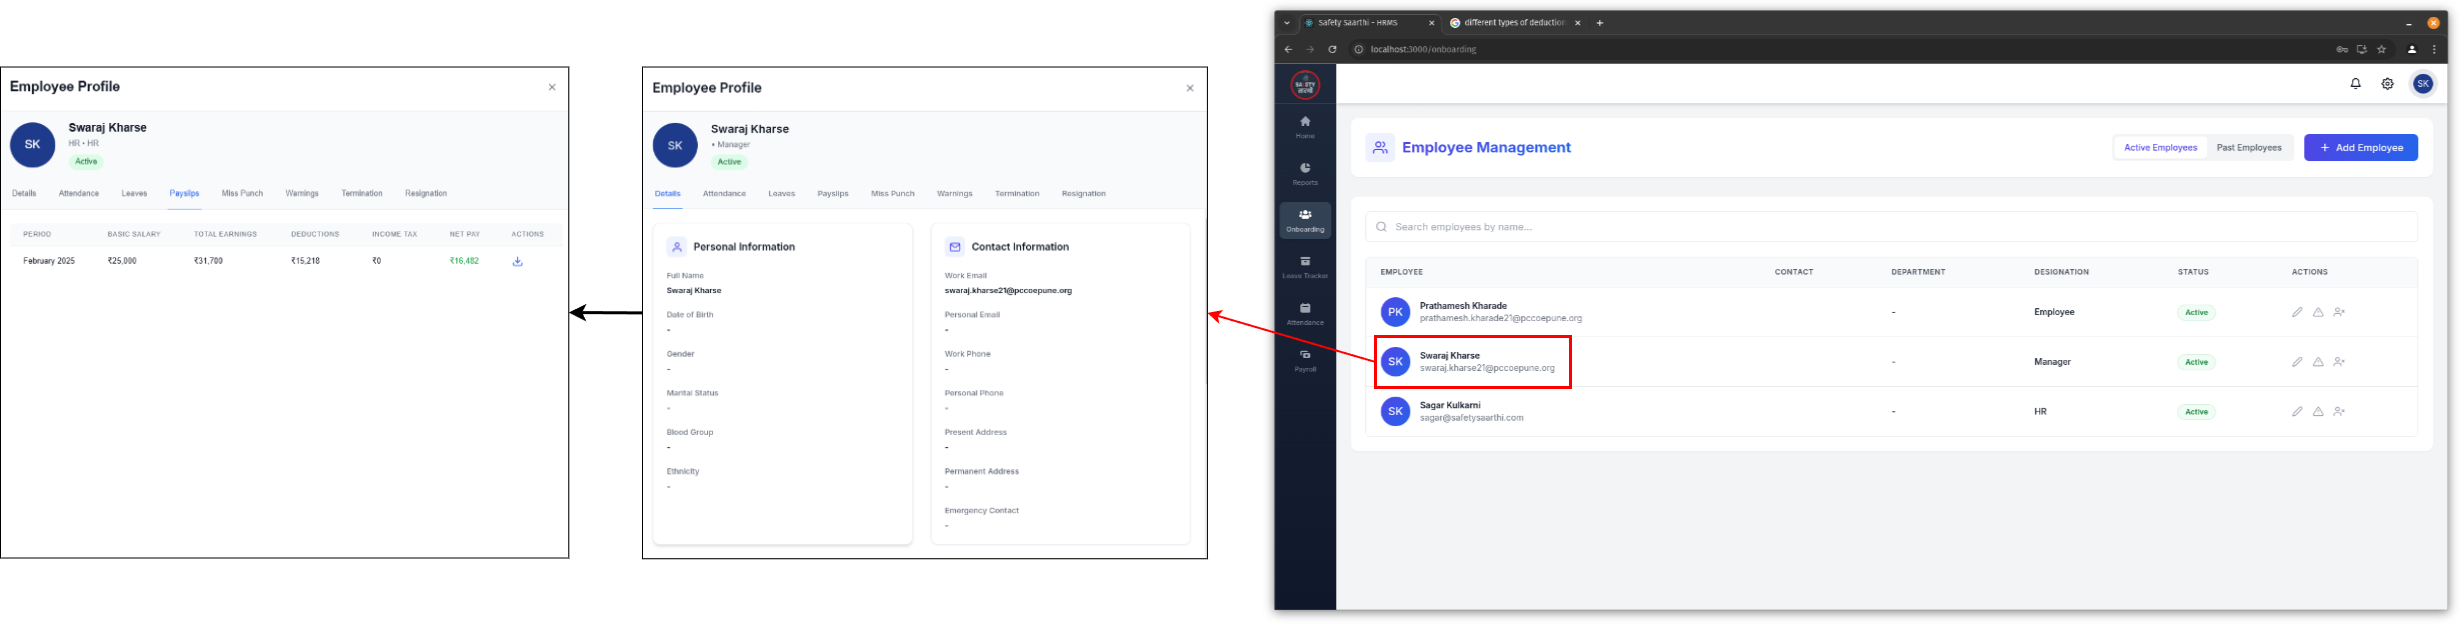
- Go to the 'Onboarding' tab on the sidebar.
- Select the employee and go to 'Payslips' to view their previous payslips.
-
View monthly payslips for all employees (HR)
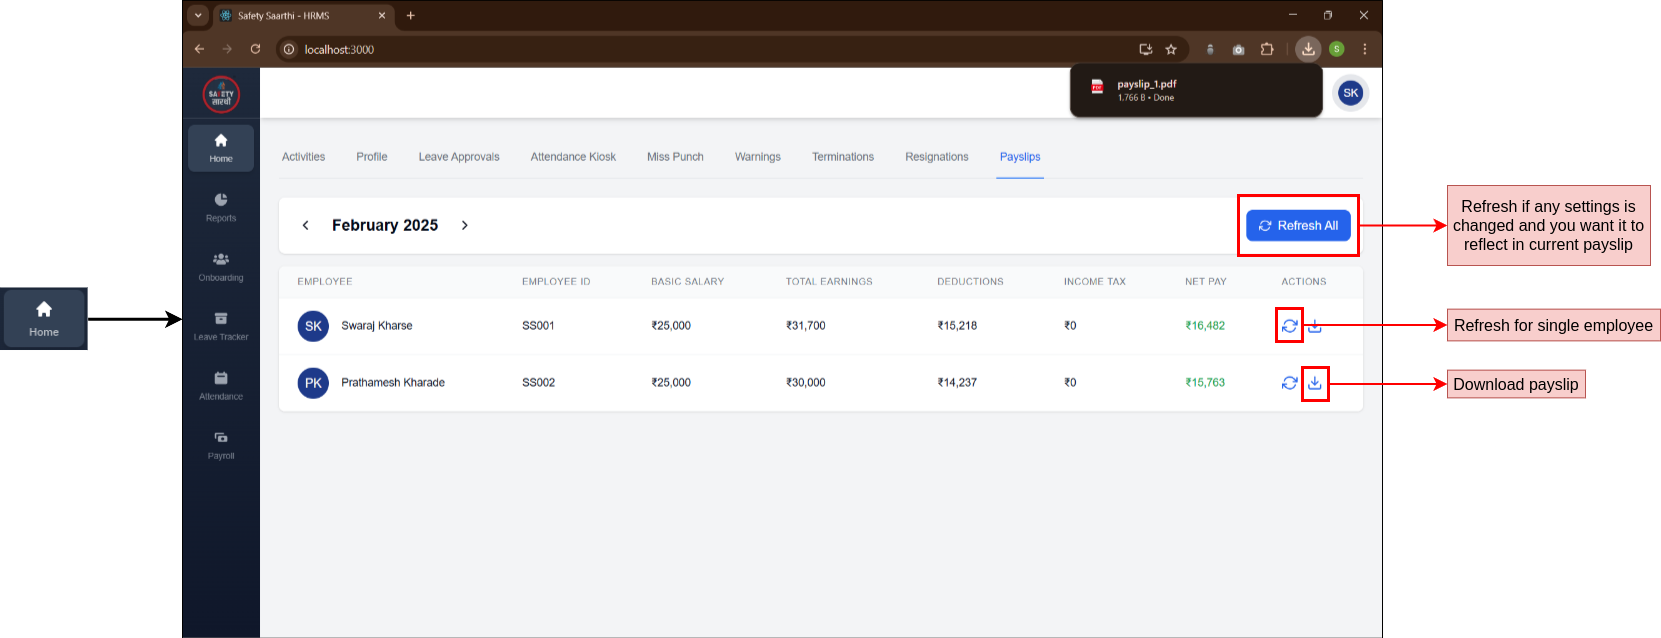
- Go to the 'Home' tab on the sidebar and click on 'Payslips'.
- Use the refresh button to update payslips to reflect the latest changes (e.g., adjustments made after the initial viewing).
-
View payslips of individual employee (Employee)
-
Mobile
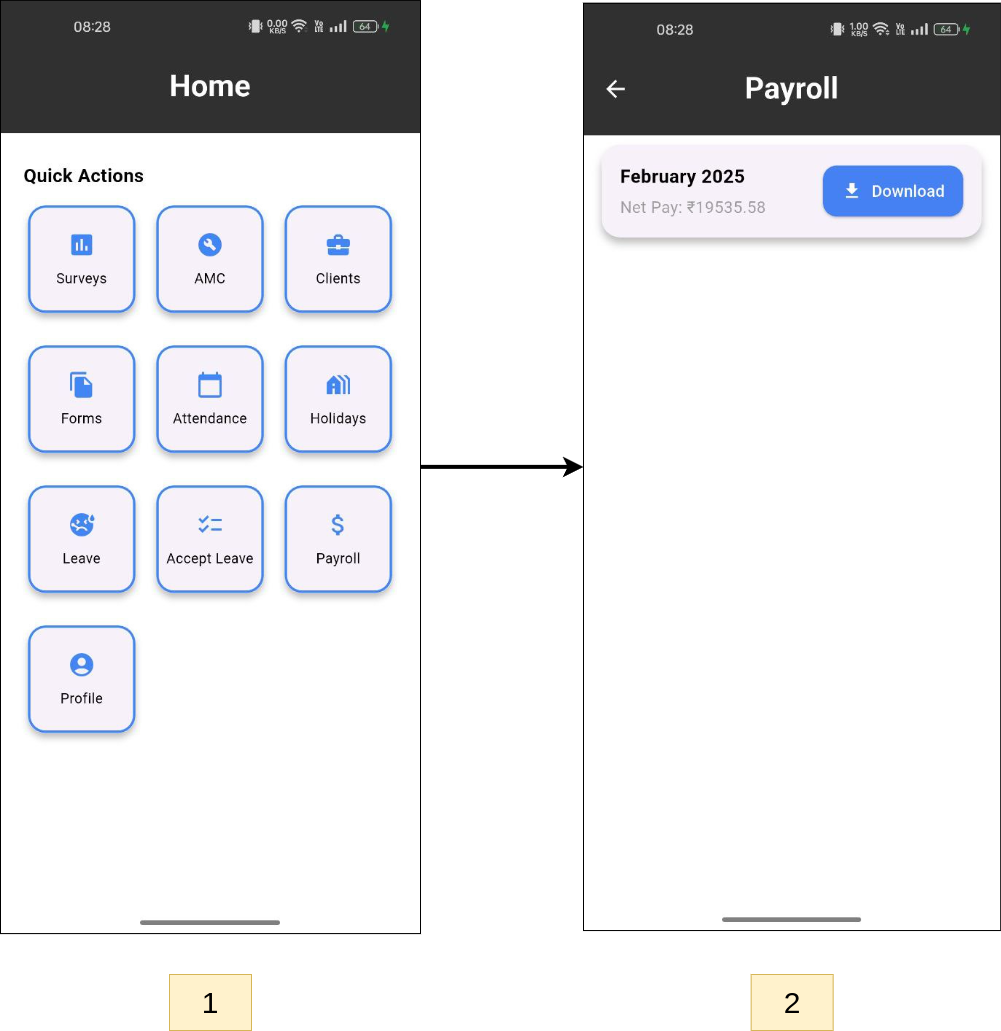
- From the home page, click on the 'Payroll' button.
- View the list of payslips and download the PDF file using the download button.
-
HRMS Website

- Go to the 'Payroll' tab on the sidebar.
- View the list of payslips and download the PDF file using the download button.
-
Mobile
Role Based Access
View permissions for all employees (HR)
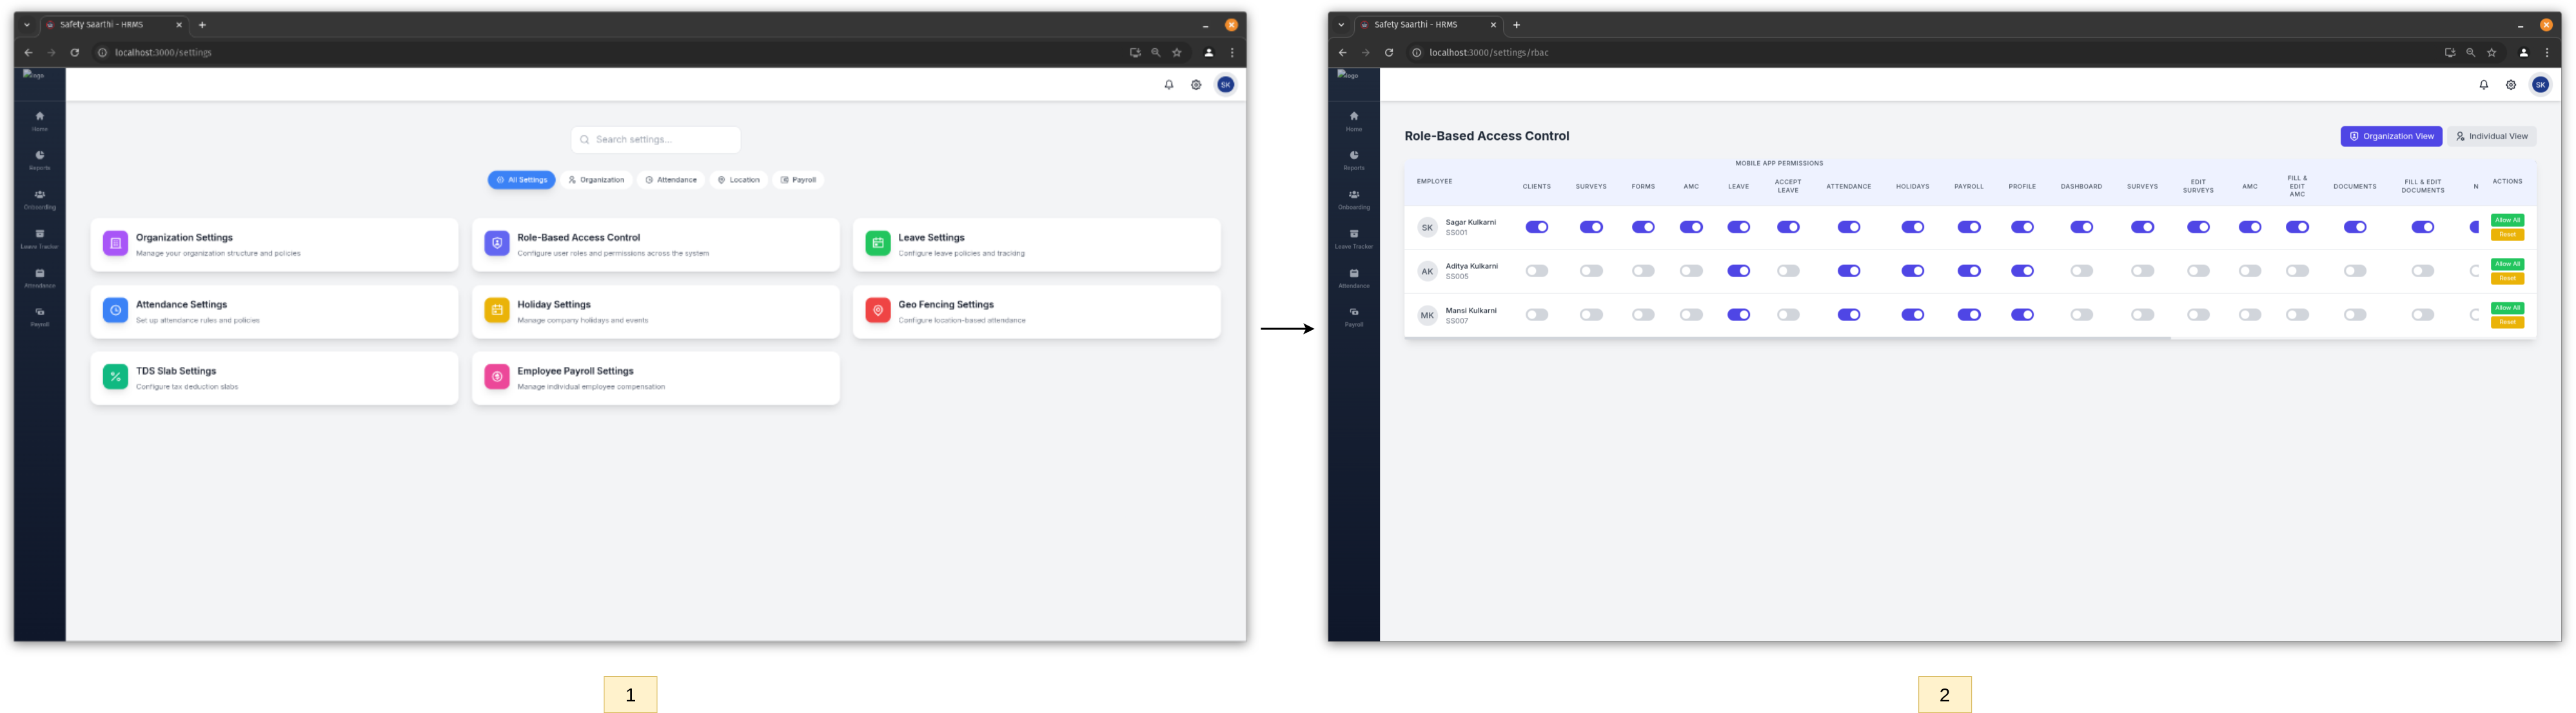
- Open the settings page and click on 'Role-Based Access Control'.
- View a list of all employees and their permissions.
- Use the functionalities to enable, disable, allow all, or reset to default permissions.
View permissions for individual employee (HR)
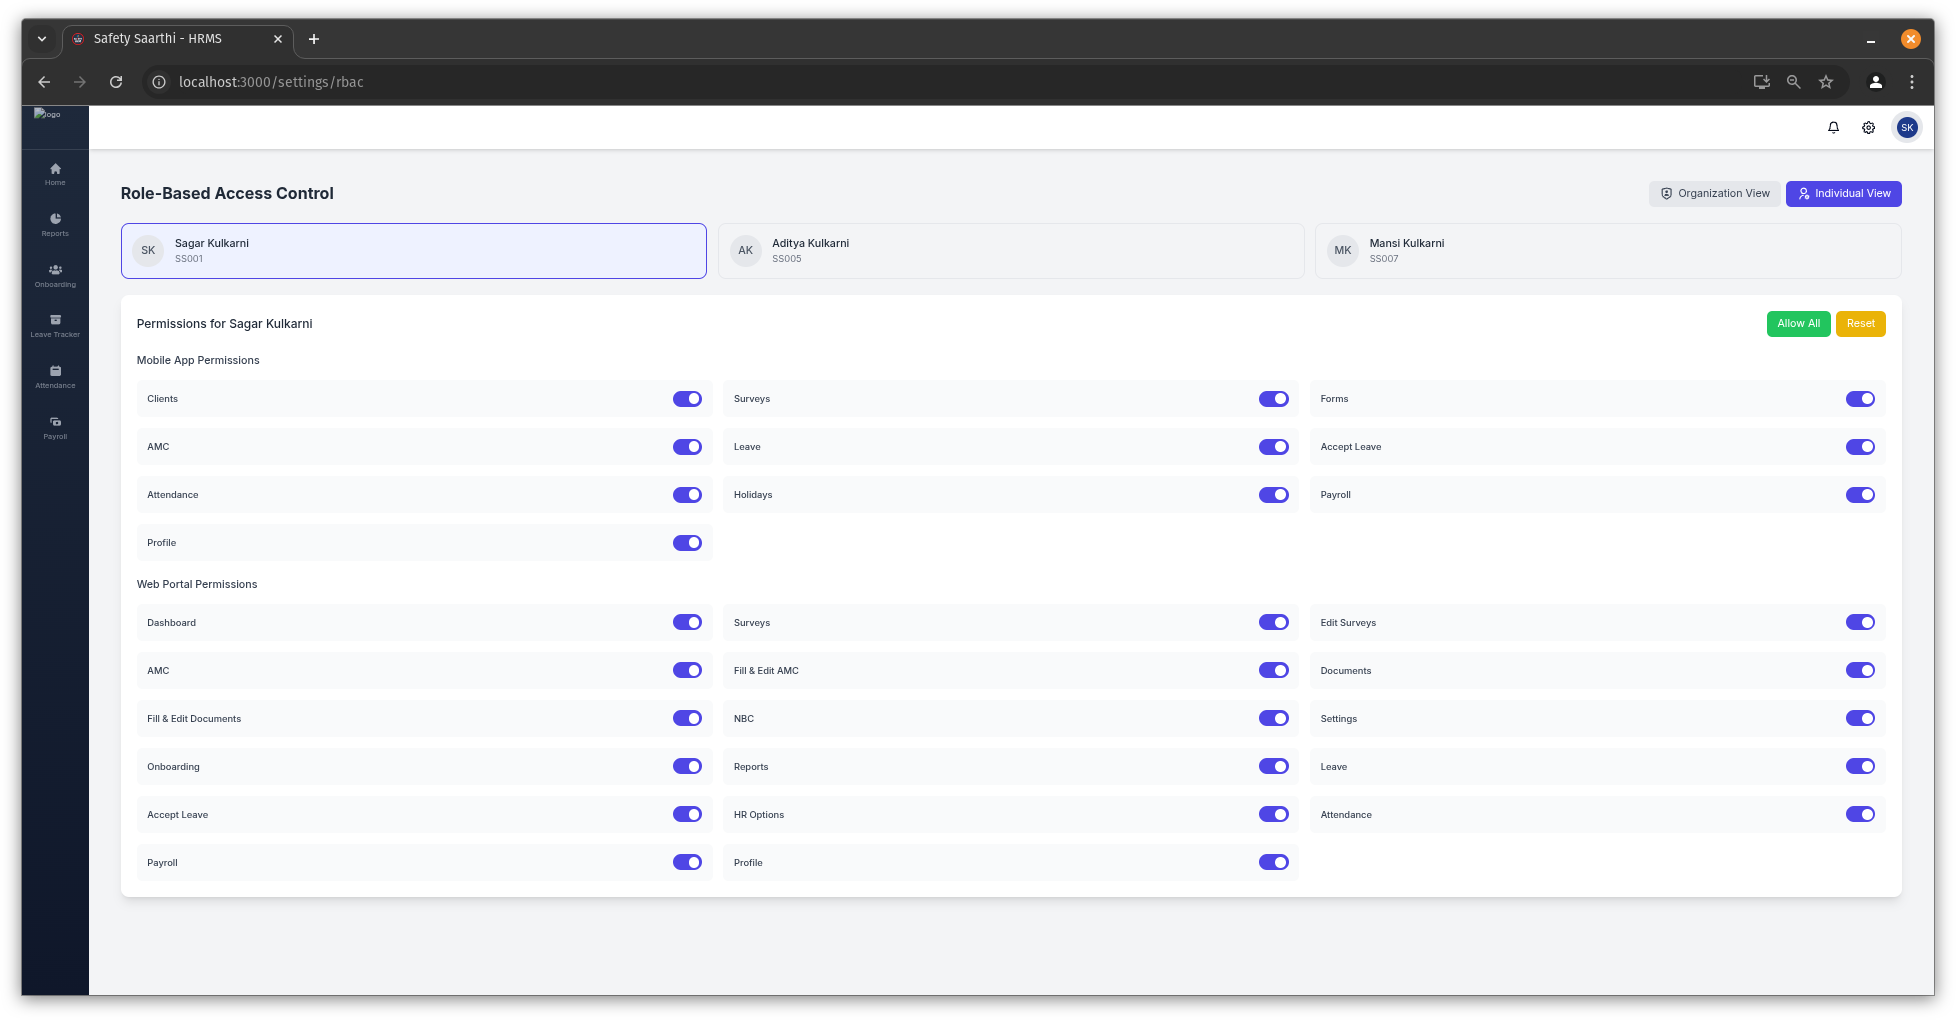
- Click on 'Individual View' and select an employee.
- View all permissions assigned to the employee.
- Use the functionalities to enable, disable, allow all, or reset to default permissions.
The 'HR Options' section includes all HR-related options on the 'Home' tab, such as: Attendance Kiosk, Miss Punch, Warnings, Terminations, Resignations, and Payslips
Policies
Leave Policy
-
Paid Leave
-
Deduct the Balance
- Deduct the leave balance when paid leave is applied.
-
Half-Day Leave
- If the current balance is 0.5, check for previous half-day leaves. If found, mark the previous half-day as unpaid, and the current half-day as paid.
- If the balance is 0, the leave is marked as unpaid.
- If a half-day leave is applied with a balance of 0, it is marked as an unpaid half-day.
-
Unpaid Leave
- For employees on Probation, unpaid leave balance exists.
- For Active employees, unpaid leave balance is not applicable.
-
For Previous Days
- Check for previous unpaid half-days or unpaid leave days. If found, mark them as paid.
- Increment the current leave balance.
- Mark the new leave accordingly.
-
Deduct the Balance
-
Unpaid Leave
For employees on Probation, an unpaid leave balance is applicable. For Active employees, an unpaid leave balance is not applicable.
-
For Previous Days
- Check for previous unpaid half-days or unpaid leave days. If found, mark them as paid.
- Increment the current leave balance.
- Mark the new leave.
Attendance Policy
-
Mark Attendance (Employee)
-
On Weekends or Holidays
- If the day is a weekend or holiday, the attendance is marked as "Weekend" or "Holiday" respectively.
- If overtime is allowed for the employee, it is marked excluding break time. The attendance is marked as "Present".
-
On Paid Leave Days
- Check for previous unpaid half-days or unpaid leave days. If found, mark them as paid.
- Increment the current leave balance.
-
On Unpaid Leave Days
For employees on Probation, an unpaid leave balance is applicable. For Active employees, an unpaid leave balance is not applicable.
-
On Half-Days
Half-day hours must be completed excluding break time. If not, the attendance is marked as "Absent".
-
On Normal Days
Shift Timings Example
- Shift Start Time: 9:00 AM
- Shift End Time: 6:00 PM
- Break Start Time: 1:00 PM
- Break End Time: 2:00 PM
- Late Grace Time: 15 min
- Early Grace Time: 0 min
- Overtime Minutes: 60 min
- Half Day Hours: 4
- Full Day Hours: 8
-
Present
- Check-in and check-out are marked correctly. Example: 9:00 AM to 6:00 PM → Present.
-
Absent
- Half-day hours are not completed. Examples:
- 9:00 AM to 12:59 PM → Absent
- 2:00 PM to 5:59 PM → Absent
- 10:00 AM to 2:59 PM → Absent
-
Late Check-In
- Check-in is late. Example: 9:16 AM to 6:00 PM → Late Check-In.
-
Early Check-Out
- Check-out is early. Example: 9:00 AM to 5:59 PM → Early Check-Out.
-
Late Check-In and Early Check-Out
- Both check-in and check-out are outside the grace period. Example: 9:16 AM to 5:59 PM → Late Check-In and Early Check-Out.
-
Overtime
- Check-out is late after overtime minutes. Examples:
- 9:00 AM to 7:00 PM → Overtime (60 minutes)
- 9:00 AM to 7:29 PM → Overtime (60 minutes)
- 9:00 AM to 7:30 PM → Overtime (90 minutes)
-
On Weekends or Holidays
-
Miss Punch (Employee)
- Apply miss punch if the employee forgets to mark check-in or check-out.
- All policies are similar to the Mark Attendance Policy.
-
Change Attendance (HR)
- Use this functionality if the miss punch application is not used, and HR needs to change attendance manually.
- All policies are similar to the Mark Attendance Policy.
HR cannot apply Paid Leave or Unpaid Leave using this functionality. Employees must apply for leave requests separately.
Payroll Policy
Key Definitions
- Holiday - Paid (not included in sandwich policy) + Overtime (if applicable).
- Weekend - Paid (not included in sandwich policy) + Overtime (if applicable).
- Present - Paid + Overtime (if applicable).
- Absent - Unpaid.
- Late Check-In - Half day paid.
- Early Check-Out - Half day paid.
- Late Check-In and Early Check-Out - Unpaid.
- Paid Leave - Paid.
- Unpaid Leave - Unpaid.
- Half Day - Half day paid / unpaid.
-
Cost to Company (CTC)
- Value for Day = CTC / 30 (days).
- Half Day Value = Value for Day / 2.
- Hourly Value = Value for Day / Total hours in full day.
-
Basic Salary
- Basic Salary = (CTC * Basic Salary Percent) / 100.
-
House Rent Allowance (HRA)
- HRA = (Basic Salary * HRA Percent) / 100.
-
Dearness Allowance (DA)
- DA = (Basic Salary * DA Percent) / 100.
-
Period Allowances
- Sum of all allowances for the period (excluding HRA and DA).
-
Attendance Bonus
- Bonus based on attendance.
-
Performance Based Bonus
- Bonus based on performance.
-
Period Bonuses
- Sum of all bonuses for the period (excluding Attendance Bonus and Performance Based Bonus).
-
Overtime
- Overtime = (Overtime Minutes / 30) * (Hourly Value / 2).
-
Absent Deduction
- Absent Deduction = Value for Day * Absent Count.
-
Late Deduction
- Late Deduction = Half-Day Value * Late Count.
-
Half-Day Deduction
- Half-Day Deduction = Half-Day Value * Unpaid Half-Day Count.
-
Unpaid Leave Deduction
- Unpaid Leave Deduction = Value for Day * Unpaid Leave Count.
-
Employer Provident Fund Deduction
- Employer Provident Fund Deduction = (Basic Salary * Employer Provident Fund Percent) / 100.
-
Employee Provident Fund Deduction
- Employee Provident Fund Deduction = (Basic Salary * Employee Provident Fund Percent) / 100.
-
ESIC Deduction
- ESIC Deduction = (Basic Salary * ESIC Percent) / 100.
-
Gratuity Deduction
- Gratuity Deduction = (Basic Salary * Gratuity Percent) / 100.
-
Period Deductions
- Sum of all deductions for the period (excluding Absent, Late, Half-Day, Unpaid Leave, Provident Fund, ESIC, and Gratuity).
-
Total Earnings
- Total Earnings = Basic Salary + HRA + DA + Period Allowances + Attendance Bonus + Performance-Based Bonus + Period Bonuses + Overtime + Employer Provident Fund Deduction.
-
Total Deductions
- Total Deductions = Absent Deduction + Late Deduction + Half-Day Deduction + Unpaid Leave Deduction + Employer Provident Fund Deduction + Employee Provident Fund Deduction + ESIC Deduction + Gratuity Deduction + Period Deductions.
-
TDS Deduction
- TDS Deduction = ((CTC * 12) * TDS Percent) / 100 * 12.
-
Net Pay
- Net Pay = Total Earnings - Total Deductions - TDS Deduction.